# World Developer Docs
> World is building the world's largest identity and financial network as a public utility, giving ownership to everyone. It consists of World ID (a privacy-preserving digital identity solution), World App, and the Worldcoin Token (WLD).
World Developer Docs provides comprehensive information about all World products and services, including integration guides, API references, and examples.
## World ID
- [Build with World ID](/world-id.md): Simple, private, and secure proof of humanity
- [Integration Guide](/world-id/quick-start.md): Step-by-step guide to integrate World ID into your application
- [API Reference](/world-id/api.md): Complete API documentation for World ID
## Mini Apps
- [Create a Mini App](/mini-apps.md): Native-like applications integrated in World App
- [Mini App Concepts](/mini-apps/concepts.md): Learn about core concepts in Mini App development
- [Commands Reference](/mini-apps/commands.md): Full reference for all available Mini App commands
## World Chain
- [Integrate World Chain](/world-chain.md): A blockchain designed for real humans
- [Quick Start](/world-chain/quick-start.md): Get started with World Chain development
- [Features](/world-chain/quick-start/features.md): Explore World Chain's unique features
## Optional
- [World App](/world-app.md): Information about the World App ecosystem
- [Developer Portal](https://developer.worldcoin.org): Access developer tools and resources
- [GitHub Repositories](https://github.com/worldcoin): Open source code and examples
# Full Documentation Content
> This section contains the complete documentation content from docs.world.org.
---
import Image from 'next/image'
import {Card} from "@/components/Card"
<h1 className='sm:text-5xl text-3xl'>World Developer Docs</h1>
<p className='text-xl text-gray-700 my-5'>Building the world's largest identity and financial network as a public utility, giving ownership to everyone.</p>
<span className="grid lg:grid-flow-col gap-x-8 mt-10 sm:grid-cols-3">
<Card alt="Mini Apps" title={"Create a Mini App"} content="Native like applications integrated in World App" link="/mini-apps" imagePath="/images/docs/mini-apps-cover.png"/>
<Card alt="World ID" title={"Build with World ID"} content="Simple, private, and secure proof of humanity" link="/world-id" imagePath="/images/docs/world-id-cover.png"/>
<Card alt="World Chain" title={"Integrate World Chain"} content="A chain designed for real humans." link="/world-chain" imagePath="/images/docs/worldchain-cover.png"/>
</span>import { Link } from '@/components/Link'
# Connect Wallet
Wallet auth returns a wallet address upon completion. If you don't want to use SIWE and just want the wallet address,
just use the `walletAuth` command and skip the verification of the payload.
<Link href="/mini-apps/commands/wallet-auth">Go to Wallet Auth Section</Link>
**Use Case:** This command is useful for applications that require user authentication via their Ethereum wallet,
allowing for secure access without traditional credentials.
**Example:** An app that allows users to manage their assets and trade tokens directly from their wallet without needing to create a separate account.
import { Link } from '@/components/Link'
import Tabs, { TabItem } from '@/components/Tabs'
# Pay
This command is essential for applications that need to facilitate payments directly within the app,
enabling seamless transactions for users. At launch, WLD and USDC.e will be supported.
**Example:** Enabling an e-commerce platform to allow users to purchase digital goods using cryptocurrencies,
providing a smooth checkout experience.
Payments are easy to use and only have three simple steps.
1. Creating the transaction
2. Sending the command
3. Verifying the payment
## Setup
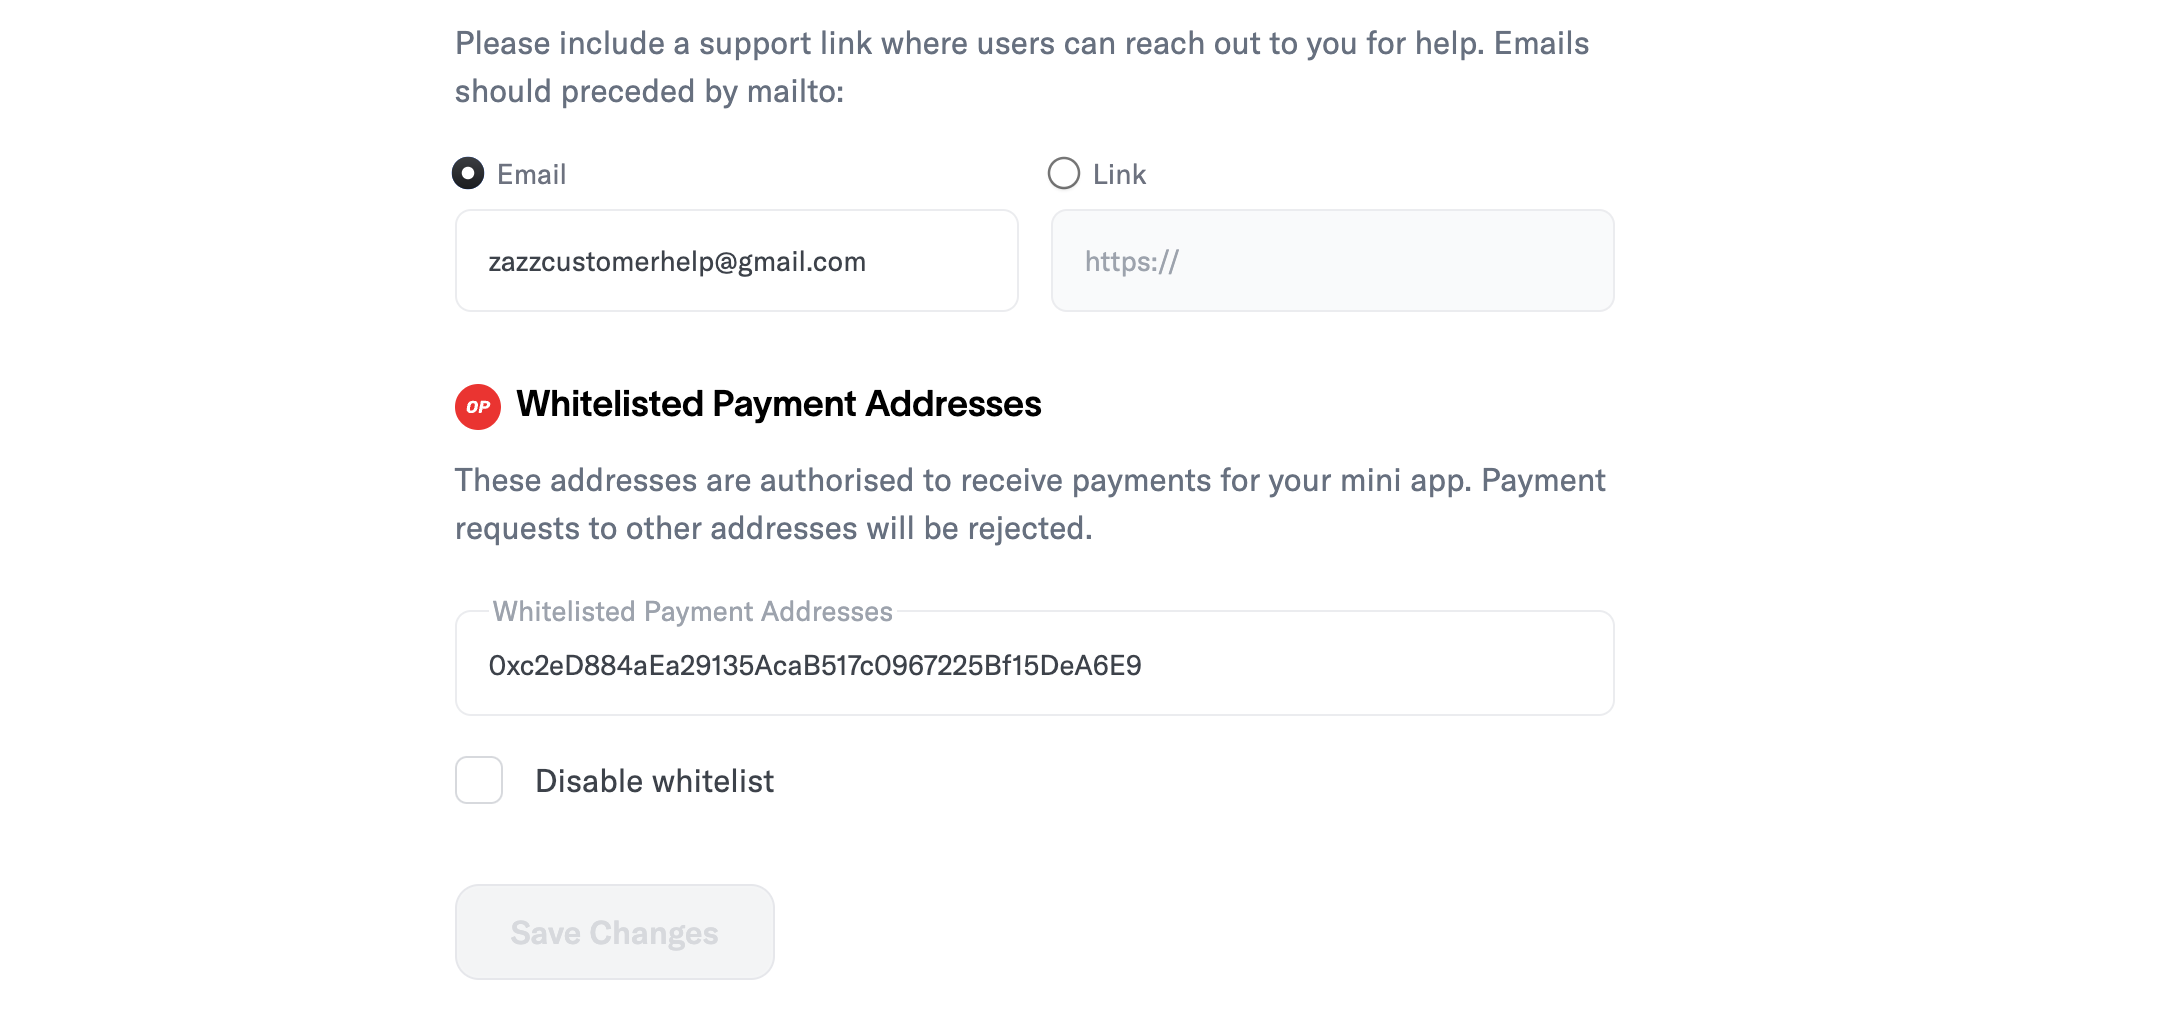
Payments are executed on-chain, so you'll need an <Link href="https://metamask.io/">Ethereum compatible wallet</Link>.
Next, whitelist the address in the <Link href="https://developer.worldcoin.org/">Developer Portal</Link>.
Whitelisting adds security to your mini app to prevent payments from being sent to an unauthorized addresses. Optionally you can
disable this check in the Developer Portal.
## Initiating the payment
For security, it's important you initialize and store your payment operation in the backend.
```tsx {{ title: 'app/api/initiate-pay/route.ts' }}
import { NextRequest, NextResponse } from 'next/server'
export async function POST(req: NextRequest) {
const uuid = crypto.randomUUID().replace(/-/g, '')
// TODO: Store the ID field in your database so you can verify the payment later
return NextResponse.json({ id: uuid })
}
```
## Using the command
<Tabs>
<TabItem label="Async handlers">
### Sending the command & handling the response
We currently support WLD and USDC payments on Worldchain. Below is the expected input for the Pay command.
Since World App sponsors the gas fee, there is a minimum transfer amount of $0.1 for all tokens.
``` tsx {{title: 'PayCommandInput' }}
// Represents tokens you allow the user to pay with and amount for each
export type TokensPayload = {
symbol: Tokens;
token_amount: string;
};
export type PayCommandInput = {
reference: string;
to: string;
tokens: TokensPayload[];
network?: Network; // Optional
description: string;
};
```
For convenience, we offer a public endpoint to query the current price of WLD in various currencies detailed <Link href="/mini-apps/reference/api#get-prices">here</Link>.
``` tsx {{ title: 'app/page.tsx' }}
import { MiniKit, tokenToDecimals, Tokens, PayCommandInput } from '@worldcoin/minikit-js'
const sendPayment = async () => {
const res = await fetch('/api/initiate-payment', {
method: 'POST',
})
const { id } = await res.json()
const payload: PayCommandInput = {
reference: id,
to: '0xd8dA6BF26964aF9D7eEd9e03E53415D37aA96045', // Test address
tokens: [
{
symbol: Tokens.WLD,
token_amount: tokenToDecimals(1, Tokens.WLD).toString(),
},
{
symbol: Tokens.USDCE,
token_amount: tokenToDecimals(3, Tokens.USDCE).toString(),
},
],
description: 'Test example payment for minikit',
}
if (!MiniKit.isInstalled()) {
return
}
const { finalPayload } = await MiniKit.commandsAsync.pay(payload)
if (finalPayload.status == 'success') {
const res = await fetch(`/api/confirm-payment`, {
method: 'POST',
headers: { 'Content-Type': 'application/json' },
body: JSON.stringify(finalPayload),
})
const payment = await res.json()
if (payment.success) {
// Congrats your payment was successful!
}
}
}
```
</TabItem>
<TabItem label="Event listeners">
### Sending the command
We currently support WLD and USDC payments on Worldchain. Below is the expected input for the Pay command.
Since World App sponsors the gas fee, there is a minimum transfer amount of $0.1 for all tokens.
``` tsx {{title: 'PayCommandInput' }}
// Represents tokens you allow the user to pay with and amount for each
export type TokensPayload = {
symbol: Tokens;
token_amount: string;
};
export type PayCommandInput = {
reference: string;
to: string;
tokens: TokensPayload[];
network?: Network; // Optional
description: string;
};
```
For convenience, we offer a public endpoint to query the current price of WLD in various currencies detailed <Link href="/mini-apps/reference/api#get-prices">here</Link>.
``` tsx {{ title: 'app/page.tsx' }}
import { MiniKit, tokenToDecimals, Tokens, PayCommandInput } from '@worldcoin/minikit-js'
// ...
const sendPayment = async () => {
const res = await fetch('/api/initiate-payment', {
method: 'POST'
});
const { id } = await res.json();
const payload: PayCommandInput = {
reference: id,
to: "0xd8dA6BF26964aF9D7eEd9e03E53415D37aA96045", // Test address
tokens: [
{
symbol: Tokens.WLD,
token_amount: tokenToDecimals(1, Tokens.WLD).toString(),
},
{
symbol: Tokens.USDCE,
token_amount: tokenToDecimals(3, Tokens.USDCE).toString(),
},
],
description: "Test example payment for minikit",
};
if (MiniKit.isInstalled()) {
MiniKit.commands.pay(payload);
}
};
```
### Handling the response
Once World App receives the command, the user will be prompted to confirm the payment via a drawer. After that the app will send the payment to our relayer to be submitted on-chain.
The response does not wait until the transaction is mined. **Thus, it's critical to confirm the payment in your backend.**
``` tsx {{ title: 'app/page.tsx' }}
import { MiniKit, tokenToDecimals, Tokens, PayCommandInput, ResponseEvent } from '@worldcoin/minikit-js'
useEffect(() => {
if (!MiniKit.isInstalled()) {
console.error("MiniKit is not installed");
return;
}
MiniKit.subscribe(
ResponseEvent.MiniAppPayment,
async (response: MiniAppPaymentPayload) => {
if (response.status == "success") {
const res = await fetch(`/api/confirm-payment`, {
method: "POST",
headers: { "Content-Type": "application/json" },
body: JSON.stringify(response),
});
const payment = await res.json();
if (payment.success) {
// Congrats your payment was successful!
}
}
}
);
return () => {
MiniKit.unsubscribe(ResponseEvent.MiniAppPayment);
};
}, []);
```
</TabItem>
</Tabs>
## Verifying the payment
<Note type="warning">
You should always verify the payment in your backend. Users can manipulate information in the frontend, so the
response must be verified in a trusted environment.
</Note>
**Web2** applications can call our Developer Portal API to get the current status of the transaction. Since payments are executed on-chain, it can take up to a few minutes to confirm.
You can choose to optimistically accept the payments once they've landed on-chain, or poll the endpoint to wait until it's successful mined.
**Web3** applications can choose to search the on-chain event logs temselves via the `TransferReference` event emitted on-chain.
Note for reference ID the value on chain will be the keccak256 hash of the reference ID.
```solidity {{title : 'TransferReference'}}
event TransferReference(
address sender,
address indexed recipient,
uint256 amount,
address token,
string indexed referenceId,
bool indexed success
);
```
In this example, we will show querying via Developer Portal API.
```tsx {{ title: 'app/confirm-payment/route.ts' }}
import { NextRequest, NextResponse } from 'next/server'
import { MiniAppPaymentSuccessPayload } from '@worldcoin/minikit-js'
interface IRequestPayload {
payload: MiniAppPaymentSuccessPayload
}
export async function POST(req: NextRequest) {
const { payload } = (await req.json()) as IRequestPayload
// IMPORTANT: Here we should fetch the reference you created in /initiate-payment to ensure the transaction we are verifying is the same one we initiated
const reference = getReferenceFromDB()
// 1. Check that the transaction we received from the mini app is the same one we sent
if (payload.reference === reference) {
const response = await fetch(
`https://developer.worldcoin.org/api/v2/minikit/transaction/${payload.transaction_id}?app_id=${process.env.APP_ID}`,
{
method: 'GET',
headers: {
Authorization: `Bearer ${process.env.DEV_PORTAL_API_KEY}`,
},
}
)
const transaction = await response.json()
// 2. Here we optimistically confirm the transaction.
// Otherwise, you can poll until the status == mined
if (transaction.reference == reference && transaction.status != 'failed') {
return NextResponse.json({ success: true })
} else {
return NextResponse.json({ success: false })
}
}
}
```
## Success Result on World App
If implemented correctly, the user will see the following drawer on World App.
<div className='grid justify-items-center text-center'>
<video className="m-auto" width="300" autoPlay muted loop playsInline>
<source src="/images/docs/mini-apps/commands/pay-command.mp4" type="video/mp4" />
Your browser does not support the video tag.
</video>
</div>
# Send Notifications
Sending notifications has three parts:
- Requesting the permission in the Dev Portal Advanced settings
- Requesting permission to send notifications via minikit
- Sending the notification
This command will be available from v1.4.0 of minikit and v2.8.72 of World App.
## Requesting permission
Here is an example of how to use the requestPermission command.
Note this modal will only allow you to show it once. If you reject it, you will need to direct the user to settings in order to re-enable this.
You can find this out by checking the `error_code` in the response.
The schema for the settings page is:
```
worldcoin.org/settings/miniapps
```
<Tabs>
<TabItem label="Async handlers">
### Sending the command and handling the response
```tsx
import { MiniKit, RequestPermissionPayload, Permission } from '@worldcoin/minikit-js'
// Example function of how to use the command
const requestPermission = useCallback(
async () => {
const requestPermissionPayload: RequestPermissionPayload = {
permission: Permission.Notifications,
};
const payload = await MiniKit.commandsAsync.requestPermission(requestPermissionPayload);
// Handle the response
},
[]
);
```
</TabItem>
<TabItem label="Event listeners">
### Sending the command
```tsx
// Example function of how to use the command
const requestPermission = useCallback(
() => {
const requestPermissionPayload: RequestPermissionPayload = {
permission: Permission.Notifications,
};
const payload = MiniKit.commands.requestPermission(requestPermissionPayload);
},
[]
);
```
### Handling the response
``` tsx {{ title: 'app/page.tsx' }}
import { MiniKit, tokenToDecimals, Tokens, PayCommandInput, ResponseEvent } from '@worldcoin/minikit-js'
// ...
useEffect(() => {
if (!MiniKit.isInstalled()) {
console.error("MiniKit is not installed");
return;
}
MiniKit.subscribe(
ResponseEvent.MiniAppRequestPermission,
async (response: MiniAppRequestPermissionPayload) => {
if (response.status == "success") {
const response = await res.json();
// Handle the response
}
}
);
return () => {
MiniKit.unsubscribe(ResponseEvent.MiniAppRequestPermission);
};
}, []);
```
</TabItem>
</Tabs>
## Response type
### Success response payload
``` ts
type MiniAppRequestPermissionSuccessPayload = {
status: 'success';
permission: 'notifications';
timestamp: string; // ISO-8601
version: number; // same version that was received from MiniKit
};
```
### Error response payload
``` ts
type MiniAppRequestPermissionErrorPayload = {
status: 'error';
error_code: RequestPermissionErrorCodes;
version: number;
}
```
The possible error codes are:
- `user_rejected` - User declined permission request
- `generic_error` - Request failed for unknown reason
- `already_requested` - User has already declined turning on notifications once
- `permission_disabled` - User has notification disabled for World App
- `already_granted` - User has already granted this mini app permission
- `unsupported_permission` - Permission is not supported yet
## Calling the notification endpoint
You can send notifications to this endpoint: https://developer.worldcoin.org/api/v2/minikit/send-notification.
For detailed information on the endpoint, see the [API Reference](/mini-apps/reference/api#send-notification).
Business rules about this endpoint
- We do not allow marketing notifications. These should be purely functional notifications.
- We do not allow notifications that are not related to the mini app.
- We do not allow notifications that are not related to the user.
- The endpoint is limited to 1000 users per call
- Messages are limited to 200 characters
- Titles are limited to 30 characters
## Testing
We currently have a limit of 40 notifications per 4 hours for unverified apps. This is to help you test your notification implementations.
Currently you will need to create a new app if your app is verified as it will default to the verified app's metadata. In addition, you need
to enable notifications for your mini app inside of World App to receive them.
import { Link } from '@/components/Link'
import Tabs, { TabItem } from '@/components/Tabs'
# Send Transaction
Send transaction is our command that lets you write to arbitrary smart contracts.
One important policy restriction we enforce is that we do not allow approvals. In order to use funds
you must use the Signature Transfer function of <Link href="https://docs.uniswap.org/contracts/permit2/reference/signature-transfer">permit2</Link>.
## Crafting the payload
Send transaction will automatically create the permit2 signatures for you.
<Note type="info">
Make sure you specify the contracts and tokens you are interacting with in the Developer Portal
(configuration/advanced) otherwise we will block the transaction.
</Note>
```ts
export type SendTransactionInput = {
transaction: Transaction[]
permit2?: Permit2[] // Optional
}
export type Permit2 = {
permitted: {
token: string
amount: string | unknown
}
spender: string
nonce: string | unknown
deadline: string | unknown
}
export type Transaction = {
address: string // Contract address
abi: Abi | readonly unknown[] // Only include the abi for the function you're calling
functionName: ContractFunctionName<Abi | readonly unknown[], 'payable' | 'nonpayable'>
value?: string // Hex string representation of the value to send with the function call
args: ContractFunctionArgs<
// Wrap all your arguments in strings to avoid overflow errors
Abi | readonly unknown[],
'payable' | 'nonpayable',
ContractFunctionName<Abi | readonly unknown[], 'payable' | 'nonpayable'>
>
}
```
## Using the command
In this example we will use two nested transactions. If your function requires a permit2 signature use `PERMIT2_SIGNATURE_PLACEHOLDER_{n}` with
the index of the permit2 object in the transaction array.
Additionally if you introduce a new ERC20 token we will automatically approve the permit2 contract to spend the tokens.
It is strongly recommended to execute using only one transaction.
{/* If you need `setApprovalForAll` or are working with NFTs please reach out. */}
<Note type="info">
- Wrap all your arguments in strings to avoid overflow errors when passing to the SDK. We will auto parse your arguments to match the types in the ABI.
</Note>
<Tabs>
<TabItem label="Async handlers">
### Sending the transaction & receiving the response
```tsx {{ title: 'app/page.tsx' }}
// Make sure this is only the function you're calling
// Otherwise you will get an error
import DEXABI from '../../abi/DEX.json'
import { MiniKit } from '@worldcoin/minikit-js'
// ...
const sendTransaction = async () => {
if (!MiniKit.isInstalled()) {
return;
}
const deadline = Math.floor((Date.now() + 30 * 60 * 1000) / 1000).toString()
// Transfers can also be at most 1 hour in the future.
const permitTransfer = {
permitted: {
token: testTokens.worldchain.USDCE,
amount: '10000',
},
nonce: Date.now().toString(),
deadline,
}
const permitTransferArgsForm = [
[permitTransfer.permitted.token, permitTransfer.permitted.amount],
permitTransfer.nonce,
permitTransfer.deadline,
]
const transferDetails = {
to: '0x126f7998Eb44Dd2d097A8AB2eBcb28dEA1646AC8',
requestedAmount: '10000',
}
const transferDetailsArgsForm = [transferDetails.to, transferDetails.requestedAmount]
const {commandPayload, finalPayload} = await MiniKit.commandsAsync.sendTransaction({
transaction: [
{
address: '0x34afd47fbdcc37344d1eb6a2ed53b253d4392a2f',
abi: DEXABI,
functionName: 'signatureTransfer',
args: [permitTransferArgsForm, transferDetailsArgsForm, 'PERMIT2_SIGNATURE_PLACEHOLDER_0'],
},
],
permit2: [
{
...permitTransfer,
spender: '0x34afd47fbdcc37344d1eb6a2ed53b253d4392a2f',
},
],
})
}
```
Learn more about your errors see [errors](/mini-apps/reference/errors#transactions)
### Check transaction status
The transaction will be first simulated and checked for errors. If there are no errors the user will be prompted to sign the transaction. To make it easier we let you install hooks built on top of Viem.
This requires installing the `@worldcoin/minikit-react` package.
```bash {{ title: "Usage" }}
pnpm i @worldcoin/minikit-react
```
In this flow we will use the hook `useWaitForTransactionReceipt` to check the status of the transaction.
```tsx {{ title: 'app/page.tsx' }}
import { useWaitForTransactionReceipt } from '@worldcoin/minikit-react'
const [transactionId, setTransactionId] = useState<string>('')
const client = createPublicClient({
chain: worldchain,
transport: http('https://worldchain-mainnet.g.alchemy.com/public'),
})
const { isLoading: isConfirming, isSuccess: isConfirmed } = useWaitForTransactionReceipt({
client: client,
appConfig: {
app_id: '<app_id>',
},
transactionId: transactionId,
})
const sendTransaction = async () => {
if (!MiniKit.isInstalled()) {
return;
}
// ...
const {commandPayload, finalPayload} = await MiniKit.commandsAsync.sendTransaction({
// ...
})
if (payload.status === 'error') {
console.error('Error sending transaction', payload)
} else {
setTransactionId(payload.transaction_id)
}
}
```
</TabItem>
<TabItem label="Event listeners">
```tsx {{ title: 'app/page.tsx' }}
import DEXABI from '../../abi/DEX.json'
import { MiniKit } from '@worldcoin/minikit-js'
// ...
const sendTransactionCommand = () => {
const deadline = Math.floor((Date.now() + 30 * 60 * 1000) / 1000).toString()
// Transfers can also be at most 1 hour in the future.
const permitTransfer = {
permitted: {
token: testTokens.worldchain.USDCE,
amount: '10000',
},
nonce: Date.now().toString(),
deadline,
}
const permitTransferArgsForm = [
[permitTransfer.permitted.token, permitTransfer.permitted.amount],
permitTransfer.nonce,
permitTransfer.deadline,
]
const transferDetails = {
to: '0x126f7998Eb44Dd2d097A8AB2eBcb28dEA1646AC8',
requestedAmount: '10000',
}
const transferDetailsArgsForm = [transferDetails.to, transferDetails.requestedAmount]
const payload = MiniKit.commands.sendTransaction({
transaction: [
{
address: '0x34afd47fbdcc37344d1eb6a2ed53b253d4392a2f',
abi: DEXABI,
functionName: 'signatureTransfer',
args: [permitTransferArgsForm, transferDetailsArgsForm, 'PERMIT2_SIGNATURE_PLACEHOLDER_0'],
},
],
permit2: [
{
...permitTransfer,
spender: '0x34afd47fbdcc37344d1eb6a2ed53b253d4392a2f',
},
],
})
}
```
### Receiving the response
The transaction will be first simulated and checked for errors. If there are no errors the user will be prompted to sign the transaction. To make it easier we let you install hooks built on top of Viem.
This requires installing the `@worldcoin/minikit-react` package.
```bash {{ title: "Usage" }}
pnpm i @worldcoin/minikit-react
```
In this flow we will use the hook `useWaitForTransactionReceipt` to check the status of the transaction.
```tsx
interface UseTransactionReceiptResult {
transactionHash?: `0x${string}`
receipt?: TransactionReceipt
isError: boolean
isLoading: boolean
isSuccess: boolean
error?: Error
retrigger: () => void
}
```
```tsx {{ title: 'app/page.tsx' }}
const [transactionId, setTransactionId] = useState<string>('')
const client = createPublicClient({
chain: worldchain,
transport: http('https://worldchain-mainnet.g.alchemy.com/public'),
})
const { isLoading: isConfirming, isSuccess: isConfirmed } = useWaitForTransactionReceipt({
client: client,
appConfig: {
app_id: '<app_id>',
},
transactionId: transactionId,
})
useEffect(() => {
if (!MiniKit.isInstalled()) {
return
}
MiniKit.subscribe(ResponseEvent.MiniAppSendTransaction, async (payload: MiniAppSendTransactionPayload) => {
if (payload.status === 'error') {
console.error('Error sending transaction', payload)
} else {
setTransactionId(payload.transaction_id)
}
})
return () => {
MiniKit.unsubscribe(ResponseEvent.MiniAppSendTransaction)
}
}, [])
```
</TabItem>
<TabItem label="ABI">
```tsx
[
{
"inputs": [
{
"components": [
{
"components": [
{ "internalType": "address", "name": "token", "type": "address" },
{ "internalType": "uint256", "name": "amount", "type": "uint256" }
],
"internalType": "struct ISignatureTransfer.TokenPermissions",
"name": "permitted",
"type": "tuple"
},
{ "internalType": "uint256", "name": "nonce", "type": "uint256" },
{ "internalType": "uint256", "name": "deadline", "type": "uint256" }
],
"internalType": "struct ISignatureTransfer.PermitTransferFrom",
"name": "permitTransferFrom",
"type": "tuple"
},
{
"components": [
{ "internalType": "address", "name": "to", "type": "address" },
{
"internalType": "uint256",
"name": "requestedAmount",
"type": "uint256"
}
],
"internalType": "struct ISignatureTransfer.SignatureTransferDetails",
"name": "transferDetails",
"type": "tuple"
},
{ "internalType": "bytes", "name": "signature", "type": "bytes" }
],
"name": "buyNFTWithPermit2",
"outputs": [],
"stateMutability": "nonpayable",
"type": "function"
}
]
```
</TabItem>
</Tabs>
## Alternative: Verifying the transaction
If you don't want to use our hook you can choose to query for the hash yourself using this endpoint. Make sure to specify `type=transaction` in the query string.
Transactions are sent via our relayer currently and so we provide you an internal id rather than a hash in the original response above.
```tsx {{ title: 'app/confirm-transaction/route.ts' }}
import { NextRequest, NextResponse } from 'next/server'
import { MiniAppSendTransactionSuccessPayload } from '@worldcoin/minikit-js'
interface IRequestPayload {
payload: MiniAppSendTransactionSuccessPayload
}
export async function POST(req: NextRequest) {
const { payload } = (await req.json()) as IRequestPayload
const response = await fetch(
`https://developer.worldcoin.org/api/v2/minikit/transaction/${payload.transaction_id}?app_id=${process.env.APP_ID}&type=transaction`,
{
method: 'GET',
}
)
const transaction = await response.json()
return NextResponse.json(transaction)
}
```
Example response from `/minikit/transaction`
```tsx
{
"transactionId": "0xa5b02107433da9e2a450c433560be1db01963a9146c14eed076cbf2c61837d60",
"transactionHash": "0xa8388148b630b49a3d5a739eaad9e98b5766235cdb21a5ec8d3f89053d982a71",
"transactionStatus": "failed",
"miniappId": "app_staging_5748c49d2e6c68849479e0b321bc5257",
"updatedAt": "2024-09-09T15:18:25.320Z",
"network": "worldchain",
"fromWalletAddress": "0x2321401e6a175a7236498ab66f25cd1db4b17558",
"toContractAddress": "0x2321401e6a175a7236498ab66f25cd1db4b17558"
}
```
## Calling a payable function to send ETH
<Note type="info">
This functionality is available from minikit-js 1.6.0 onwards.
</Note>
Send transaction supports sending to payable functions. Make sure you have ETH in your wallet.
For ease of use, we have a simple contract that lets you send ETH by forwarding the value. [Forward.sol](https://worldscan.org/address/0x087d5449a126e4e439495fcBc62A853eB3257936#code)
```tsx
// Sending eth via Forward.sol
const sendTransaction = async () => {
const payload = await MiniKit.commandsAsync.sendTransaction({
transaction: [
{
address: '0x087d5449a126e4e439495fcBc62A853eB3257936', // Forward.sol
abi: ForwardABI,
functionName: 'pay',
args: ['0x377da9cab87c04a1d6f19d8b4be9aef8df26fcdd'], // To Whom
value: '0x9184E72A000', // Send 0.00001 ETH hex encoded
},
],
});
}
```# Share Contacts
Sharing contacts is a command that allows you to request users to share contacts in their phone in a privacy preserving way.
This command will be available from v1.4.0 of minikit and v2.8.72 of World App.
## Crafting the payload
```ts
export type ShareContactsInput = {
isMultiSelectEnabled: boolean;
inviteMessage?: string;
}
```
- `isMultiSelectEnabled` is a boolean that determines if the user can select multiple contacts, by default you can only select one contact in the modal.
- `inviteMessage` is an optional custom message that will be displayed to the user when the user invites a non world app user while inside of your mini app.
## Using the command
Here is an example of how to use the shareContacts command.
<Tabs>
<TabItem label="Async handlers">
### Sending the command and handling the response
```tsx
// Example function of how to use the command
const shareContacts = useCallback(
async (isMultiSelectEnabled: boolean = false, inviteMessage?: string) => {
const shareContactsPayload: ShareContactsPayload = {
isMultiSelectEnabled,
inviteMessage,
};
const payload = await MiniKit.commandsAsync.shareContacts(shareContactsPayload);
// Handle the response
},
[]
);
```
</TabItem>
<TabItem label="Event listeners">
### Sending the command
```tsx
// Example function of how to use the command
const shareContacts = useCallback(
(isMultiSelectEnabled: boolean = false, inviteMessage?: string) => {
const shareContactsPayload: ShareContactsPayload = {
isMultiSelectEnabled,
inviteMessage,
};
const payload = MiniKit.commands.shareContacts(shareContactsPayload);
},
[]
);
```
### Handling the response
The user will then see a modal of their contacts as well as be able to search for other users.
``` tsx {{ title: 'app/page.tsx' }}
import { MiniKit, tokenToDecimals, Tokens, PayCommandInput, ResponseEvent } from '@worldcoin/minikit-js'
// ...
useEffect(() => {
if (!MiniKit.isInstalled()) {
console.error("MiniKit is not installed");
return;
}
MiniKit.subscribe(
ResponseEvent.MiniAppShareContacts,
async (response: MiniAppShareContactsPayload) => {
if (response.status == "success") {
const contacts = await res.json();
// Handle the response
}
}
);
return () => {
MiniKit.unsubscribe(ResponseEvent.MiniAppShareContacts);
};
}, []);
```
</TabItem>
</Tabs>
## Response type
The response will contain an array of contacts that the user has selected.
### Success response payload
``` ts
type MiniAppShareContactsSuccessPayload = {
status: 'success';
contacts: Array<{
username: string;
walletAddress: string;
profilePictureUrl: string | null;
}>;
timestamp: string;
version: number;
};
```
### Error response payload
``` ts
type MiniAppShareContactsErrorPayload = {
status: 'error';
error_code: ShareContactsErrorCodes;
version: number;
}
```
The possible error codes are:
- `user_rejected` - The user rejected the request
- `generic_error` - An unknown error occurred
import { Link } from '@/components/Link'
import Tabs, { TabItem } from '@/components/Tabs'
# Sign Message
Sign message lets you create an [EIP-191](https://eips.ethereum.org/EIPS/eip-191).
You should verify the signature.
**Use Case:** This command is useful for applications that need to sign messages for verification purposes,
ensuring that the message was indeed created by the owner of the wallet.
**Example:** A voting app that requires users to sign a message to prove ownership
of their wallet before allowing them to vote.
## Using the command
<Tabs>
<TabItem label="Async handlers">
### Sending the command & handling the response
The response will include a signature compliant with EIP-191.
You should verify the signature.
```ts
type MiniAppSignMessageSuccessPayload = {
status: "success";
signature: string;
address: string;
version: number;
};
```
```tsx {{ title: 'app/page.tsx' }}
import { MiniKit, SignMessageInput } from '@worldcoin/minikit-js'
const signAndVerifyMessage = async () => {
const signMessagePayload: SignMessageInput = {
message: "Hello world",
};
const {finalPayload} = await MiniKit.commandsAsync.signMessage(signMessagePayload);
if (finalPayload.status === "success") {
const messageHash = hashSafeMessage(messageToSign);
const isValid = await (
await Safe.init({
provider:
"https://worldchain-mainnet.g.alchemy.com/v2/your-api-key",
safeAddress: finalPayload.address,
})
).isValidSignature(messageHash, finalPayload.signature);
// Checks functionally if the signature is correct
if (isValid) {
console.log("Signature is valid");
}
}
};
```
Your message is verified!
</TabItem>
<TabItem label="Event listeners">
### Sending the command
```ts
export type SignMessageInput = {
message: string;
};
```
``` tsx {{ title: 'app/page.tsx' }}
import { MiniKit, SignMessageInput } from '@worldcoin/minikit-js'
const onSignMessage = () => {
if (!MiniKit.isInstalled()) {
return
}
const signMessagePayload: SignMessageInput = {
message: "Hello world",
};
MiniKit.commands.signMessage(signMessagePayload);
};
```
### Receiving the response
The response will include a signature compliant with [EIP-191](https://eips.ethereum.org/EIPS/eip-191).
You should verify the signature.
```ts
export type SignMessageInput = {
message: string;
};
```
```ts
type MiniAppSignMessageSuccessPayload = {
status: "success";
signature: string;
address: string;
version: number;
};
```
```tsx {{ title: 'app/page.tsx' }}
import { MiniKit, ResponseEvent } from '@worldcoin/minikit-js'
import Safe, { hashSafeMessage } from "@safe-global/protocol-kit";
MiniKit.subscribe(ResponseEvent.MiniAppSignMessage, async (payload) => {
if (payload.status === "success") {
const messageHash = hashSafeMessage(messageToSign);
const isValid = await (
await Safe.init({
provider:
"https://opt-mainnet.g.alchemy.com/v2/your-api-key",
safeAddress: payload.address,
})
).isValidSignature(messageHash, payload.signature);
// Checks functionally if the signature is correct
if (isValid) {
console.log("Signature is valid");
}
}
return () => {
MiniKit.unsubscribe(ResponseEvent.MiniAppSignMessage);
};
}, []);
```
Your message is verified!
</TabItem>
</Tabs>
# Sign Typed Data
Sign Typed Data lets you create an [EIP-712 signature](https://eips.ethereum.org/EIPS/eip-712).
**Use Case:** This command is essential for applications that require structured data to be signed.
**Example:** An insurance platform that requires users to sign typed data to confirm the terms of their insurance policy.
## Using the command
<Tabs>
<TabItem label="Async handlers">
### Sending the command & handling the response
```tsx
import type { TypedData, TypedDataDomain } from 'abitype'
export type SignTypedDataInput = {
types: TypedData
primaryType: string
message: Record<string, unknown>
domain?: TypedDataDomain
}
```
```tsx
type MiniAppSignTypedDataSuccessPayload = {
status: 'success'
signature: string
address: string
version: number
}
```
```tsx {{ title: 'app/page.tsx' }}
import { MiniKit, SignTypedDataInput } from '@worldcoin/minikit-js'
const signAndVerifyTypedData = async () => {
if (!MiniKit.isInstalled()) {
return
}
const {finalPayload} = await MiniKit.commandsAsync.signTypedData(
somePayloadforEIP712 as SignTypedDataInput;
);
// Verifying the signature. Note permit2 payloads and safe operations are not permitted in this command.
if (payload.status === 'success') {
const messageHash = hashSafeMessage(signTypedDataPayload)
const isValid = await (
await Safe.init({
provider: 'https://worldchain-mainnet.g.alchemy.com/v2/your-api-key',
safeAddress: payload.address,
})
).isValidSignature(messageHash, payload.signature)
// Checks functionally if the signature is correct
if (isValid) {
console.log('Signature is valid')
}
}
};
```
</TabItem>
<TabItem label="Event listeners">
### Sending the command
```tsx
import type { TypedData, TypedDataDomain } from 'abitype'
export type SignTypedDataInput = {
types: TypedData
primaryType: string
message: Record<string, unknown>
domain?: TypedDataDomain
}
```
```tsx {{ title: 'app/page.tsx' }}
import { MiniKit, SignTypedDataInput } from '@worldcoin/minikit-js'
const onSignTypedData = () => {
const payload = MiniKit.commands.signTypedData(
somePayloadforEIP712 as SignTypedDataInput;
);
};
```
### Receiving the response
Verifying the signature. Note permit2 payloads and safe operations are not permitted in this command.
```tsx
type MiniAppSignTypedDataSuccessPayload = {
status: 'success'
signature: string
address: string
version: number
}
```
```tsx {{ title: 'app/page.tsx' }}
import { MiniKit, ResponseEvent } from '@worldcoin/minikit-js'
useEffect(() => {
if (!MiniKit.isInstalled()) {
return
}
MiniKit.subscribe(ResponseEvent.MiniAppSignTypedData, async (payload: MiniAppSignTypedDataPayload) => {
if (payload.status === 'success') {
const messageHash = hashSafeMessage(signTypedDataPayload)
const isValid = await (
await Safe.init({
provider: 'https://opt-mainnet.g.alchemy.com/v2/your-api-key',
safeAddress: payload.address,
})
).isValidSignature(messageHash, payload.signature)
// Checks functionally if the signature is correct
if (isValid) {
console.log('Signature is valid')
}
}
})
}, [])
```
</TabItem>
</Tabs>
import { Link } from '@/components/Link'
# Verify
The verify command lets you use <Link href="/world-id/id/cloud">incognito actions</Link> inside of your mini app. Incognito actions are a primitive of World ID and allow you to gate functionality behind a unique human check.
To use incognito actions, first create one in the <Link href="https://developer.worldcoin.org/">Developer Portal</Link>.
**Use Case:** This command is crucial for applications that require user verification to access certain features,
ensuring that only verified humans can perform actions. You can set up the incognito action limiting the number of times a user can perform an action.
**Example:** An game that requires users to verify their identity before playing to have a bot free experience.
## Using the command
<Tabs>
<TabItem label="Async handlers">
### Sending the command & handling the response
MiniKit uses a slightly different input payload than IDKit. We do not need to pass in the `app_id`.
```tsx
export type VerifyCommandInput = {
action: string
signal?: string
verification_level?: VerificationLevel // Default: Orb
}
```
```ts
type MiniAppVerifyActionSuccessPayload = {
status: 'success'
proof: string
merkle_root: string
nullifier_hash: string
verification_level: VerificationLevel
version: number
}
```
```tsx {{ title: 'app/page.tsx' }}
import { MiniKit, VerifyCommandInput, VerificationLevel, ISuccessResult } from '@worldcoin/minikit-js'
const verifyPayload: VerifyCommandInput = {
action: 'voting-action', // This is your action ID from the Developer Portal
signal: '0x12312', // Optional additional data
verification_level: VerificationLevel.Orb, // Orb | Device
}
const handleVerify = async () => {
if (!MiniKit.isInstalled()) {
return
}
// World App will open a drawer prompting the user to confirm the operation, promise is resolved once user confirms or cancels
const {finalPayload} = await MiniKit.commandsAsync.verify(verifyPayload)
if (finalPayload.status === 'error') {
return console.log('Error payload', finalPayload)
}
// Verify the proof in the backend
const verifyResponse = await fetch('/api/verify', {
method: 'POST',
headers: {
'Content-Type': 'application/json',
},
body: JSON.stringify({
payload: finalPayload as ISuccessResult, // Parses only the fields we need to verify
action: 'voting-action',
signal: '0x12312', // Optional
}),
})
// TODO: Handle Success!
const verifyResponseJson = await verifyResponse.json()
if (verifyResponseJson.status === 200) {
console.log('Verification success!')
}
}
```
</TabItem>
<TabItem label="Event listeners">
### Sending the command
MiniKit uses a slightly different input payload than IDKit. We do not need to pass in the `app_id`.
```tsx
export type VerifyCommandInput = {
action: string
signal?: string
verification_level?: VerificationLevel // Default: Orb
}
```
Using the `verify` command:
```tsx {{ title: 'app/page.tsx' }}
import { MiniKit, VerifyCommandInput, VerificationLevel } from '@worldcoin/minikit-js'
const verifyPayload: VerifyCommandInput = {
action: 'voting-action', // This is your action ID from the Developer Portal
signal: '0x12312', // Optional additional data
verification_level: VerificationLevel.Orb, // Orb | Device
}
const payload = MiniKit.commands.verify(verifyPayload)
```
### Listening for the response
Upon receiving the command from your mini app, World App will open a drawer prompting the user to confirm the operation.
```tsx {{ title: 'app/page.tsx' }}
import { MiniKit, ResponseEvent, ISuccessResult, MiniAppVerifyActionPayload } from '@worldcoin/minikit-js'
// ...
useEffect(() => {
if (!MiniKit.isInstalled()) {
return
}
MiniKit.subscribe(ResponseEvent.MiniAppVerifyAction, async (response: MiniAppVerifyActionPayload) => {
if (response.status === 'error') {
return console.log('Error payload', response)
}
// Verify the proof in the backend
const verifyResponse = await fetch('/api/verify', {
method: 'POST',
headers: {
'Content-Type': 'application/json',
},
body: JSON.stringify({
payload: response as ISuccessResult, // Parses only the fields we need to verify
action: 'voting-action',
signal: '0x12312', // Optional
}),
})
// TODO: Handle Success!
const verifyResponseJson = await verifyResponse.json()
if (verifyResponseJson.status === 200) {
console.log('Verification success!')
}
})
return () => {
MiniKit.unsubscribe(ResponseEvent.MiniAppVerifyAction)
}
}, [])
```
</TabItem>
</Tabs>
## Verifying the proof
<Note type="warning">
You should pass the proof to your backend when verifying proofs via the API. Users can manipulate information in the
frontend, so the proof must be verified in a trusted environment.
</Note>
Successful responses will return a `MiniAppVerifyActionSuccessPayload`.
```ts
type MiniAppVerifyActionSuccessPayload = {
status: 'success'
proof: string
merkle_root: string
nullifier_hash: string
verification_level: VerificationLevel
version: number
}
```
To verify the proof, you will need to make a backend route.
```ts {{ title: 'app/api/verify/route.ts' }}
import { NextRequest, NextResponse } from 'next/server'
import { verifyCloudProof, IVerifyResponse, ISuccessResult } from '@worldcoin/minikit-js'
interface IRequestPayload {
payload: ISuccessResult
action: string
signal: string | undefined
}
export async function POST(req: NextRequest) {
const { payload, action, signal } = (await req.json()) as IRequestPayload
const app_id = process.env.APP_ID as `app_${string}`
const verifyRes = (await verifyCloudProof(payload, app_id, action, signal)) as IVerifyResponse // Wrapper on this
if (verifyRes.success) {
// This is where you should perform backend actions if the verification succeeds
// Such as, setting a user as "verified" in a database
return NextResponse.json({ verifyRes, status: 200 })
} else {
// This is where you should handle errors from the World ID /verify endpoint.
// Usually these errors are due to a user having already verified.
return NextResponse.json({ verifyRes, status: 400 })
}
}
```
## Success Result on World App
If implemented correctly, the user will see the following drawer on World App.
<div className='grid justify-items-center text-center'>
<video className="m-auto" width="300" autoPlay muted loop playsInline>
<source src="/images/docs/mini-apps/commands/verify-command.mp4" type="video/mp4" />
Your browser does not support the video tag.
</video>
</div>
import { Link } from '@/components/Link'
import Tabs, { TabItem } from '@/components/Tabs'
# Wallet Auth (Sign in with Ethereum)
Wallet Auth is our native support for <Link href="https://eips.ethereum.org/EIPS/eip-4361">Sign in With Ethereum</Link>.
Wallet Auth is a command that:
- Authenticates users through their Ethereum wallet using the SIWE protocol (EIP-4361).
- Provides the user's Ethereum address after successful authentication.
- Verifies ownership of the wallet address via a signed message.
With this, developers can:
- Identify users securely and without centralized credentials.
- Implement token-based access controls.
- Enable blockchain-related features like transactions tied to the authenticated address.
There's an additional benefit of Wallet Auth - apart from the verified wallet address you get the user's username and profile picture url.
After a successful Wallet Auth, you can access these values from the MiniKit class directly:
```tsx
const username = MiniKit.user.username
```
## Creating the nonce
Since the user can modify the client, it's important to create the nonce in the backend. **The nonce must be at least 8 alphanumeric characters in length.**
```ts {{ title: 'app/api/nonce.ts' }}
import {cookies} from "next/headers"; import {(NextRequest, NextResponse)} from "next/server";
export function GET(req: NextRequest) {
// Expects only alphanumeric characters
const nonce = crypto.randomUUID().replace(/-/g, "");
// The nonce should be stored somewhere that is not tamperable by the client
// Optionally you can HMAC the nonce with a secret key stored in your environment
cookies().set("siwe", nonce, { secure: true });
return NextResponse.json({ nonce });
}
```
## Using the command
<Tabs>
<TabItem label="Async handlers">
### Sending & handling the command response
Below is the expected input for `walletAuth`.
```ts
interface WalletAuthInput {
nonce: string
expirationTime?: Date
statement?: string
requestId?: string
notBefore?: Date
}
```
Using the async `walletAuth` command.
```tsx {{ title: 'app/page.tsx' }}
import { MiniKit, WalletAuthInput } from '@worldcoin/minikit-js'
// ...
const signInWithWallet = async () => {
if (!MiniKit.isInstalled()) {
return
}
const res = await fetch(`/api/nonce`)
const { nonce } = await res.json()
const {commandPayload: generateMessageResult, finalPayload} = await MiniKit.commandsAsync.walletAuth({
nonce: nonce,
requestId: '0', // Optional
expirationTime: new Date(new Date().getTime() + 7 * 24 * 60 * 60 * 1000),
notBefore: new Date(new Date().getTime() - 24 * 60 * 60 * 1000),
statement: 'This is my statement and here is a link https://worldcoin.com/apps',
})
// ...
```
The returned message (in final payload) will include a signature compliant with <Link href="https://eips.ethereum.org/EIPS/eip-191">ERC-191</Link>.
You're welcome to use any third party libraries to verify the payloads for SIWE.
```tsx
type MiniAppWalletAuthSuccessPayload = {
status: 'success'
message: string
signature: string
address: string
version: number
}
```
```tsx {{ title: 'app/page.tsx' }}
const signInWithWallet = async () => {
if (!MiniKit.isInstalled()) {
return
}
const res = await fetch(`/api/nonce`)
const { nonce } = await res.json()
const { commandPayload: generateMessageResult, finalPayload } = await MiniKit.commandsAsync.walletAuth({
nonce: nonce,
requestId: '0', // Optional
expirationTime: new Date(new Date().getTime() + 7 * 24 * 60 * 60 * 1000),
notBefore: new Date(new Date().getTime() - 24 * 60 * 60 * 1000),
statement: 'This is my statement and here is a link https://worldcoin.com/apps',
})
if (finalPayload.status === 'error') {
return
} else {
const response = await fetch('/api/complete-siwe', {
method: 'POST',
headers: {
'Content-Type': 'application/json',
},
body: JSON.stringify({
payload: finalPayload,
nonce,
}),
})
}
}
```
You can now additionally access the user's wallet address from the minikit object.
```tsx
const walletAddress = MiniKit.walletAddress
// or
const walletAddress = window.MiniKit?.walletAddress
```
</TabItem>
<TabItem label="Event listeners">
### Sending the command
Below is the expected input for `walletAuth`.
```ts
interface WalletAuthInput {
nonce: string
expirationTime?: Date
statement?: string
requestId?: string
notBefore?: Date
}
```
Using the `walletAuth` command.
```tsx {{ title: 'app/page.tsx' }}
import { MiniKit, WalletAuthInput } from '@worldcoin/minikit-js'
// ...
const signInWithWallet = async () => {
const res = await fetch(`/api/nonce`)
const { nonce } = await res.json()
const generateMessageResult = MiniKit.commands.walletAuth({
nonce: nonce,
requestId: '0', // Optional
expirationTime: new Date(new Date().getTime() + 7 * 24 * 60 * 60 * 1000),
notBefore: new Date(new Date().getTime() - 24 * 60 * 60 * 1000),
statement: 'This is my statement and here is a link https://worldcoin.com/apps',
})
}
```
### Receiving the response
The returned message will include a signature compliant with <Link href="https://eips.ethereum.org/EIPS/eip-4361">ERC-191</Link>.
```tsx
type MiniAppWalletAuthSuccessPayload = {
status: 'success'
message: string
signature: string
address: string
version: number
}
```
```tsx {{ title: 'app/page.tsx' }}
import { ResponseEvent } from '@worldcoin/minikit-js'
// ...
useEffect(() => {
if (!MiniKit.isInstalled()) {
return
}
MiniKit.subscribe(ResponseEvent.MiniAppWalletAuth, async payload => {
if (payload.status === 'error') {
return
} else {
const response = await fetch('/api/complete-siwe', {
method: 'POST',
headers: {
'Content-Type': 'application/json',
},
body: JSON.stringify({
payload: payload,
nonce,
}),
})
}
})
return () => {
MiniKit.unsubscribe(ResponseEvent.MiniAppWalletAuth)
}
}, [])
```
You can now additionally access the user's wallet address from the minikit object.
```tsx
const walletAddress = MiniKit.walletAddress
// or
const walletAddress = window.MiniKit?.walletAddress
```
</TabItem>
</Tabs>
## Verifying the Login
Finally, complete the sign in by verifying the response from World App in your backend. Here we check the nonce matches the one we created earlier, and
then verify the signature.
```ts {{ title: 'app/api/complete-siwe.ts' }}
import { cookies } from 'next/headers'
import { NextRequest, NextResponse } from 'next/server'
import { MiniAppWalletAuthSuccessPayload, verifySiweMessage } from '@worldcoin/minikit-js'
interface IRequestPayload {
payload: MiniAppWalletAuthSuccessPayload
nonce: string
}
export const POST = async (req: NextRequest) => {
const { payload, nonce } = (await req.json()) as IRequestPayload
if (nonce != cookies().get('siwe')?.value) {
return NextResponse.json({
status: 'error',
isValid: false,
message: 'Invalid nonce',
})
}
try {
const validMessage = await verifySiweMessage(payload, nonce)
return NextResponse.json({
status: 'success',
isValid: validMessage.isValid,
})
} catch (error: any) {
// Handle errors in validation or processing
return NextResponse.json({
status: 'error',
isValid: false,
message: error.message,
})
}
}
```
import { Link } from '@/components/Link'
# Guidelines
These guidelines are meant to help you succeed as a mini app developer. Please follow them to ensure your app is approved.
## MiniKit Integration
Integrate MiniKit to supercharge your web app with exclusive features like World ID and Wallet access, making your mini app more engaging and valuable to users.
To get your mini app approved, it’s essential to use the MiniKit SDK commands effectively to enhance the user experience.
We’re looking for meaningful integrations, whether through _World ID_ and _Wallet access_ , or other creative uses that add real value.
## Mobile First
Mini apps are inherently accessed via mobile, so your application UI should look and feel like a mobile app.
### Key considerations for a mobile-first experience:
- Use tab navigation to simplify movement within the app.
- Implement snap-to text boxes for easy user input.
- Avoid footers, sidebars, and excessive scrolling.
- Provide clear and direct navigation without hamburger menus.
- Ensure smooth transitions between different screens or sections.
- Use consistent background colors for a cohesive visual experience.
- Provide clear navigation cues to help users understand where they are and how to proceed.
- Ensure all UI elements are responsive and adapt well to different screen sizes.
- Use fonts that are optimized for readability on mobile devices.
- Include a splash page for sign-in if needed.
<div className="grid grid-cols-2">
<div className="grid justify-items-center text-center">
<video className="m-auto" width="300" autoPlay muted loop playsInline>
<source src="/images/docs/mini-apps/guidelines/bad-compressed.mp4" type="video/mp4" />
Your browser does not support the video tag.
</video>
❌ Bad Example <br /> Footer and long scrolling
</div>
<div className="grid justify-items-center text-center">
<video className="m-auto" width="300" autoPlay muted loop playsInline>
<source src="/images/docs/mini-apps/guidelines/good-compressed.mp4" type="video/mp4" />
Your browser does not support the video tag.
</video>
✅ Good Example <br /> Bottom tab navigation and anchored buttons
</div>
</div>
## Scroll Bounce on IOS.{' '}
We recommend you avoid scroll bounce error on iOS devices. Try disabling autoscroll & maybe fixed position elements or using 100dvh instead of 100vh.
If you are not using a bottom navigation bar, you can use the following CSS to disable the scroll bounce error:
```css
html,
body {
width: 100vw;
height: 100vh;
overscroll-behavior: none;
overflow: hidden;
}
```
## App Icon
Your app icon should be a **square** image with a non white background.
## Load times
For mini apps, 2-3 seconds max for initial load and under 1 second for subsequent actions should be your target.
However, always test for real-world scenarios and provide visual feedback during loading to maintain user trust.
## Chance based
We recommend developers to avoid building chance based games, as these games have a very low likelihood of being approved.
**Chance based** = prize awarded based on chance, not skill. This means you are using a RNG to determine a winner.
You can still have prizes but they need to be awarded based on skill. Not randomness. So winning a game where I get a prize is skill based.
## Localisation
Many of our users are located around the world. Apps that are localised for each region will perform significantly better.
You can recognize the user's locale by using the <Link href="https://developer.mozilla.org/en-US/docs/Web/HTTP/Headers/Accept-Language">Accept-Language</Link> header
These languages are particularly important given our users:
1. English
2. Spanish
3. Japanese
4. Korean
## Usernames
You should never display the user's wallet address, always use their username.
If you use Sign in with World ID you should not be doing any transactions with the user's wallet address, instead you should be using the username.
Sign in with World ID and Verify offer the same World ID guarantees, but Verify is more reliable.
## Using the Address Book
World ID inherently allows anonymity between applications. We generally encourage
developers to use their own Verify Command and verify the proof. However, we also offer a World ID
address book. This contract stores a mapping `addressVerifiedUntil` you can query to see if a World App
address is World ID Orb verified.
## Design Patterns
Here are some design patterns that we recommend you follow:
1. When a user is authenticated through their wallet, always show their username instead of the wallet address
2. Use the "Verify" command to confirm important actions or identity verification.
3. When dealing with wallet addresses, use an address book to link them to recognizable usernames or other identifiers
## Inspiration
Looking for inspiration? Check out the approved mini apps to see what successful integrations look like and learn from their best practices.
Seeing how others have effectively used MiniKit can provide you with ideas for creating an engaging and valuable experience for your users.
Join our developer network to connect with fellow developers, share insights, and get support:
<Link href="https://t.me/worldcoindevelopers">World Developers Telegram</Link>
If your inspiration is still off, here are some concepts that you can follow to build your mini app. Always keep in mind adding value to users through the minikit commands.
- **Limited Edition Art Distribution**: Build an app that allows artists to distribute limited editions of their work, ensuring that each human can claim only a certain number of pieces.
- **Sybil-Resistant Airdrop Platform**: Build a platform for distributing tokens to verified humans, ensuring that airdrops reach genuine users.
- **Community Engagement Airdrops**: Create an app that rewards users for participating in community activities, verified through proof of personhood.
- **Bot-Free Social Network**: Build a social platform that integrates World ID to limit bot activity, enhancing content quality and user engagement.
- **Human-AI Interaction Platform**: Develop an app where AI agents can interact with verified humans for tasks like customer support or data collection.
- **Decentralized Credit Marketplace**: Build a platform that connects borrowers and lenders, using proof of personhood and zero-knowledge attributes to assess creditworthiness.
- **Merchant Payment Solutions**: Develop a platform for local businesses to accept payments in cryptocurrencies, leveraging the World ecosystem for seamless transactions.
import { useMDXComponents } from '@mdx-js/react'
# UI Kit
The Mini Apps UI Kit is a React-based design system for accelerating the development of mini apps.
It provides pre-built, reusable UI components that follow World's design guidelines, ensuring consistency and high-quality user experience.
**Get Started**
Install the UI Kit with NPM:
```
npm install @worldcoin/mini-apps-ui-kit-react
```
Learn more about its usage in the official [README](https://www.npmjs.com/package/@worldcoin/mini-apps-ui-kit-react?activeTab=readme).
Explore the full component library and usage examples on the UI Kit Documentation and Demo [Storybook](https://mini-apps-ui-kit.vercel.app/?path=/docs/documentation-spacing-recommendations--docs).
import { Link } from '@/components/Link'
# Mini Apps {{ className: 'text-5xl' }}

Mini apps enable third-party developers to create native-like applications within World App.
Building a mini app will provide access to our rapidly growing user network and monetization opportunities via WLD and USDC.
In addition, mini apps introduce smart contract support natively inside of World App.<br/>
# How it Works
Mini apps are simply web applications opened via webview inside of World App. Using the MiniKit SDK, these applications can become
native-like and interact with the World ecosystem.
# Grants
## Foundation Grants
In addition to Fast Grants you can apply for Foundation Grants. These grants are larger and have a formal review process.
The Foundation is dedicating 50M WLD to support novel mini apps.
It is encouraged to first have an MVP of your product before applying for a Foundation Grant.
Receiving a Fast Grant does not disqualify you from applying for a Foundation Grant, in fact it is encouraged to apply for a Fast Grant first.
More Here: [Foundation Grants](https://world.org/community-grants)import { Link } from '@/components/Link'
# Policy
World App seeks to foster a diverse and flourishing ecosystem of applications while at the same time ensuring users stay safe, and privacy is maximized. These applications are displayed to users within World App, but users interact with these applications either within a web browser or as a platform native application. World App has sole discretion of determining how apps are presented to users within its platform.
These guidelines dictate the rules for apps which seek to be displayed to users from within World App. In the following sections you will find our latest guidelines arranged into the following sections:
1. <Link href="/mini-apps/more/policy#safety" aria-label="Home">Safety</Link>
2. <Link href="/mini-apps/more/policy#legal" aria-label="Home">Legal</Link>
3. <Link href="/mini-apps/more/policy#app-submission" aria-label="Home">App Submission</Link>
4. <Link href="/mini-apps/more/policy#app-review" aria-label="Home">App Review</Link>
5. <Link href="/mini-apps/more/policy#technical-requirements" aria-label="Home">Technical Requirements</Link>
6. <Link href="/mini-apps/more/policy#user-support" aria-label="Home">User Support</Link>
This document is subject to change, and as it changes applications may need to change with it.
## Safety
The following content is not permitted for apps:
- **Objectionable Content:**
- Defamatory, discriminatory, or mean-spirited content, including references or commentary about religion, race, sexual orientation, gender, national/ethnic origin, or other targeted groups
- Realistic portrayals of people or animals being killed, maimed, tortured, or abused, or content that encourages violence.
- Depictions that encourage illegal or reckless use of weapons and dangerous objects, or facilitate the purchase of firearms or ammunition.
- Overtly sexual or pornographic material, defined as “explicit descriptions or displays of sexual organs or activities intended to stimulate erotic rather than aesthetic or emotional feelings.”
- Inflammatory religious commentary or inaccurate or misleading quotations of religious texts.
- False information and features, including inaccurate device data or trick/joke functionality, such as fake location trackers.
- Harmful concepts which capitalize or seek to profit on recent or current events, such as violent conflicts, terrorist attacks, and epidemics.
- Impersonating TFH or Worldcoin.
- **Physical Harm**
- If your app behaves in a way that risks physical harm, we may reject it.
- Apps that encourage consumption of tobacco and vape products, illegal drugs, or excessive amounts of alcohol are not permitted.
## Legal
Apps must comply with all legal requirements to be listed within World App. This includes the following:
- **Privacy:**
- **Consent**: All apps that collect and store data from the user must request access and gain approval from the user before doing so
- **Data Minimization:** Apps should only request access to data that is relevant to how the app functions
- **Regulatory Compliance:** The application itself is responsible for maintaining regulatory compliance in all jurisdictions where it selects to be shown to users. Although the burden of compliance rests on the submitted application, if TFH determines that an application is non-compliant with jurisdiction(s) it has a right to take down the application and ask for it to be re-submitted in jurisdictions where it is compliant
## App Submission
Applications must be submitted for review on the developer platform. Before submission, please ensure the following:
- Test your app for bugs
- Ensure that your app contains a live integration with a Worldcoin SDK, either IDkit or MiniKit
- Ensure that all app information in your dev portal submission is complete and accurate
- Ensure your contact information is updated so the review team can contact you
- Ensure your app can be accessed by the review team for testing
- Check whether your app follows safety and legal guidelines
Ensure your app does not violate any of these <Link href="/mini-apps/design/app-guidelines">design guidelines</Link>
, otherwise your app will be rejected.
## App Review
The review team has sole discretion of approving applications for the app store.
Apps will be reviewed as quickly as possible, though if the app is complex or difficult to test it may take some time. You will receive an email if the review status of your app changes, and you can view updates in the developer portal as well.
Tools for Humanity will approve all submitted apps if it deems the following are true:
- The data submitted in the form is complete and accurate
- The app is complete and contains all necessary copy and functionality to fulfil it’s purpose outlined in the submission
- The app is a final version, and is not a demo, trial or beta version
- The app contains a live integration with IDkit or MiniKit that functioned properly when tested
- The app abides by the safety and legal guidelines
The review team will provide a rationale for any rejections, to which the developer can re-submit after remediating any concerns. If the application continuously fails review for the same reason, it may take longer for subsequent reviews to occur.
Additionally, World App provides users the ability to report apps. If an app is in violation of the safety and legal guidelines or the review team deems the app should be removed for other reasons, the team has the sole discretion to remove an app from the platform. If an app is removed from the platform or an investigation is in progress, the development team will be alerted.
## Technical Requirements
- On Android and iOS, the World App Mini App should support operation under poor internet connections and handle temporary disconnections properly.
- The World App Mini App must be reliable, with no infinite loading during non-standard user actions.
- The World App Mini App must comply with the rules of both the Android and iOS app stores.
- The World App Mini App must not contain features that are unavailable on certain platforms.
- User progress must synchronize seamlessly between different platform versions.
## User Support
- Developers must provide user support and ensure accessible means of communication for resolving any issues that arise.
import Image from 'next/image'
import { Link } from '@/components/Link'
# Promotion
The App Store will be a powerful distribution channel for your mini app. To help the ecosystem grow, we will be introducing 3 programs to help you get started.
## App of the Week
Each week we will highlight a different mini app that showcases an outstanding usecase and developer effort.
This will be featured on the Worldcoin App Store homepage and in the Worldcoin App Store app. Learn about how we evaluate which apps to feature,
and how you can increase your chances of being selected.
<div className="w-full flex flex-col items-center justify-center">
<Image width={243} height={549} src={"/images/docs/mini-apps/more/featured.jpg"} alt={"Featured"} className="!m-0" />
<p>The app of the week will get a prominent content card showcasing their app</p>
</div>
## Guidelines
To be considered for App of the Week, your app must meet the following <Link href="/mini-apps/design/app-guidelines">criteria</Link>.
## Marketing
Occasionally we will run marketing campaigns to promote mini apps. Please join our Telegram group @worldcoindevelopers.# Security
MiniKit is purely a communication channel between the client and the app. Your application should never default trust any payloads it receives on the client side.
**Verify, Pay, and Wallet Auth should all be verified inside of your backend.**
# Troubleshooting
If you're having trouble with your mini-app, here are some common issues and solutions.
### **Triggering a command on initialize**
**Problem:** Since we use a client side component to install the minikit provider onto the `Window` object.
If you try to trigger a command seperately as soon as the page opens via a separate `useEffect` hook
it can result in a race condition where minikit is not yet installed when you call the command.
**Fix:** If you wish to call a command on open include the command inside the same `useEffect` hook you use to install MiniKit.
```tsx {{ title: '/components/MiniKitProvider.tsx' }}
'use client'
import { useEffect, ReactNode } from 'react'
import { MiniKit } from '@worldcoin/minikit-js'
export const MiniKitProvider = ({ children }: { children: ReactNode }) => {
useEffect(() => {
MiniKit.install()
// Add any commands you wish to trigger on start here to prevent race conditions
MiniKit.commands.walletAuth({
// ...
})
}, [])
return <>{children}</>
}
```
### Universal Links on iOS
Go to notes long press the link and click open in world app on iOS to reset it.
This will happen if you selected open in browser a long time ago, needs to be reset
# Webview Specifications
The widget is opened within the World App via a WebView. This means providers can tailor their solutions by considering the specific features and restrictions of these platforms.
### **Capabilities:**
- **WebView Engine:**
- **Android:** Uses Android's native WebView implementation.
- **iOS:** Uses **WKWebView**, the recommended web rendering engine on iOS, offering enhanced security and performance.
- **File System and Camera Access:**
- Access to the camera and file system (e.g., for file uploads) is possible if the user grants permission.
- **Cookies and DOM Storage:**
- Supported on both platforms with explicit activation for Android and default behavior for iOS.
### **Restrictions:**
- **Geolocation and Other Extra Permissions:**
- By default, neither platform enables geolocation or additional permissions. Each new type of permission must be discussed and implemented separately if required.
- **New Windows:**
- Opening new browser windows is prohibited. All navigation remains within the current WebView instance.
- **Zooming:**
- **Android:** Not restricted by default.
- **iOS:** Disabled.import { Link } from '@/components/Link'
# App Store
To ensure a consistent user experience, apps will be rejected unless they follow our <Link href="/mini-apps/design/app-guidelines">guidelines</Link>.
Once your mini app is ready to be published, you can submit it for review inside of the Developer Portal.
Once approved, your mini app will be available to all World App users to discover in the app store.
If your app was rejected please reach out to @MateoSauton on Telegram for more information.import { Link } from '@/components/Link'
# Commands
Commands are defined actions your mini app can perform in World App. Every command is available as either:
- a synchronous function that dispatches an event, the result of which has to be listened for,
- an async function, that can be awaited, resolves with the result.
<table>
<thead>
<tr>
<th className="p-2">Command</th>
<th className="p-2">Description</th>
</tr>
</thead>
<tbody>
<tr>
<td className="flex items-center p-2">Verify</td>
<td className="p-2 align-middle">Verify an action with World ID.</td>
</tr>
<tr>
<td className="p-2 align-middle">Pay</td>
<td className="p-2 align-middle">Initiate a payment request.</td>
</tr>
<tr>
<td className="flex items-center p-2">Wallet Auth</td>
<td className="p-2 align-middle">Authenticate via Sign in with Ethereum</td>
</tr>
<tr>
<td className="flex items-center p-2">Send Transaction</td>
<td className="p-2 align-middle">Write to smart contracts</td>
</tr>
<tr>
<td className="flex items-center p-2">Sign Message</td>
<td className="p-2 align-middle">Sign personal messages with your wallet</td>
</tr>
<tr>
<td className="flex items-center p-2">Sign Typed Data</td>
<td className="p-2 align-middle">Sign EIP-712 payloads with your wallet</td>
</tr>
<tr>
<td className="flex items-center p-2">Share Contacts</td>
<td className="p-2 align-middle">Share your contacts in a privacy preserving way with apps</td>
</tr>
<tr>
<td className="flex items-center p-2">Notifications</td>
<td className="p-2 align-middle">Send notifications to users</td>
</tr>
<tr>
<td className="flex items-center p-2">Quick Actions</td>
<td className="p-2 align-middle">Use other mini app feature</td>
</tr>
</tbody>
</table>
import { Link } from '@/components/Link'
# MiniKit-JS SDK
MiniKit-JS is our official SDK for creating mini apps that work with World App. It provides handy functions and types to make development a breeze.
## Template Repository
If you want to create a brand new mini app, you can use our template repositories:
- [React template (featuring a simple backend for verifications)](https://github.com/new?template_name=minikit-react-template&template_owner=worldcoin),
- [Vanilla JS (using a CDN) template (featuring a simple backend for verifications)](https://github.com/new?template_name=minikit-js-template&template_owner=worldcoin),
- [NextJS template](https://github.com/new?template_name=minikit-next-template&template_owner=worldcoin).
Otherwise, continue below with the installation instructions.
## Installing MiniKit
<Link href="https://www.npmjs.com/package/@worldcoin/minikit-js">MiniKit-JS</Link> is the core lib, framework agnostic,
<Link href="https://www.npmjs.com/package/@worldcoin/minikit-react">MiniKit-React </Link>provides hooks that make it easy to interact with the MiniKit SDK.
<CodeGroup>
```bash {{ title: "minikit-js" }}
npm install @worldcoin/minikit-js
```
```bash {{ title: "minikit-react" }}
npm install @worldcoin/minikit-react
```
</CodeGroup>
Or use a CDN like <Link href="https://www.jsdelivr.com/package/npm/@worldcoin/minikit-js">jsdelivr</Link>, for inline HTML, make sure to fill in the version.
<CodeGroup>
```html {{ title: "minikit-js" }}
<script>
import { MiniKit } from "https://cdn.jsdelivr.net/npm/@worldcoin/minikit-js@[version]/+esm"
</script>
```
</CodeGroup>
## Usage
1. Create a MiniKit Provider component that installs the SDK and makes it easy to access `MiniKit` inside your app
```tsx {{ title: 'src/minikit-provider.tsx' }}
'use client' // Required for Next.js
import { ReactNode, useEffect } from 'react'
import { MiniKit } from '@worldcoin/minikit-js'
export default function MiniKitProvider({ children }: { children: ReactNode }) {
useEffect(() => {
// Passing appId in the install is optional
// but allows you to access it later via `window.MiniKit.appId`
MiniKit.install(appId?)
}, [])
return <>{children}</>
}
```
2. Wrap your root with the MiniKitProvider component.
```tsx {{ title: 'src/index.tsx' }}
export default async function Root({
children,
}: Readonly<{
children: React.ReactNode
}>) {
return (
<html lang="en">
<MiniKitProvider>
<body className={inter.className}>{children}</body>
</MiniKitProvider>
</html>
)
}
```
3. Check if MiniKit is installed and ready to use
`MiniKit.isInstalled()` will only return true if the app is opened and properly initialized inside the World App. This is useful to distinguish between a user opening your app in the browser or in the World App.
```tsx
// ...
console.log(MiniKit.isInstalled())
```
# Responses
World App will return responses to your mini app based on the command sent. You can define custom logic to handle these responses with MiniKit.
If you choose to use event listeners, we recommend adding them only to the pages where they are triggered.
Another way of handling responses is to use async handlers.
Calling an async handler will call the command and wait for a response from WorldApp
The resolved object contains the WorldApp response (`finalPayload`) along with an object returned by calling command (`commandPayload`).
You don't have to worry about cleaning up the listeners, and the command can be simply awaited.
### Example Response
Two ways of getting the response:
<CodeGroup>
```tsx {{ title: "Event listeners" }}
import { MiniKit, ResponseEvent } from '@worldcoin/minikit-js'
export function ReactComponent() {
// ...
useEffect(() => {
MiniKit.subscribe(ResponseEvent.MiniAppVerifyAction, async payload => {
if (payload.status === 'error') {
return console.log('Error payload', payload)
}
// Verify the proof in the backend
const verifyResponse = await fetch('/api/verify', {
method: 'POST',
headers: {
'Content-Type': 'application/json',
},
body: {
//...
},
})
})
return () => {
// Clean up on unmount
MiniKit.unsubscribe(ResponseEvent.MiniAppVerifyAction)
}
}, [])
}
```
```tsx {{ title: "Async handlers" }}
import { MiniKit } from '@worldcoin/minikit-js'
// ...
const handleVerify = async () => {
// ...
// The async versions of commands, return an object that contains the final payload, which is the response from World App,
// as well as commandPayload, which is the object that is returned after calling the command.
const { finalPayload } = await MiniKit.verifyAsync({
//...
})
if (finalPayload.status === 'error') {
return console.log('Error payload', finalPayload)
}
// Verify the proof in the backend
const verifyResponse = await fetch('/api/verify', {
method: 'POST',
headers: {
'Content-Type': 'application/json',
},
body: {
// ...
},
})
}
```
</CodeGroup>
import { Link } from '@/components/Link'
import { QRCodeGenerator } from '@/components/QrTest'
# Testing
### Testing your mini app
Enter your app id in the text box below and scan the QR code generated with your phone's camera.
Your app id is in the developer portal in the format `app_xxxxxxxxxx`.
<QRCodeGenerator />
### Tips
1. <Link href="https://ngrok.com/">Ngrok</Link> is a great tool for testing locally.
2. <Link href="https://github.com/liriliri/eruda">Eruda</Link> is helpful showing logs on mobile# Address Book
The Address Book is a contract that stores verified World ID addresses. You can check if a user's address and associated ENS name (if available) is Orb verified using the `getIsUserVerified` helper function.
## Considerations
- Default RPC is `https://worldchain-mainnet.g.alchemy.com/public`
- Contract Address is [0x57b930D551e677CC36e2fA036Ae2fe8FdaE0330D](https://worldscan.org/address/0x57b930D551e677CC36e2fA036Ae2fe8FdaE0330D#readContract).
## Implementation
The helper function connects to the World Chain and checks if a given wallet address is verified by querying the Address Book contract.
## Example Usage
```typescript
import { getIsUserVerified } from "@worldcoin/minikit-js"
const userWalletAddress = "0x000000000000000000000000000000000000dEaD"
const isUserVerified = await getIsUserVerified(userWalletAddress) // optionally you can provide your rpc url as a second argument to the function
```
- Returns `true` if the address is verified
- Returns `false` if the address is not verified
- Throws an error if the verification check fails
## React Bindings
For React applications, we provide a hook `useIsUserVerified` that handles the verification check and loading state.
import { Link } from '@/components/Link'
# API Reference
## Send Notification{{ tag: "POST", label: "https://developer.worldcoin.org/api/v2/minikit/send-notification" }}
This endpoint lets you send notifications to users of your mini app and requires an `api_key`.
<Row>
<Col>
### Body Params
<Properties>
<Property name="wallet_addresses" type="string[]" required={true}>
The `wallet_addresses` is an array of wallet addresses to send the notification to. Users must have opted in to notifications for your app. Max 1000 users per call.
</Property>
<Property name="title" type="string" required={true}>
The `title` is the title of the notification. It should be 30 characters or less.
</Property>
<Property name="message" type="string" required={true}>
The `message` is the message of the notification. It should be 200 characters or less.
</Property>
<Property name="mini_app_path" type="string" required={true}>
The `mini_app_path` is the url encoded path of the mini app where your notification should link to when the user clicks on it. <br/><br/> Should be of the format `worldapp://mini-app?app_id=[app_id]&path=[path]` (path is optional).
</Property>
<Property name="app_id" type="string" required={true}>
The `app_id` is the identifier of the app initiating the transaction.
</Property>
</Properties>
### Request Headers
<Properties>
<Property name="Authorization" type="string" required={true}>
The `Authorization` header should be the `api_key` for your app from the Developer Portal. Make sure to
prefix it with `Bearer {api_key}`.
</Property>
</Properties>
</Col>
<Col>
<CodeGroup title="Request" tag="POST" label="https://developer.worldcoin.org/api/v2/minikit/send-notification">
```bash {{ title: "cURL" }}
curl -X POST "https://developer.worldcoin.org/api/v2/minikit/send-notification" \
-H "Authorization: Bearer {api_key}" \
-H "Content-Type: application/json" \
-d '{"app_id": "app_id", "wallet_addresses": ["0x123", "0x456"], "title": "title", "message": "message", "mini_app_path": "mini_app_path"}'
```
```js
fetch(apiUrl, {
method: 'POST',
headers: {
'Authorization': 'Bearer {api_key}',
},
body: JSON.stringify({
app_id: "app_id",
wallet_addresses: ["0x123", "0x456"],
title: "title",
message: "message",
mini_app_path: "mini_app_path"
})
})
```
</CodeGroup>
</Col>
</Row>
<hr/>
### Response
<Row>
<Col>
<Properties>
<Property name="success" type="boolean">
Indicates if the API request was successful.
</Property>
<Property name="status" type="number">
The HTTP status code of the response.
</Property>
<Property name="result" type="array">
An array of notification delivery results for each wallet address, where each item contains:
- `walletAddress` (string): The wallet address that the notification was attempted to be sent to
- `sent` (boolean): Whether the notification was successfully sent to this wallet address
- `reason` (string, optional): If the notification failed to send, this field contains the reason
</Property>
</Properties>
</Col>
<Col>
<CodeGroup title="Response">
```json
{
"success": true,
"status": 200,
"result": [
{
"walletAddress": "0x377da9cab87c04a1d6f19d8b4be9aef8df26fcdd",
"sent": true
},
{
"walletAddress": "0x444da9cab87c04a1d6f19d8b4be9aef8df26fcdd",
"sent": false,
"reason": "User has notification disabled for World App"
}
]
}
```
</CodeGroup>
</Col>
</Row>
<hr/>
## Get Transaction{{ tag: "GET", label: "https://developer.worldcoin.org/api/v2/minikit/transaction/{transaction_id}?app_id=&type=" }}
<Row>
<Col>
This endpoint lets you query your apps transactions for their current status. You will only be able to
query for transactions of apps where you possess the `api_key`.
### Query Params
<Properties>
<Property name="app_id" type="string" required={true}>
The `app_id` corresponding to the transaction that is being queried.
</Property>
<Property name="type" type="string" required={true}>
The `type` is either payment (pay) or transaction (sendTransaction) depending on the command you used.
</Property>
</Properties>
### Request Headers
<Properties>
<Property name="Authorization" type="string" required={true}>
The `Authorization` header should be the `api_key` for your app from the Developer Portal. Make sure to
prefix it with `Bearer {api_key}`.
</Property>
</Properties>
</Col>
<Col>
<CodeGroup title="Request" tag="GET" label="/api/v2/minikit/transaction/{transaction_id}">
```bash {{ title: "cURL" }}
curl -X GET "/api/v2/minikit/transaction/{transaction_id}" \
-H "Authorization: Bearer {api_key}"
```
```js
fetch(apiUrl, {
method: 'GET',
headers: {
'Authorization': 'Bearer {api_key}',
}
})
```
</CodeGroup>
</Col>
</Row>
<hr/>
### Response
<Row>
<Col>
<Properties>
<Property name="reference" type="string" >
The `reference` is your specified unique identifier for the transaction.
</Property>
<Property name="transaction_hash" type="string" >
The `transaction_hash` is the hash of the transaction on the blockchain.
</Property>
<Property name="transaction_status" type="string" >
The current `transaction_status`, can be either 'pending', 'mined', or 'failed'.
</Property>
<Property name="from" type="string" >
The `from` is the address of the sender.
</Property>
<Property name="chain" type="string" >
The `chain` is the name of the blockchain network.
</Property>
<Property name="timestamp" type="string">
The `timestamp` is the time when the transaction was created, in ISO 8601 format.
</Property>
<Property name="token_amount" type="string">
The `token_amount` is the amount of tokens transferred, in BigInt with 6 decimals.
</Property>
<Property name="token" type="string">
The `token` is the type of token transferred.
</Property>
<Property name="to" type="string">
The `to` is the address of the receiver.
</Property>
<Property name="app_id" type="string">
The `app_id` is the identifier of the app initiating the transaction.
</Property>
</Properties>
</Col>
<Col>
<CodeGroup title="Response" tag="GET" label="/api/v2/minikit/transaction/{transaction_id}">
```json {{ title: "Payment" }}
{
"reference": "1fa38f30-8ee1-4e4b-9988-0517a774f96c",
"transaction_hash": "0xfb25cb74b13d51deeb1a91460619c3d86a7637d40dd29831aa38dd6cbb05e880",
"transaction_status": "pending | mined | failed",
"from": "0x0c892815f0B058E69987920A23FBb33c834289cf",
"chain": "worldchain",
"timestamp": "2024-01-01T00:00:00.000Z", // ISO 8601
"token_amount": "100000000", // amount in BigInt with 6 decimals
"token": "USDCE",
"to": "0xd8dA6BF26964aF9D7eEd9e03E53415D37aA96045",
"app_id": "app_9a73963d73efdf2e7d9472593dc9dffd"
}
```
```json {{ title: "Transaction" }}
{
"transactionId": "0xa5b02107433da9e2a450c433560be1db01963a9146c14eed076cbf2c61837d60",
"transactionHash": "0xa8388148b630b49a3d5a739eaad9e98b5766235cdb21a5ec8d3f89053d982a71",
"transactionStatus": "failed",
"miniappId": "app_staging_5748c49d2e6c68849479e0b321bc5257",
"updatedAt": "2024-09-09T15:18:25.320Z",
"network": "worldchain",
"fromWalletAddress": "0x2321401e6a175a7236498ab66f25cd1db4b17558",
"toContractAddress": "0x2321401e6a175a7236498ab66f25cd1db4b17558"
}
```
</CodeGroup>
</Col>
</Row>
<hr/>
## Get Prices {{ tag: "GET", label: "https://app-backend.worldcoin.dev/public/v1/miniapps/prices?cryptoCurrencies=WLD,USDCE&fiatCurrencies=" }}
<Row>
<Col>
This endpoint lets you query the latest prices of the Worldcoin token in various fiat currencies.
We offer this as a service to make it easier to use WLD as a currency.
### Query Params
<Properties>
<Property name="fiatCurrencies" type="string" required={true}>
The `fiatCurrencies` is a comma-separated list of fiat currencies following ISO4217 currency code.
eg. `USD,EUR,JPY,ARS`
</Property>
</Properties>
<Properties>
<Property name="cryptoCurrencies" type="string" required={true}>
The `cryptoCurrencies` is a comma-separated list of currencies we support.
eg. `USDCE,WLD`
</Property>
</Properties>
</Col>
<Col>
<CodeGroup title="Request" tag="GET" label="/public/v1/miniapps/prices?...">
```bash {{ title: "cURL" }}
curl -X GET "https://app-backend.worldcoin.dev/public/v1/prices?cryptoCurrencies=WLD&fiatCurrencies=USD"
```
```js
fetch(apiUrl, {
method: 'GET',
})
```
</CodeGroup>
</Col>
</Row>
<hr/>
### Response (abridged)
Detailed are a just a few values in the return that could be confusing. See the response object in the bottom right column for the full list of fields
<Row>
<Col>
<Properties>
<Property name="prices" type="string" >
The `prices` is an object where each key is the respective currency code
</Property>
<Property name="amount" type="string" >
The `amount` represents the non converted value for the price of 1 WLD for a given currency
</Property>
<Property name="decimals" type="string" >
The current `decimals`, should be used to calculate the converted price. ie an amount of 1000000 with 6 decimals would mean a price of $1.00
via, 1000000 * 10^-6
</Property>
</Properties>
</Col>
<Col>
<CodeGroup title="Response" tag="GET" label="/public/v1/miniapps/prices?...">
```json
{
"result": {
"prices": {
"WLD": {
"USD": {
"asset": "USD",
"amount": "1510763",
"decimals": 6,
"symbol": "USD"
},
},
"USDCE": {
"USD": {
"asset": "USD",
"amount": "1000058",
"decimals": 6,
"symbol": "USD"
},
}
}
}
}
```
</CodeGroup>
</Col>
</Row>
# Errors
This page is a reference to error codes returned by MiniKit.
## Verify
Below are the error codes you could receive with the `Verify` command
<table>
<thead>
<tr>
<th>Code</th>
<th>Description</th>
<th>How to fix?</th>
</tr>
</thead>
<tbody>
<tr>
<td>`verification_rejected`</td>
<td>User rejected the World ID request in World App.</td>
<td>If this was a mistake, trigger the verify command again.</td>
</tr>
<tr>
<td>`max_verifications_reached`</td>
<td>This person has already verified for this particular action the maximum number of times allowed.</td>
<td>Nothing to do. User cannot verify for this action again.</td>
</tr>
<tr>
<td>`credential_unavailable`</td>
<td>This user does not have the requested credential.</td>
<td>
The user must verify at the Orb or verify their unique device in World App to receive the credential
required.
</td>
</tr>
<tr>
<td>`malformed_request`</td>
<td>The request payload couldn't be decrypted or did not conform to the standard.</td>
<td>Ensure MiniKit is configured properly and all parameters are valid.</td>
</tr>
<tr>
<td>`invalid_network`</td>
<td>The application is configured for a different environment than the verifying user's client.</td>
<td>
Ensure you use the [Worldcoin Simulator](https://simulator.worldcoin.org) for Staging applications and
World App for Production applications.
</td>
</tr>
<tr>
<td>`inclusion_proof_failed`</td>
<td>The sequencer returned an unexpected error when retrieving the inclusion proof.</td>
<td>
Ask the user to try again. This may be due to a temporary network issue, or a bug with World App or the
Signup Sequencer.
</td>
</tr>
<tr>
<td>`inclusion_proof_pending`</td>
<td>
The user might have the requested credential, but it is not available on-chain yet. It might be
available for API verification.
</td>
<td>Ask the user to verify again in approximately one hour.</td>
</tr>
<tr>
<td>`unexpected_response`</td>
<td>There was a problem with the response obtained from the WLD app.</td>
<td>Try again, though in most cases these will require contacting us to report the bug.</td>
</tr>
<tr>
<td>`generic_error`</td>
<td>An unhandled exception occurred.</td>
<td>Try again, though in most cases these will require contacting us to report the bug.</td>
</tr>
</tbody>
</table>
## Pay
Below are the error codes you could receive with the `Pay` command
<table>
<thead>
<tr>
<th>Code</th>
<th>Description</th>
<th>How to fix?</th>
</tr>
</thead>
<tbody>
<tr>
<td>`input_error`</td>
<td>There was a problem with this request. Please try again or contact the app owner.</td>
<td>Ensure the request is properly formed and try again.</td>
</tr>
<tr>
<td>`payment_rejected`</td>
<td>You’ve cancelled the payment in World App.</td>
<td>If this was a mistake, initiate the payment again.</td>
</tr>
<tr>
<td>`invalid_receiver`</td>
<td>The receiver address is invalid. Please contact the app owner.</td>
<td>You don't have this address whitelisted inside the Developer Portal.</td>
</tr>
<tr>
<td>`insufficient_balance`</td>
<td>You do not have enough balance to complete this transaction.</td>
<td>Add more funds to your wallet</td>
</tr>
<tr>
<td>`transaction_failed`</td>
<td>The transaction failed. Please try again.</td>
<td>Try the transaction again. Something failed on-chain.</td>
</tr>
<tr>
<td>`generic_error`</td>
<td>Something unexpected went wrong. Please try again.</td>
<td>Try again, though in most cases these will require contacting us to report the bug.</td>
</tr>
</tbody>
</table>
## Wallet Auth
Below are the error codes you could receive with the `walletAuth` command
<table>
<thead>
<tr>
<th>Code</th>
<th>Description</th>
<th>How to fix?</th>
</tr>
</thead>
<tbody>
<tr>
<td>`malformed_request`</td>
<td>Provided parameters in the request are invalid.</td>
<td>
Ensure the request is properly formed and try again. If the problem persists, contact the app owner.
</td>
</tr>
<tr>
<td>`user_rejected`</td>
<td>User rejected the request.</td>
<td>If this was a mistake, initiate the request again.</td>
</tr>
<tr>
<td>`generic_error`</td>
<td>Something unexpected went wrong.</td>
<td>Try the request again. If the problem persists, contact the app owner.</td>
</tr>
</tbody>
</table>
## Transactions
Below are the error codes you could receive with the `Transaction` command
<table>
<thead>
<tr>
<th>Code</th>
<th>Description</th>
<th>How to fix?</th>
</tr>
</thead>
<tbody>
<tr>
<td>`invalid_operation`</td>
<td>Transaction included an operation that was invalid</td>
<td>Your app tried using a disallowed operation. These include approve, setAllowance, setApprovalForAll, or setApprovalForAll.</td>
</tr>
<tr>
<td>`invalid_contract`</td>
<td>App must whitelist the contract you're calling in the Developer Portal</td>
<td>Go to the Developer Portal and whitelist the contract you're calling</td>
</tr>
<tr>
<td>`user_rejected`</td>
<td>User declined the transaction modal</td>
<td>User closed the transaction modal.</td>
</tr>
<tr>
<td>`input_error`</td>
<td>Payload received does not conform to specified type</td>
<td>Ensure the request is properly formed and try again. Note all args must be string. Payload has max size of 8kb so your ABI should just be for your function</td>
</tr>
<tr>
<td>`simulation_failed`</td>
<td>Simulation provider transaction simulation failed (this can include insufficient balance)</td>
<td>Txn simulation failed see the debugUrl returned to understand why</td>
</tr>
<tr>
<td>`transaction_failed`</td>
<td>Transaction failed please try again later</td>
<td>Try again later. Could be blob fees too high or network congestion</td>
</tr>
<tr>
<td>`generic_error`</td>
<td>Request failed for unknown reason</td>
<td>Try the request again. If the problem persists, contact the app owner.</td>
</tr>
</tbody>
</table>
Other helpful things
1. If you get a GS026 error, it means the signature is not valid. Most likely there's something switched in your args vs your permit.
Double check each argument usually this is the nonce and timestamp getting mixed up.
import { Link } from '@/components/Link'
# Status Page
You can check the current status of World services at <Link href="https://status.worldcoin.org">status.worldcoin.org</Link>.
<Note type="info">The Networks section is not up to date yet.</Note>
For transactions, status is determined by:
- **Disruption**: Transactions taking longer than 45 seconds
- **Outage**: Transactions taking longer than 5 minutes
## Get Status {{ tag: "GET", label: "https://status.worldcoin.org/api/services" }}
<Row>
<Col>
This endpoint returns the current status of all World services.
### Query Params
<Properties>
<Property name="logs" type="boolean">
Include `logs=true` to get historical status logs for each service.
</Property>
</Properties>
</Col>
<Col>
<CodeGroup title="Request" tag="GET" label="/api/services">
```bash {{ title: "cURL" }}
curl -X GET "https://status.worldcoin.org/api/services?logs=true"
```
```js
fetch('https://status.worldcoin.org/api/services?logs=true')
```
</CodeGroup>
</Col>
</Row>
<hr/>
### Response
<Row>
<Col>
<Properties>
<Property name="services" type="array">
Array of service status objects, each containing:
</Property>
<Property name="name" type="string">
Service name (e.g., "Mini Apps", "World ID Verifications")
</Property>
<Property name="id" type="string">
Service identifier
</Property>
<Property name="description" type="string">
Description of the service
</Property>
<Property name="categoryId" type="string">
Category the service belongs to (e.g., "mini-apps", "world-id", "finance")
</Property>
<Property name="status" type="string">
Current service status: "ok", "warning", or "error"
</Property>
<Property name="logs" type="array">
Historical status changes, containing:
- `datetime`: Unix timestamp
- `status`: Status at that time
- `name`: Event name
- `description`: Event description
- `downtime`: Duration in seconds (if applicable)
</Property>
<Property name="uptimeRatio" type="object">
Uptime percentages for different time periods:
- `1`: Last 24 hours
- `7`: Last 7 days
- `30`: Last 30 days
- `90`: Last 90 days
</Property>
</Properties>
</Col>
<Col>
<CodeGroup title="Response">
```json
{
"services": [
{
"name": "Crypto Transactions",
"id": "crypto-transactions",
"description": "",
"categoryId": "mini-apps",
"status": "ok",
"logs": [
{
"datetime": 1739546233,
"status": "ok",
"name": "Running again",
"description": "Service outage"
}
],
"uptimeRatio": {
"1": 99.7,
"7": 100,
"30": 100,
"90": 100
}
}
],
"categories": [
{
"id": "mini-apps",
"name": "Mini Apps",
"status": "ok"
}
],
"uptimeRatio": {
"1": 98,
"7": 98.7,
"30": 99.6,
"90": 99.9
},
"status": "ok"
}
```
</CodeGroup>
</Col>
</Row>
# Usernames
## Introduction
Usernames are ENS-compatible identifiers for every World App user, ensuring consistency and easy recognition.
For example, when displaying transaction history, show the username instead of the wallet address to make it more user-friendly and private.
The usernames service is public, docs can be found [here](https://usernames.worldcoin.org/docs). This will be mostly useful for more advanced use cases.
## How to get it
To get the user's username you can either complete Wallet Auth and access the username/profile picture url from MiniKit directly:
```tsx
const username = MiniKit.user.username
```
Or you can request it manually, using the `getUserByAddress` method on MiniKit:
```tsx
const worldIdUser = await MiniKit.getUserByAddress(userAddress)
```
Other ways involve querying the [usernames service](https://usernames.worldcoin.org/docs).
# DNA Quick Action
Generate deep links to the DNA app for quick actions like Swap and Send.
[DNA](https://worldcoin.org/ecosystem/app_8e407cfbae7ae51c19b07faff837aeeb) now supports a **Quick Action** to deeplink directly
into the wallet interface, allowing users to perform specific actions like sending tokens or swapping assets with predefined parameters.
<div style={{ display: 'flex', justifyContent: 'space-between', alignItems: 'flex-start' }}>
<div style={{ flex: 1 }}>
<h3>Parameters</h3>
<Properties>
<Property name="tab" type="string" required={true}>
Supports deep linking to the `swap` and `send` tabs.
</Property>
<Property name="fromToken" type="string">
The contract address of the token being sent (`fromToken`).
</Property>
<Property name="toToken" type="string">
The contract address of the token being received (`toToken`). This is used in **swap** actions.
</Property>
<Property name="recipientAddress or username" type="string">
The recipient’s wallet address or username for sending tokens.
</Property>
<Property name="amount" type="string">
The amount of the `fromToken` to be sent, specified in its **base unit** .
</Property>
<Property name="sourceAppId" type="string">
The application ID of the source app initiating the deeplink.
</Property>
<Property name="sourceDeeplinkPath" type="string">
A deeplink path from the source application, which will be **URL-encoded**.
</Property>
</Properties>
</div>
<div style={{ marginLeft: '20px' }}>
<img
src="/images/docs/mini-apps/quick-actions/dna-qa.png"
alt="Liquidity Pool Screen"
style={{ maxWidth: '300px', height: 'auto' }}
/>
</div>
</div>
## Helper Function
```tsx
const DNA_APP_ID = 'app_8e407cfbae7ae51c19b07faff837aeeb'
function getDNADeeplinkUrl({
tab,
fromToken,
toToken,
recipientAddress,
amount,
sourceAppId,
sourceDeeplinkPath,
}: {
tab: 'swap' | 'send'
fromToken?: string
toToken?: string
recipientAddress?: string
amount?: string
sourceAppId?: string
sourceDeeplinkPath?: string
}) {
let path = `/wallet?tab=${tab}`
if (fromToken) {
path += `&fromToken=${fromToken}`
if (amount) {
path += `&amount=${amount}`
}
}
if (toToken) {
path += `&toToken=${toToken}`
}
if (recipientAddress) {
path += `&recipientAddress=${recipientAddress}`
}
if (sourceAppId) {
path += `&sourceAppId=${sourceAppId}`
}
if (sourceDeeplinkPath) {
path += `&sourceDeeplinkPath=${encodeURIComponent(sourceDeeplinkPath)}`
}
const encodedPath = encodeURIComponent(path)
return `https://worldcoin.org/mini-app?app_id=${DNA_APP_ID}&path=${encodedPath}`
}
```
## **Returns**
A string representing the complete deeplink URL to the DNA application with the specified parameters.
## **Example Usage**
```typescript
const deeplinkUrl = getDNADeeplinkUrl({
fromToken: '0x79A02482A880bCE3F13e09Da970dC34db4CD24d1',
toToken: '0x4200000000000000000000000000000000000006',
recipientAddress: '0xRecipientAddressHere',
amount: ‘1235',
sourceAppId: 'app_a4f7f3e62c1de0b9490a5260cb390b56',
sourceDeeplinkPath: ‘/path’,
});
console.log(deeplinkUrl);
```
## **Generated Deeplink URL:**
```bash
https://worldcoin.org/mini-app?app_id=app_8e407cfbae7ae51c19b07faff837aeeb&path=%2Fwallet%3Ftab%3Dsend%26fromToken%3D0x79A02482A880bCE3F13e09Da970dC34db4CD24d1%26amount%3D1234500%26toToken%3D0x4200000000000000000000000000000000000006%26recipientAddress%3D0xRecipientAddressHere%26sourceAppId%3Dapp_a4f7f3e62c1de0b9490a5260cb390b56%26sourceDeeplinkPath%3D%252Fsome%252Fpath
```
## **Note**
- Ensure that the **amount** is specified in the unit of the fromToken (e.g., wei for Ethereum-based tokens).
- The **sourceDeeplinkPath** is URL-encoded to ensure it is correctly interpreted when the deeplink is accessed.
- The **DNA_APP_ID** should be defined in your environment to match the application ID assigned to your DNA instance.
- If the tab is **Send**, it is necessary/recommended to provide **fromToken**, **amount**, and **the recipient’s address or username** _(toToken is not required)_.
- If the tab is **Swap**, it is necessary/recommended to provide **fromToken**, **toToken**, and **amount** _(in base unit)_.
This function facilitates the creation of deeplink URLs that can be used to direct users seamlessly into specific actions within the DNA application, enhancing the user experience by pre-filling transaction details.
# Earn WLD Quick Action
Earn high yields with your WLD token. Put your WLD to work by adding liquidity to the markets and earning large rewards from other traders.
Earn WLD now supports a Quick Action to deeplink directly to their staking screen.
<div style={{ display: 'flex', justifyContent: 'space-between', alignItems: 'flex-start' }}>
<div style={{ flex: 1 }}>
<h3>Parameters</h3>
<Properties>
<Property name="app_id" type="string" required={true}>
Unique ID for the Earn WLD mini app.
</Property>
</Properties>
</div>
<div style={{ marginLeft: '20px' }}>
<img
src="/images/docs/mini-apps/quick-actions/earn-wld-qa.png"
alt="Liquidity Pool Screen"
style={{ maxWidth: '300px', height: 'auto' }}
/>
</div>
</div>
Url follows the schema below. Navigate there to use this Quick Action.
```
http://worldcoin.org/mini-app?app_id=app_b0d01dd8f2bdfbff06c9e123de487eb8
```
# Eggs Vault Quick Action
Crack your egg daily to earn reward
Eggs Vault now supports a Quick Action to deeplink directly the smash screen to never miss your daily eggs.
<div style={{ display: 'flex', justifyContent: 'space-between', alignItems: 'flex-start' }}>
<div style={{ flex: 1 }}>
<h3>Parameters</h3>
<Properties>
<Property name="campaignName" type="string">
Links to a specific campaign. If you have campaignName then it will go to campaign detail page.
</Property>
</Properties>
</div>
<div style={{ marginLeft: '20px' }}>
<img
src="/images/docs/mini-apps/quick-actions/eggs-vault-qa.png"
alt="Swap Screen"
style={{ maxWidth: '300px', height: 'auto' }}
/>
</div>
</div>
Url follows the schema below. Navigate there to use this Quick Action.
```
https://worldcoin.org/mini-app?app_id=app_ee968e983074cb090e6f12cd75b63bb3
```
# Quick Actions
### **What Are Quick Actions?**
A Quick Action is a universal deeplink defined by a schema that navigates to a specific path inside your app.
It facilitates direct integrations between mini apps, enabling one app (App A) to use a feature or action of another app (App B) seamlessly.
In short, you can create a quick action for your own mini app to share it with other developers or use other mini app quick actions that will be listed in this page.
<Note type="info">
If a user clicks on your link and has World App installed, it will automatically open the mini app inside of World
App to the specified path. Otherwise, it will direct them to the app store and prompt them to install World App.
</Note>
### **Benefits of Quick Actions**
1. **Leverage Expertise**: Use other mini apps already working specific features.
2. **Resource & Time Optimization**: Focus on your apps core functionalities while outsourcing supplementary features.
3. **Community Growth**: Integrating another apps functionality opens opportunities for co-marketing.
### **How to Make a Quick Action**
1. **Create a Universal Link Schema**: Define a schema with a custom path that aligns with the functionality you want to provide.
2. **Publish it in our docs for all devs to use**: Fill this [form](https://forms.gle/UBcKMrnxtyxqX4dq6) for our team to test and publish your quick action on this page.
Urls will follow the schema below.
```
https://worldcoin.org/mini-app?app_id={app_id}&path={path}
```
### Parameters
<Properties>
<Property name="app_id" type="string" required={true}>
The `app_id` corresponding to your mini app.
</Property>
<Property name="path" type="string">
Should be the url encoded path where you want to link to inside of your mini app
</Property>
</Properties>
# UNO Quick Action
[UNO](https://worldcoin.org/ecosystem/app_a4f7f3e62c1de0b9490a5260cb390b56) is your simple, secure token wallet.
View your token balances and check prices all in one place. Buy, Sell, Swap, or Send tokens in a fun and simple interface.
Uno now supports a Quick Action to deeplink directly to the swap tab, with a specific swap ready to be executed.
<div style={{ display: 'flex', justifyContent: 'space-between', alignItems: 'flex-start' }}>
<div style={{ flex: 1 }}>
<h3>Parameters</h3>
<Properties>
<Property name="tab" type="string" required={true}>
Currently only supports "swap"; this allows deep linking to the swap tab.
</Property>
<Property name="fromToken" type="string">
Token address for the from token.
</Property>
<Property name="amount" type="string">
Base units amount of the from token.
</Property>
<Property name="toToken" type="string">
Token address for the to token.
</Property>
<Property name="referrerAppId" type="string">
World Miniapp App id of the referring World Miniapp. When provided, a “Go Back” deeplink button will
appear in the top left of the header that takes the user back to the referring Miniapp.
</Property>
<Property name="referrerDeeplinkPath" type="string">
Deeplink path for referring World Miniapp Quick Actions. When provided, this path will be added to the
“Go Back” deeplink button so that the referring Miniapp can execute a Quick Action when the user taps
“Go Back” in Uno.
</Property>
</Properties>
</div>
<div style={{ marginLeft: '20px' }}>
<img
src="/images/docs/mini-apps/quick-actions/uno-qa.png"
alt="Swap Screen"
style={{ maxWidth: '300px', height: 'auto' }}
/>
</div>
</div>
## Helper function
```tsx
const UNO_APP_ID = 'app_a4f7f3e62c1de0b9490a5260cb390b56'
function getUnoDeeplinkUrl({
fromToken,
toToken,
amount,
referrerAppId,
referrerDeeplinkPath,
}: {
fromToken?: string
toToken?: string
amount?: string
referrerAppId?: string
referrerDeeplinkPath?: string
}) {
let path = `?tab=swap`
if (fromToken) {
path += `&fromToken=${fromToken}`
if (amount) {
path += `&amount=${amount}`
}
}
if (toToken) {
path += `&toToken=${toToken}`
}
if (referrerAppId) {
path += `&referrerAppId=${referrerAppId}`
}
if (referrerDeeplinkPath) {
path += `&referrerDeeplinkPath=${encodeURIComponent(referrerDeeplinkPath)}`
}
const encodedPath = encodeURIComponent(path)
return `https://worldcoin.org/mini-app?app_id=${UNO_APP_ID}&path=${encodedPath}`
}
// create a trade for 1.2345 USDC to WETH
console.log(
getUnoDeeplinkUrl({
fromToken: '0x79A02482A880bCE3F13e09Da970dC34db4CD24d1',
amount: '1234500',
toToken: '0x4200000000000000000000000000000000000006',
})
)
```
### Example output link
```
https://worldcoin.org/mini-app?app_id=app_a4f7f3e62c1de0b9490a5260cb390b56&path=%3Ftab%3Dswap%26fromToken%3D0x79A02482A880bCE3F13e09Da970dC34db4CD24d1%26amount%3D1234500%26toToken%3D0x4200000000000000000000000000000000000006
```
### Appendix
**Terminology**
- **fromToken** - token that is being swapped away for another token. Other names for this parameter are “sell token”, or “input token”.
- **toToken** - token that is being swapped into for another token. Other names for this parameter are “buy token”, or “output token”.
- **referrer** - In the cases that the UNO Quick Action link is used from a different Miniapp, the referrer is the Miniapp where that link was used.
Specifying the referrerAppId allows UNO to provide a “Go back” to the Miniapp that provided the link to the UNO Quick Action.
**Caveats/Warnings** Swap will not work if not taken into consideration.
- If the user does not have the fromToken (sell token).
- Amount should be in the base units of the fromToken.
import {Button} from '@/components/Button'
<span className="mb-9 mt-4 flex rounded-3xl bg-gray-900 bg-[url('/images/docs/announcement-texture.png')] bg-repeat px-8 py-1 text-white">
<span className="grow">
<span className="block text-lg font-bold">World ID SDK now publicly available</span>
The SDK is now available for public use. Read the announcement and start building now.
</span>
<span className="flex items-center justify-end pl-6">
<a
className="m-0 rounded-lg bg-white px-4 py-2 text-gray-900 no-underline hover:no-underline"
href="http://world.org/blog/product/wait-over-worldcoin-world-id-sdk-publicly-available"
target="_blank"
>
<p className="m-0 p-0 font-medium hover:no-underline">Announcement</p>
</a>
</span>
</span>
# World ID is now available!
World ID has transitioned from a private beta to a public beta, and there is no longer a waitlist. You can start building with our SDK today at the [Worldcoin Developer Portal](https://developer.worldcoin.org).
<Button href="https://developer.worldcoin.org" arrow="right">
<p className="m-0 p-0 text-md hover:no-underline">Developer Portal</p>
</Button># Deploy a sample contract on World Chain
In this tutorial, we will use the [Solidity programming language](https://docs.soliditylang.org/en/v0.8.28/) to write the `HelloWorldChain` smart contract for World Chain.
Solidity is a programming language that can compile to EVM (Ethereum Virtual Machine) bytecode which can be executed on the World Chain EVM.
We will also be using the [Foundry CLI](https://book.getfoundry.sh/) toolkit, which has a lot of tools to help build, test and interact with Solidity programs.
## Download development tools
First, we need to install the Foundry CLI toolkit and the Solidity compiler. Solidity comes with a compiler called `solc` which we will use to compile the `HelloWorldChain` contract. The Foundry CLI
will automatically download the right version of the Solidity compiler for you during the compilation process using `forge build`.
```bash {{title: "Install Foundry"}}
curl -L https://foundry.paradigm.xyz | bash
```
## Create a Foundry project
Open your terminal of choice, navigate to a directory where you want to create your project, and run the following command to create a new Foundry project:
```bash {{title: "Create a new Foundry project"}}
forge init hello-world-chain && cd hello-world-chain
```
Now that you have created a new Foundry project, you can start writing your smart contract. All smart contracts in Foundry projects are stored in the `src` directory.
If you are using VSCode, it should something look like this:
## Write the HelloWorldChain contract
First, delete the template file called Counter.sol in the /src directory:
```bash {{title: "Delete Template"}}
rm src/Counter.sol
```
Next, create a new file called HelloWorldChain.sol in the /src directory and add the following code to it:
```solidity {{title: "HelloWorldChain.sol"}}
// SPDX-License-Identifier: MIT
pragma solidity ^0.8.28;
contract HelloWorldChain {
string private word;
// Constructor that sets the initial word to "Hello World Chain!"
constructor() {
word = "Hello World Chain!";
}
// Setter function to update the word
function setWord(string memory newWord) public {
word = newWord;
}
// Getter function to return the current word
function getWord() public view returns (string memory) {
return word;
}
}
```
This contract has a `word` variable that stores a string and two functions: `setWord` to update the word and `getWord` to return the current word.
## Update Scripts and Tests
Since we deleted `Counter.sol`, we need to update or remove the scripts and tests that reference it to prevent compilation errors.
**Delete the `script` directory**
The script directory contains scripts that import `Counter.sol`. Since we no longer have `Counter.sol`, we can delete the entire script directory to avoid any compilation issues:
```bash {{title: "Delete Script Directory"}}
rm -rf script
```
**Replace** `Counter.t.sol` with `HelloWorldChain.t.sol`
In the test directory, delete the existing `Counter.t.sol` and create a new test file called `HelloWorldChain.t.sol` and add the following simple tests:
```solidity {{title: "HelloWorldChain.t.sol"}}
// SPDX-License-Identifier: MIT
pragma solidity ^0.8.28;
import "forge-std/Test.sol";
import "../src/HelloWorldChain.sol";
contract HelloWorldChainTest is Test {
HelloWorldChain helloWorldChain;
function setUp() public {
helloWorldChain = new HelloWorldChain();
}
function testInitialWord() public view {
string memory expected = "Hello World Chain!";
string memory actual = helloWorldChain.getWord();
assertEq(actual, expected);
}
function testSetWord() public {
string memory newWord = "Hello Foundry!";
helloWorldChain.setWord(newWord);
string memory actual = helloWorldChain.getWord();
assertEq(actual, newWord);
}
}
```
**Now You can Run tests:**
```bash {{title: "Test the contract"}}
forge test
```
## Compile the contract
To compile the `HelloWorldChain` contract, run the following command:
```bash {{title: "Compile the contract"}}
forge build
```
The `forge build` command will compile the contract using the Solidity compiler and generate the necessary artifacts in the `artifacts` directory.
## Generate a wallet
To deploy the `HelloWorldChain` contract to World Chain Sepolia, you will need a wallet with some World Chain Sepolia ETH. An easy way to generate a
wallet using the Foundry CLI is to run the following command:
```bash {{title: "Generate a wallet"}}
cast wallet new
```
`cast` is a versatile set of utility functions and commands for Solidity development. In this case, we are using one of its many built-in features to generate a wallet with one account.
<Note>Never share your private key with anyone and always make sure that you don't upload them to code versioning tools like Git and hosting platforms like GitHub.
Research best practices for private key management in order to avoid loss of funds.</Note>
The output of the command will look something like this:
```
Successfully created new keypair.
Address: 0xB815A0c4bC23930119324d4359dB65e27A846A2d
Private key: 0xcc1b30a6af68ea9a9917f1dda20c927704c5cdb2bbe0076901a8a0e40bf997c5
```
## Fund your wallet
Now that you have a wallet, you need to fund it with some World Chain Sepolia ETH. You can get some World Chain Sepolia ETH from the [World Chain Sepolia faucet](https://www.alchemy.com/faucets/world-chain-sepolia) operated by Alchemy.
In the form on the faucet page, enter the address of your wallet which you generated above and click the "Send me ETH" button. If you have any issues please send us a message in the developer
group chat on [Telegram](https://t.me/worldcoindevelopers) or [Discord](https://discord.gg/worldcoin).
## Deploy the contract
Now that you have a wallet and you funded it with World Chain Sepolia ETH, you can deploy the `HelloWorldChain` contract to World Chain Sepolia using the following `forge create` command:
```bash {{title: "Deploy the contract"}}
forge create src/HelloWorldChain.sol:HelloWorldChain --rpc-url https://worldchain-sepolia.g.alchemy.com/public --private-key 0xcc1b30a6af68ea9a9917f1dda20c927704c5cdb2bbe0076901a8a0e40bf997c5
```
Here, we are using the `<path>:<contractname>` format to specify the contract. This tells Foundry where to find the contract file (src/HelloWorldChain.sol) and which contract within the file (HelloWorldChain) to deploy.
We also use the `--rpc-url` flag to specify the RPC URL of the World Chain Sepolia network and the `--private-key` flag to specify the private key of the wallet we generated earlier.
On top of this we can also provide other flags like `-vvvvv` to get more verbose output from the deployment process, `--verify` to verify the contract on [Worldscan](https://worldscan.org) or [Blockscout](https://worldchain-sepolia.explorer.alchemy.com/) (alongside with an `--etherscan-api-key` flag) and
several other flags to toggle different features that you can find more about in the [Foundry documentation](https://book.getfoundry.sh/).
And that's it! You have successfully deployed a smart contract to World Chain Sepolia. You can interact with the contract using `forge script` scripts, using a block explorer or any other EVM library like [ethers.js](https://docs.ethers.io/v5/), [alloy-rs](https://github.com/alloy-rs/alloy/), and many others.# EVM Equivalence
World Chain is EVM-equivalent because it utilizes the [OP Stack](https://docs.optimism.io/stack/getting-started), a modular framework developed by Optimism,
which ensures compatibility with the [Ethereum Virtual Machine (EVM)](https://ethereum.org/en/developers/docs/evm/). By leveraging the OP Stack,
World Chain can execute smart contracts and interact with decentralized applications designed for Ethereum
without any modifications. This equivalency enables seamless interoperability with Ethereum's ecosystem of applications and protocols.
The OP Stack's modularity also allows World Chain to implement scaling solutions and other customizations while maintaining the fundamental EVM equivalence,
ensuring a flexible yet consistent environment for developers and users alike.
## Differences between World Chain, OP Mainnet and Ethereum
Though the EVM remains unchanged across OP Stack (Superchain) chains compared to the Ethereum layer 1, there are some configurations of the execution clients that
do differ.
<table>
<thead>
<tr>
<th>Parameter</th>
<th>World Chain</th>
<th>OP Mainnet</th>
<th>Ethereum</th>
</tr>
</thead>
<tbody>
<tr>
<td>Block time in seconds</td>
<td>2</td>
<td>2</td>
<td>12</td>
</tr>
<tr>
<td>Block gas limit</td>
<td>30,000,000</td>
<td>30,000,000</td>
<td>30,000,000</td>
</tr>
<tr>
<td>Block gas target</td>
<td>10,000,000</td>
<td>5,000,000</td>
<td>15,000,000</td>
</tr>
<tr>
<td>EIP-1559 elasticity multiplier</td>
<td>6</td>
<td>6</td>
<td>2</td>
</tr>
<tr>
<td>EIP-1559 denominator</td>
<td>250</td>
<td>250</td>
<td>8</td>
</tr>
<tr>
<td>Maximum base fee increase (per block)</td>
<td>0.8%</td>
<td>2%</td>
<td>12.5%</td>
</tr>
<tr>
<td>Maximum base fee decrease (per block)</td>
<td>0.4%</td>
<td>0.4%</td>
<td>12.5%</td>
</tr>
</tbody>
</table>
For more information check out the [OP Stack docs](https://docs.optimism.io/stack/getting-started).
# Fees on World Chain
Every World Chain transaction consists of two costs: an L2 (execution) fee and an L1 (security) fee. The L2 fee is the cost to execute your transaction on the L2, while the L1 fee covers the estimated cost of publishing the transaction on the L1. Typically, the L1 security fee is higher than the L2 execution fee.
The L1 fee fluctuates depending on the volume of transactions on the L1. If your transaction timing is flexible, you can save on costs by submitting during periods of lower gas fees on the L1 (for example, weekends) or using products like [GasHawk](https://gashawk.io/) which schedule transactions during periods of low demand.
Similarly, the L2 fee can vary based on the number of transactions submitted to the L2. This dynamic adjustment works similarly to the L1; you can learn more about it [here](https://blog.thirdweb.com/eip-1559-ethereum-gas-fees/).
For additional details about fee calculation on World Chain, please refer to the relevant [op-stack developer documentation](https://docs.optimism.io/stack/transactions/fees).# Apply for a grant to build on World Chain
The [Worldcoin Foundation](https://worldcoin.foundation) runs the [Human Collective Grants](https://world.org/community-grants) program
which gives grants to builders that help accelerate the [Worldcoin Tech Tree](https://world.org/tech-tree) and [related RFPs](https://world.org/rfp).
The grants program switched from a quarterly waves format to a continuous format where builders can apply for a grant at any point in time. For more information
you can read the [Continuous Grants program announcement blogpost](https://world.org/blog/announcements/worldcoin-foundation-introduces-new-continuous-grants-program-spur-innovation).
## Areas of interest for applications
- Rustification of the [OP Stack](https://docs.optimism.io/stack/getting-started)
- Futhering [the gigagas roadmap](https://www.google.com/url?q=https://www.paradigm.xyz/2024/04/reth-perf&sa=D&source=editors&ust=1726507097184499&usg=AOvVaw34fUyrLcoigheJlrfbIDM2)
- ZK-ifying the OP Stack (efforts like [OP Succinct](https://blog.succinct.xyz/op-succinct/), [Zeth from Risc0](https://risczero.com/blog/zeth-release) and [Mina's ZK fault proof RFP]())
- Scalability research and engineering (can be Ethereum core as well)
- Embedding priority blockspace for humans into the OP Stack derivation pipeline + fault proof program (open R&D)
- Separate eip1559 fee market for humans on OP Stack
- L2 Execution client development (especially [reth](https://github.com/paradigmxyz/reth)) and benchmarking
- Improving UX and interoperability
- Chain-level experiments with digital identity and the OP Stack (things like [human priority blockspace](/world-chain/quick-start/features#priority-blockspace-for-humans) and [free gas allowances](/world-chain/quick-start/features#gas-allowance-for-humans) for unique humans)
- Interesting applications on World Chain (past examples include proof aggregators like [Nebra](https://nebra.one/), storage proofs like [Herodotus](https://herodotus.dev/) and [Axiom](https://www.axiom.xyz/), Passkeys module for Safe, and others)
- and more...
### If you are interested [apply here](https://airtable.com/appftNMpv819abvTc/pag0uKCtjQAPJgaEB/form) or send us an email to grants@worldcoin.org!
# Deploy a World ID template app
In this tutorial we are going to deploy a [World ID template app](https://github.com/worldcoin/world-id-onchain-template) on a World Chain Sepolia local fork using anvil.
This app will be a simple web application that allows users to create a World ID proof of personhood and verify it.
The app will be deployed on World Chain Sepolia and will interact with the `WorldIDRouter` smart contract
to verify the ZK proofs of personhood.
## Prerequisites
Before we start, make sure you have the following tools installed:
- [Git](https://git-scm.com/) (usually pre-installed on most systems)
- [Node.js](https://nodejs.org/en/)
- [pnpm](https://yarnpkg.com/) (or equivalent like npm, yarn or bun)
- [Foundry CLI](https://book.getfoundry.sh/)
## Clone template
First, clone the World ID template app repository from GitHub:
```bash
git clone https://github.com/worldcoin/world-id-onchain-template.git && cd world-id-onchain-template
```
## Install dependencies
Next, install the dependencies for the World ID template app:
```bash
pnpm install
```
## Build the smart contracts
Next we are going to compile the smart contracts for the World ID template app:
```bash
cd contracts && forge build
```
## Understanding World ID
Before we deploy the World ID template app, let's take a look at the smart contracts that are part of the app:
```solidity {{title: "contracts/src/Contract.sol"}}
// SPDX-License-Identifier: MIT
pragma solidity ^0.8.13;
import { ByteHasher } from './helpers/ByteHasher.sol';
import { IWorldID } from './interfaces/IWorldID.sol';
contract Contract {
using ByteHasher for bytes;
///////////////////////////////////////////////////////////////////////////////
/// ERRORS ///
//////////////////////////////////////////////////////////////////////////////
/// @notice Thrown when attempting to reuse a nullifier
error DuplicateNullifier(uint256 nullifierHash);
/// @dev The World ID instance that will be used for verifying proofs
IWorldID internal immutable worldId;
/// @dev The contract's external nullifier hash
uint256 internal immutable externalNullifier;
/// @dev The World ID group ID (always 1)
uint256 internal immutable groupId = 1;
/// @dev Whether a nullifier hash has been used already. Used to guarantee an action is only performed once by a single person
mapping(uint256 => bool) internal nullifierHashes;
/// @param nullifierHash The nullifier hash for the verified proof
/// @dev A placeholder event that is emitted when a user successfully verifies with World ID
event Verified(uint256 nullifierHash);
/// @param _worldId The WorldID router that will verify the proofs
/// @param _appId The World ID app ID
/// @param _actionId The World ID action ID
constructor(IWorldID _worldId, string memory _appId, string memory _actionId) {
worldId = _worldId;
externalNullifier = abi.encodePacked(abi.encodePacked(_appId).hashToField(), _actionId).hashToField();
}
/// @param signal An arbitrary input from the user, usually the user's wallet address (check README for further details)
/// @param root The root of the Merkle tree (returned by the JS widget).
/// @param nullifierHash The nullifier hash for this proof, preventing double signaling (returned by the JS widget).
/// @param proof The zero-knowledge proof that demonstrates the claimer is registered with World ID (returned by the JS widget).
/// @dev Feel free to rename this method however you want! We've used `claim`, `verify` or `execute` in the past.
function verifyAndExecute(address signal, uint256 root, uint256 nullifierHash, uint256[8] calldata proof) public {
// First, we make sure this person hasn't done this before
if (nullifierHashes[nullifierHash]) revert DuplicateNullifier(nullifierHash);
// We now verify the provided proof is valid and the user is verified by World ID
worldId.verifyProof(
root,
groupId,
abi.encodePacked(signal).hashToField(),
nullifierHash,
externalNullifier,
proof
);
// We now record the user has done this, so they can't do it again (proof of uniqueness)
nullifierHashes[nullifierHash] = true;
// Finally, execute your logic here, for example issue a token, NFT, etc...
// Make sure to emit some kind of event afterwards!
emit Verified(nullifierHash);
}
}
```
This contract has all the necessary pieces that any app that wants to integrate World ID proofs of personhood will require.
The World ID docs have a [detailed explanation](https://docs.worldcoin.org/world-id) of how the World ID system works and how to integrate it into your app.
But we will go over the main parts of the contract here:
1. The `Contract` contract is the main contract that will be deployed to World Chain Sepolia. It has a constructor that
takes the `IWorldID` interface, the app ID and the action ID as parameters. The `IWorldID` interface is the World ID router
that will verify the proofs, the app ID is the ID of the app can be created by the developer using the
[World ID Developer Portal](https://developer.worldcoin.org/login) and and the action ID is the ID of the action that the user
is performing which will be generated automatically by the [IDKit SDK](https://docs.worldcoin.org/reference/idkit) and derived
from `action` string defined in the Developer Portal.
2. The [`nullifierHashes` mapping](https://docs.worldcoin.org/reference/contracts#sybil-resistance) is used to keep track of
the nullifier hashes that have been used already. This is used to guarantee that an action is only performed once by a single
person in order to achieve sybil resistance.
3. The `verifyAndExecute` function is the main function that will be called by the user to verify their proof of personhood.
It takes the user's wallet address, the root of the Merkle tree, the nullifier hash, and the proof as parameters.
4. The function first checks if the nullifier hash has been used already and reverts if it has.
5. It then verifies the proof using the `worldId.verifyProof` function which is part of the `IWorldID` interface.
6. If the proof is valid, the function records the nullifier hash and executes the logic of the app. In this case, it emits
the `Verified` event.
If you want an example of a production application which uses the World ID protocol, you can check out the
[Worldcoin grants contracts](https://github.com/worldcoin/worldcoin-grants-contracts).
Specifically, the [`RecurringGrantDrop.sol`](https://github.com/worldcoin/worldcoin-grants-contracts/blob/main/src/RecurringGrantDrop.sol)
contract which uses the World ID protocol to verify that the user is a unique human before they can claim a grant.
## Deploy template app
First, you have to go to a node provider that supports World Chain Sepolia. You can use [Alchemy](https://www.alchemy.com/)
or any of the other providers listed in the [World Chain documentation](/world-chain/providers/nodes). Once you have a node provider
account, you need to get an RPC URL for the World Chain Sepolia network. For a simple deployment, the public RPC URL is sufficient.
However, for doing a fork deployment, you will need to run a local fork of World Chain Sepolia using anvil which requires higher
requirements on the RPC provider for forking the network.
First, we will fork the World Chain Sepolia network using anvil:
```bash
# Substitute the RPC_URL with the RPC URL of the World Chain Sepolia network
anvil -f $RPC_URL
```
We need to also set three important environment variables that are required for the deployment of the World ID template app:
- `WORLD_ID_ROUTER`: The address of the World ID router contract that will verify the proofs (can be found in the [World ID documentation](https://docs.worldcoin.org/world-chain/reference/address-book))
- `NEXT_PUBLIC_APP_ID`: The app ID that was generated in the [Developer Portal](https://developer.worldcoin.org/login)
- `NEXT_PUBLIC_ACTION`: The action ID as configured in the [Developer Portal](https://developer.worldcoin.org/login)
Once the fork is running, you can deploy the World ID template app to the World Chain Sepolia network using the Foundry CLI:
```bash
# cd into the contracts directory
cd contracts
forge create --rpc-url http://localhost:8545 --private-key 0xac0974bec39a17e36ba4a6b4d238ff944bacb478cbed5efcae784d7bf4f2ff80 src/Contract.sol:Contract --constructor-args $WORLD_ID_ROUTER $NEXT_PUBLIC_APP_ID $NEXT_PUBLIC_ACTION
```
This command will deploy the `Contract` contract to the World Chain Sepolia network using the provided RPC URL and private key.
## Local Web Setup
Set up your environment variables in the `.env` file. You will need to set the following variables:
- `NEXT_PUBLIC_APP_ID`: The app ID as configured in the [Worldcoin Developer Portal](https://developer.worldcoin.org).
- `NEXT_PUBLIC_ACTION`: The action ID as configured in the Worldcoin Developer Portal.
- `NEXT_PUBLIC_WALLETCONNECT_ID`: Your WalletConnect ID.
- `NEXT_PUBLIC_CONTRACT_ADDRESS`: The address of the contract deployed in the previous step.
Back in the root directory of the World ID template app, you can start the local web server:
```bash
pnpm dev
```
The Contract ABI will be automatically re-generated and saved to `src/abi/ContractAbi.json` on each run of `pnpm dev`.
## Iterating
After making changes to the contract, you should:
- re-run the `forge create` command from above
- replace the `NEXT_PUBLIC_CONTRACT_ADDRESS` environment variable with the new contract address
- if your contract ABI has changed, restart the local web server
## Testing
You'll need to import the private keys on the local testnet into your wallet used for local development. The default development seed phrase is `test test test test test test test test test test test junk`.
<Note> This is only for local development. Do not use this seed phrase on mainnet or any public testnet. </Note>
When connecting your wallet to the local development environment, you will be prompted to add the network to your wallet.
Use the [Worldcoin Simulator](https://simulator.worldcoin.org) in place of World App to scan the IDKit QR codes and generate the zero-knowledge proofs.
## Further resources
If you want to learn more about the World ID protocol, you can check out the [World ID documentation](/world-id). If you want to build an application
that uses World ID and targets existing World App users, check out [miniapps](/mini-apps)!
# World Chain Contracts
## World Chain Mainnet
<table>
<thead>
<tr>
<th>Name</th>
<th>Address</th>
</tr>
</thead>
<tbody>
<tr>
<td className="align-middle">L2ToL1MessagePasser</td>
<td className="align-middle">[`0x4200000000000000000000000000000000000016`](https://worldscan.org/address/0x4200000000000000000000000000000000000016)</td>
</tr>
<tr>
<td className="align-middle">L2CrossDomainMessenger</td>
<td className="align-middle">[`0x4200000000000000000000000000000000000007`](https://worldscan.org/address/0x4200000000000000000000000000000000000007)</td>
</tr>
<tr>
<td className="align-middle">L2StandardBridge</td>
<td className="align-middle">[`0x4200000000000000000000000000000000000010`](https://worldscan.org/address/0x4200000000000000000000000000000000000010)</td>
</tr>
<tr>
<td className="align-middle">L2ERC721Bridge</td>
<td className="align-middle">[`0x4200000000000000000000000000000000000014`](https://worldscan.org/address/0x4200000000000000000000000000000000000014)</td>
</tr>
<tr>
<td className="align-middle">SequencerFeeVault</td>
<td className="align-middle">[`0x4200000000000000000000000000000000000011`](https://worldscan.org/address/0x4200000000000000000000000000000000000011)</td>
</tr>
<tr>
<td className="align-middle">OptimismMintableERC20Factory</td>
<td className="align-middle">[`0x4200000000000000000000000000000000000012`](https://worldscan.org/address/0x4200000000000000000000000000000000000012)</td>
</tr>
<tr>
<td className="align-middle">OptimismMintableERC721Factory</td>
<td className="align-middle">[`0x4200000000000000000000000000000000000017`](https://worldscan.org/address/0x4200000000000000000000000000000000000017)</td>
</tr>
<tr>
<td className="align-middle">L1Block</td>
<td className="align-middle">[`0x4200000000000000000000000000000000000015`](https://worldscan.org/address/0x4200000000000000000000000000000000000015)</td>
</tr>
<tr>
<td className="align-middle">GasPriceOracle</td>
<td className="align-middle">[`0x420000000000000000000000000000000000000F`](https://worldscan.org/address/0x420000000000000000000000000000000000000F)</td>
</tr>
<tr>
<td className="align-middle">ProxyAdmin</td>
<td className="align-middle">[`0x4200000000000000000000000000000000000018`](https://worldscan.org/address/0x4200000000000000000000000000000000000018)</td>
</tr>
<tr>
<td className="align-middle">BaseFeeVault</td>
<td className="align-middle">[`0x4200000000000000000000000000000000000019`](https://worldscan.org/address/0x4200000000000000000000000000000000000019)</td>
</tr>
<tr>
<td className="align-middle">L1FeeVault</td>
<td className="align-middle">[`0x420000000000000000000000000000000000001A`](https://worldscan.org/address/0x420000000000000000000000000000000000001A)</td>
</tr>
<tr>
<td className="align-middle">GovernanceToken</td>
<td className="align-middle">[`0x4200000000000000000000000000000000000042`](https://worldscan.org/address/0x4200000000000000000000000000000000000042)</td>
</tr>
<tr>
<td className="align-middle">SchemaRegistry</td>
<td className="align-middle">[`0x4200000000000000000000000000000000000020`](https://worldscan.org/address/0x4200000000000000000000000000000000000020)</td>
</tr>
<tr>
<td className="align-middle">EAS</td>
<td className="align-middle">[`0x4200000000000000000000000000000000000021`](https://worldscan.org/address/0x4200000000000000000000000000000000000021)</td>
</tr>
</tbody>
</table>
## Ethereum Mainnet
<table>
<thead>
<tr>
<th>Name</th>
<th>Address</th>
</tr>
</thead>
<tbody>
<tr>
<td className="align-middle">AnchorStateRegistryProxy</td>
<td className="align-middle">[`0xD4D7A57DCC563756DeD99e224E144A6Bf0327099`](https://etherscan.io/address/0xD4D7A57DCC563756DeD99e224E144A6Bf0327099)</td>
</tr>
<tr>
<td className="align-middle">Batch Submitter</td>
<td className="align-middle">[`0xdBBE3D8c2d2b22A2611c5A94A9a12C2fCD49Eb29`](https://etherscan.io/address/0xdBBE3D8c2d2b22A2611c5A94A9a12C2fCD49Eb29)</td>
</tr>
<tr>
<td className="align-middle">Challenger</td>
<td className="align-middle">[`0xA4fB12D15Eb85dc9284a7df0AdBC8B696EdbbF1d`](https://etherscan.io/address/0xA4fB12D15Eb85dc9284a7df0AdBC8B696EdbbF1d)</td>
</tr>
<tr>
<td className="align-middle">DelayedWETHProxy</td>
<td className="align-middle">[`0xF9adF7c9502C5C60352C20a4d22683422DbD061F`](https://etherscan.io/address/0xF9adF7c9502C5C60352C20a4d22683422DbD061F)</td>
</tr>
<tr>
<td className="align-middle">DisputeGameFactoryProxy</td>
<td className="align-middle">[`0x069c4c579671f8c120b1327a73217D01Ea2EC5ea`](https://etherscan.io/address/0x069c4c579671f8c120b1327a73217D01Ea2EC5ea)</td>
</tr>
<tr>
<td className="align-middle">L1CrossDomainMessengerProxy</td>
<td className="align-middle">[`0xf931a81D18B1766d15695ffc7c1920a62b7e710a`](https://etherscan.io/address/0xf931a81D18B1766d15695ffc7c1920a62b7e710a)</td>
</tr>
<tr>
<td className="align-middle">L1ERC721BridgeProxy</td>
<td className="align-middle">[`0x1Df436AfDb2fBB40F1fE8bEd4Fc89A0D0990a8E9`](https://etherscan.io/address/0x1Df436AfDb2fBB40F1fE8bEd4Fc89A0D0990a8E9)</td>
</tr>
<tr>
<td className="align-middle">L1StandardBridgeProxy</td>
<td className="align-middle">[`0x470458C91978D2d929704489Ad730DC3E3001113`](https://etherscan.io/address/0x470458C91978D2d929704489Ad730DC3E3001113)</td>
</tr>
<tr>
<td className="align-middle">L2OutputOracleProxy</td>
<td className="align-middle">[`0x19A6d1E9034596196295CF148509796978343c5D`](https://etherscan.io/address/0x19A6d1E9034596196295CF148509796978343c5D)</td>
</tr>
<tr>
<td className="align-middle">MIPS</td>
<td className="align-middle">[`0x16e83cE5Ce29BF90AD9Da06D2fE6a15d5f344ce4`](https://etherscan.io/address/0x16e83cE5Ce29BF90AD9Da06D2fE6a15d5f344ce4)</td>
</tr>
<tr>
<td className="align-middle">OptimismMintableERC20FactoryProxy</td>
<td className="align-middle">[`0x82Cb528466cF22412d89bdBE9bCF04856790dD0e`](https://etherscan.io/address/0x82Cb528466cF22412d89bdBE9bCF04856790dD0e)</td>
</tr>
<tr>
<td className="align-middle">OptimismPortalProxy</td>
<td className="align-middle">[`0xd5ec14a83B7d95BE1E2Ac12523e2dEE12Cbeea6C`](https://etherscan.io/address/0xd5ec14a83B7d95BE1E2Ac12523e2dEE12Cbeea6C)</td>
</tr>
<tr>
<td className="align-middle">PermissionedDisputeGame</td>
<td className="align-middle">[`0x48cf980849a7eEA03180f7dea4E21C112097b03E`](https://etherscan.io/address/0x48cf980849a7eEA03180f7dea4E21C112097b03E)</td>
</tr>
<tr>
<td className="align-middle">PreimageOracle</td>
<td className="align-middle">[`0x9c065e11870B891D214Bc2Da7EF1f9DDFA1BE277`](https://etherscan.io/address/0x9c065e11870B891D214Bc2Da7EF1f9DDFA1BE277)</td>
</tr>
<tr>
<td className="align-middle">ProtocolVersionsProxy</td>
<td className="align-middle">[`0x8eeF04eef96fef1050702453f75F0Fc4f8F70973`](https://etherscan.io/address/0x8eeF04eef96fef1050702453f75F0Fc4f8F70973)</td>
</tr>
<tr>
<td className="align-middle">ProxyAdmin</td>
<td className="align-middle">[`0xd7405BE7f3e63b094Af6C7C23D5eE33Fd82F872D`](https://etherscan.io/address/0xd7405BE7f3e63b094Af6C7C23D5eE33Fd82F872D)</td>
</tr>
<tr>
<td className="align-middle">SafeProxyFactory</td>
<td className="align-middle">[`0xa6B71E26C5e0845f74c812102Ca7114b6a896AB2`](https://etherscan.io/address/0xa6B71E26C5e0845f74c812102Ca7114b6a896AB2)</td>
</tr>
<tr>
<td className="align-middle">SuperchainConfigProxy</td>
<td className="align-middle">[`0x95703e0982140D16f8ebA6d158FccEde42f04a4C`](https://etherscan.io/address/0x95703e0982140D16f8ebA6d158FccEde42f04a4C)</td>
</tr>
<tr>
<td className="align-middle">SystemConfigProxy</td>
<td className="align-middle">[`0x6ab0777fD0e609CE58F939a7F70Fe41F5Aa6300A`](https://etherscan.io/address/0x6ab0777fD0e609CE58F939a7F70Fe41F5Aa6300A)</td>
</tr>
<tr>
<td className="align-middle">OpUSDCBridgeAdapter</td>
<td className="align-middle">[`0x153A69e4bb6fEDBbAaF463CB982416316c84B2dB`](https://etherscan.io/address/0x153A69e4bb6fEDBbAaF463CB982416316c84B2dB)</td>
</tr>
</tbody>
</table>
## World Chain Sepolia Testnet
<table>
<thead>
<tr>
<th>Name</th>
<th>Address</th>
</tr>
</thead>
<tbody>
<tr>
<td className="align-middle">L2ToL1MessagePasser</td>
<td className="align-middle">[`0x4200000000000000000000000000000000000016`](https://worldchain-sepolia.explorer.alchemy.com/address/0x4200000000000000000000000000000000000016)</td>
</tr>
<tr>
<td className="align-middle">L2CrossDomainMessenger</td>
<td className="align-middle">[`0x4200000000000000000000000000000000000007`](https://worldchain-sepolia.explorer.alchemy.com/address/0x4200000000000000000000000000000000000007)</td>
</tr>
<tr>
<td className="align-middle">L2StandardBridge</td>
<td className="align-middle">[`0x4200000000000000000000000000000000000010`](https://worldchain-sepolia.explorer.alchemy.com/address/0x4200000000000000000000000000000000000010)</td>
</tr>
<tr>
<td className="align-middle">L2ERC721Bridge</td>
<td className="align-middle">[`0x4200000000000000000000000000000000000014`](https://worldchain-sepolia.explorer.alchemy.com/address/0x4200000000000000000000000000000000000014)</td>
</tr>
<tr>
<td className="align-middle">SequencerFeeVault</td>
<td className="align-middle">[`0x4200000000000000000000000000000000000011`](https://worldchain-sepolia.explorer.alchemy.com/address/0x4200000000000000000000000000000000000011)</td>
</tr>
<tr>
<td className="align-middle">OptimismMintableERC20Factory</td>
<td className="align-middle">[`0x4200000000000000000000000000000000000012`](https://worldchain-sepolia.explorer.alchemy.com/address/0x4200000000000000000000000000000000000012)</td>
</tr>
<tr>
<td className="align-middle">OptimismMintableERC721Factory</td>
<td className="align-middle">[`0x4200000000000000000000000000000000000017`](https://worldchain-sepolia.explorer.alchemy.com/address/0x4200000000000000000000000000000000000017)</td>
</tr>
<tr>
<td className="align-middle">L1Block</td>
<td className="align-middle">[`0x4200000000000000000000000000000000000015`](https://worldchain-sepolia.explorer.alchemy.com/address/0x4200000000000000000000000000000000000015)</td>
</tr>
<tr>
<td className="align-middle">GasPriceOracle</td>
<td className="align-middle">[`0x420000000000000000000000000000000000000F`](https://worldchain-sepolia.explorer.alchemy.com/address/0x420000000000000000000000000000000000000F)</td>
</tr>
<tr>
<td className="align-middle">ProxyAdmin</td>
<td className="align-middle">[`0x4200000000000000000000000000000000000018`](https://worldchain-sepolia.explorer.alchemy.com/address/0x4200000000000000000000000000000000000018)</td>
</tr>
<tr>
<td className="align-middle">BaseFeeVault</td>
<td className="align-middle">[`0x4200000000000000000000000000000000000019`](https://worldchain-sepolia.explorer.alchemy.com/address/0x4200000000000000000000000000000000000019)</td>
</tr>
<tr>
<td className="align-middle">L1FeeVault</td>
<td className="align-middle">[`0x420000000000000000000000000000000000001A`](https://worldchain-sepolia.explorer.alchemy.com/address/0x420000000000000000000000000000000000001A)</td>
</tr>
<tr>
<td className="align-middle">GovernanceToken</td>
<td className="align-middle">[`0x4200000000000000000000000000000000000042`](https://worldchain-sepolia.explorer.alchemy.com/address/0x4200000000000000000000000000000000000042)</td>
</tr>
<tr>
<td className="align-middle">SchemaRegistry</td>
<td className="align-middle">[`0x4200000000000000000000000000000000000020`](https://worldchain-sepolia.explorer.alchemy.com/address/0x4200000000000000000000000000000000000020)</td>
</tr>
<tr>
<td className="align-middle">EAS</td>
<td className="align-middle">[`0x4200000000000000000000000000000000000021`](https://worldchain-sepolia.explorer.alchemy.com/address/0x4200000000000000000000000000000000000021)</td>
</tr>
</tbody>
</table>
## Ethereum Sepolia Testnet
<table>
<thead>
<tr>
<th>Name</th>
<th>Address</th>
</tr>
</thead>
<tbody>
<tr>
<td className="align-middle">AnchorStateRegistryProxy</td>
<td className="align-middle">[`0x1333d5E5201D760444A399E77b3D337eBDB0DD07`](https://sepolia.etherscan.io/address/0x1333d5E5201D760444A399E77b3D337eBDB0DD07)</td>
</tr>
<tr>
<td className="align-middle">Batch Submitter</td>
<td className="align-middle">[`0x0f3ff4731D7a10B89ED79AD1Fd97844d7F66B96d`](https://sepolia.etherscan.io/address/0x0f3ff4731D7a10B89ED79AD1Fd97844d7F66B96d)</td>
</tr>
<tr>
<td className="align-middle">Challenger</td>
<td className="align-middle">[`0x945185C01fb641bA3E63a9bdF66575e35a407837`](https://sepolia.etherscan.io/address/0x945185C01fb641bA3E63a9bdF66575e35a407837)</td>
</tr>
<tr>
<td className="align-middle">DelayedWETHProxy</td>
<td className="align-middle">[`0x4F4B8Adf1af4b61bb62F68b7aF1c37f8A6311663`](https://sepolia.etherscan.io/address/0x4F4B8Adf1af4b61bb62F68b7aF1c37f8A6311663)</td>
</tr>
<tr>
<td className="align-middle">DisputeGameFactoryProxy</td>
<td className="align-middle">[`0x8Ec1111f67Dad6b6A93B3F42DfBC92D81c98449A`](https://sepolia.etherscan.io/address/0x8Ec1111f67Dad6b6A93B3F42DfBC92D81c98449A)</td>
</tr>
<tr>
<td className="align-middle">L1CrossDomainMessengerProxy</td>
<td className="align-middle">[`0x7768c821200554d8F359A8902905Ba9eDe5659a9`](https://sepolia.etherscan.io/address/0x7768c821200554d8F359A8902905Ba9eDe5659a9)</td>
</tr>
<tr>
<td className="align-middle">L1ERC721BridgeProxy</td>
<td className="align-middle">[`0x3580505c56f8560E3777E92Fb27f70fD20c5B493`](https://sepolia.etherscan.io/address/0x3580505c56f8560E3777E92Fb27f70fD20c5B493)</td>
</tr>
<tr>
<td className="align-middle">L1StandardBridgeProxy</td>
<td className="align-middle">[`0xd7DF54b3989855eb66497301a4aAEc33Dbb3F8DE`](https://sepolia.etherscan.io/address/0xd7DF54b3989855eb66497301a4aAEc33Dbb3F8DE)</td>
</tr>
<tr>
<td className="align-middle">L2OutputOracleProxy</td>
<td className="align-middle">[`0xc8886f8BAb6Eaeb215aDB5f1c686BF699248300e`](https://sepolia.etherscan.io/address/0xc8886f8BAb6Eaeb215aDB5f1c686BF699248300e)</td>
</tr>
<tr>
<td className="align-middle">MIPS</td>
<td className="align-middle">[`0x69470D6970Cd2A006b84B1d4d70179c892cFCE01`](https://sepolia.etherscan.io/address/0x69470D6970Cd2A006b84B1d4d70179c892cFCE01)</td>
</tr>
<tr>
<td className="align-middle">OptimismMintableERC20FactoryProxy</td>
<td className="align-middle">[`0x2D272eF54Ee8EF5c2Ff3523559186580b158cd57`](https://sepolia.etherscan.io/address/0x2D272eF54Ee8EF5c2Ff3523559186580b158cd57)</td>
</tr>
<tr>
<td className="align-middle">OptimismPortalProxy</td>
<td className="align-middle">[`0xFf6EBa109271fe6d4237EeeD4bAb1dD9A77dD1A4`](https://sepolia.etherscan.io/address/0xFf6EBa109271fe6d4237EeeD4bAb1dD9A77dD1A4)</td>
</tr>
<tr>
<td className="align-middle">PermissionedDisputeGame</td>
<td className="align-middle">[`0x552334Bf0B124bD89BFF744f33Ca7e49d44a80Ac`](https://sepolia.etherscan.io/address/0x552334Bf0B124bD89BFF744f33Ca7e49d44a80Ac)</td>
</tr>
<tr>
<td className="align-middle">PreimageOracle</td>
<td className="align-middle">[`0x92240135b46fc1142dA181f550aE8f595B858854`](https://sepolia.etherscan.io/address/0x92240135b46fc1142dA181f550aE8f595B858854)</td>
</tr>
<tr>
<td className="align-middle">ProtocolVersionsProxy</td>
<td className="align-middle">[`0x01DBC9aBe8e59f021d47Cf79143DE830820CbA29`](https://sepolia.etherscan.io/address/0x01DBC9aBe8e59f021d47Cf79143DE830820CbA29)</td>
</tr>
<tr>
<td className="align-middle">ProxyAdmin</td>
<td className="align-middle">[`0x3a987FE1cb587B0A1808cf9bB7Cbe0E341838319`](https://sepolia.etherscan.io/address/0x3a987FE1cb587B0A1808cf9bB7Cbe0E341838319)</td>
</tr>
<tr>
<td className="align-middle">SafeProxyFactory</td>
<td className="align-middle">[`0xa6B71E26C5e0845f74c812102Ca7114b6a896AB2`](https://sepolia.etherscan.io/address/0xa6B71E26C5e0845f74c812102Ca7114b6a896AB2)</td>
</tr>
<tr>
<td className="align-middle">SuperchainConfigProxy</td>
<td className="align-middle">[`0xC2Be75506d5724086DEB7245bd260Cc9753911Be`](https://sepolia.etherscan.io/address/0xC2Be75506d5724086DEB7245bd260Cc9753911Be)</td>
</tr>
<tr>
<td className="align-middle">SystemConfigProxy</td>
<td className="align-middle">[`0x166F9406e79A656f12F05247fb8F5DfA6155bCBF`](https://sepolia.etherscan.io/address/0x166F9406e79A656f12F05247fb8F5DfA6155bCBF)</td>
</tr>
</tbody>
</table>import { Link } from '@/components/Link'
# World Chain {{ className: 'text-5xl' }}

World Chain is a blockchain for humans. World chain offers several unique primitives:
- Free gas fees for all verified humans
- Native mobile distribution to all World App users through [mini-apps](/mini-apps)
- Simplified crypto transactions [through mini apps](/mini-apps/commands/verify)
- Sybil resistance for developers via [World ID](/world-id)
- Airdrop of WLD tokens to all verified humans
These primitives enable World Chain builders to build never before possible applications and reach a global audience.
World Chain is built on the [Superchain](https://docs.optimism.io/superchain/superchain-explainer).
To learn more about what is World Chain, watch our presentation from the [A New World](https://www.youtube.com/watch?v=_RWvsCZ17x8&ab_channel=World) event: <br />
[A New World: World Chain and Priority Blockspace for Humans ft. Liam Horne](https://www.youtube.com/watch?v=NSxyKsSwjsc&ab_channel=World) on our [YouTube channel](https://www.youtube.com/@worldnetworkofficial).
<Note>
{' '}
Is anything missing in the documentation? Please reach out on our [Telegram for World Chain developers](https://t.me/worldcoindevelopers){' '}
</Note>
# Superchain Bridges
The Superchain bridge is the native bridge for World Chain as it comes with the OP Stack smart contracts which power the network. There are several interface providers for this bridge and it allows users to bridge assets from Ethereum mainnet and onto World Chain and vice versa.
## Superbridge Core
[Superbridge.app](https://superbridge.app/world-chain) is a blockchain bridging platform that enables users to transfer Ethereum (ETH) and ERC20 tokens between different blockchain networks, primarily focusing on OP Stack Layer 2 rollups chains including the World Chain network.
## Alchemy Bridge
The [native bridge interface for World Chain mainnet](https://worldchain-mainnet.bridge.alchemy.com/) provided by [Alchemy](https://alchemy.com/) is the rollup as a service (RaaS) provider for World Chain. As part of this service it also provides a World Chain bridge interface for users to deposit to and withdraw assets from the network. There is also a [testnet bridge](https://worldchain-sepolia.bridge.alchemy.com/) available for developers and users to bridge assets to the World Chain Sepolia testnet.
# Third-party bridges
## Brid.gg
[Brid.gg](https://brid.gg/) facilitates cross-chain transactions and aims to improve interoperability between different blockchain networks. It primarily connects Ethereum Mainnet to OP Chains including World Chain, allowing for transfers of digital assets across various blockchains.
## Superbridge fast
[Superbridge Fast](https://superbridge.app/fast) is a service offered by Superbridge that allows users to deposit and withdraw assets to and from World Chain quickly using third party bridges like [Synapse](/world-chain/providers/bridges#synapse), [Across](/world-chain/providers/bridges#across), and [Hyperlane](/world-chain/providers/bridges#hyperlane) which are directly integrated with the Superchain bridge interface. This is the fastest way to bridge assets to and from World Chain.
The next best method is to use the native Superchain bridge for which both Alchemy and Superbridge Core provide interfaces.
## Synapse
[Synapse](https://synapseprotocol.com/) is a cross-chain communication protocol that enables seamless asset transfers and messaging across different blockchain networks. It provides a secure and efficient infrastructure for interoperability, allowing users to move tokens and data between various chains without the need for centralized intermediaries.
## Across
[Across](https://app.across.to/bridge?) is an intent-based cross-chain bridging protocol that allows users to transfer tokens between different blockchain networks, particularly focusing on Layer 2 solutions and Ethereum-compatible chains.
## Hyperlane
[Hyperlane](https://hyperlane.xyz/) is an innovative interoperability protocol designed to facilitate seamless cross-chain communication and enable the development of interchain applications.
Hyperlane provides permissionless infrastructure for sending arbitrary data between blockchains, allowing developers to create applications that can be accessed from any connected chain.
It supports general asset transfers and custom cross-chain messaging, enabling users to interact with assets and applications across different networks including World Chain.
## LayerZero
[LayerZero](https://layerzero.network/) is an omnichain interoperability protocol that enables seamless communication between different blockchains.
## Chainlink CCIP
[Chainlink CCIP](https://chain.link/cross-chain) is a blockchain interoperability protocol that enables developers to build secure applications that can transfer tokens, messages (data), or both tokens and messages across chains.
You can see World Chain-specific documentation for CCIP [here](https://docs.chain.link/ccip/directory/mainnet/chain/ethereum-mainnet-worldchain-1).
# Liquidity Layers
## Cortex Protocol
[Cortex Protocol](https://cortexprotocol.com/) is a decentralized, non-custodial liquidity protocol built on Ethereum that enables users to lend and borrow crypto assets. The protocol is designed to provide a secure and efficient platform for decentralized finance (DeFi) activities.
# Data Indexing and Analytics
Data indexing solutions and other APIs streamline access to blockchain data, enabling efficient querying and real-time analysis of on-chain events. This is crucial for decentralized applications built on World Chain, as it reduces the cost of processing, and presenting data. APIs also facilitate
third-party integration, enhancing developer experiences and expanding the ecosystem with more accessible, decentralized apps (dApps) and services.
## Dune
[Dune Analytics](https://dune.com/) is a blockchain data platform that enables users to query, visualize, and share insights from on-chain data.
It provides a powerful interface for querying blockchain information using SQL-like queries, allowing users
to create custom dashboards and visualizations.
Dune’s enhanced data accessibility and insights will give developers and non-developers on World Chain the
ability to:
- Explore metrics related to real humans interacting on the chain
- Track the performance of DeFi protocols and DEXes
- Explore onchain data of any public blockchain project
With Dune’s comprehensive dataset and web-based app, anyone (with a little SQL knowledge) may quickly query World Chain data and create insightful dashboards.
For more data on [World](https://world.org/) and [World Chain](https://world.org/world-chain), visit the World Data Dashboards on Dune:
- [World Chain](https://dune.com/blockchains/worldchain)
- [World](https://dune.com/world/world)
### Supported networks
- World Chain
## Zerion API
[The Zerion API](https://zerion.io/api) can be used to build feature-rich web3 apps, wallets, and protocols with ease.
Across all major blockchains, you can access wallets, assets, and chain data for web3 portfolios.
### Supported networks
- World Chain
## GoldSky Subgraphs
GoldSky Subgraphs is a data indexing service designed to simplify querying blockchain data. It provides developers with scalable, customizable subgraphs for
efficiently indexing and retrieving on-chain data from various blockchain networks. GoldSky streamlines data access for decentralized applications (dApps),
offering a user-friendly interface and advanced APIs that help developers query blockchain data faster and more accurately.
### Supported networks
- World Chain
## Alchemy Subgraphs
[Alchemy Subgraphs](https://docs.alchemy.com/reference/subgraphs-quickstart) provide fast, reliable blockchain indexing and community APIs.
### Supported networks
- World Chain
- World Chain Sepolia
## QuickNode
Build real-time data processing pipelines with QuickNode Streams. Get instant access to World Chain data feeds with custom webhooks, filtering, and automatic retries. Backfill historical blockchain data in minutes with our ETL tools. Perfect for indexers, analytics platforms, and data-intensive applications.
### Supported Resources
- [Streams](https://www.quicknode.com/streams)
- [Backfills](https://www.quicknode.com/streams/backfills)
### Supported networks
- World Chain
- World Chain Sepolia
# Developer Tooling
## Alchemy
Alchemy provides a suite of data tools to make it easy to build on World Chain:
- [APIs](https://docs.alchemy.com/reference/token-api-quickstart) provide out-of-the-box solutions to retrieve fungible token balances, metadata, and historical transaction activity.
- [Webhooks](https://docs.alchemy.com/reference/notify-api-quickstart) allow you to configure real-time push notifications for on-chain activity.
- [Subgraphs](https://docs.alchemy.com/reference/subgraphs-quickstart) provide fast, reliable blockchain indexing and community APIs.
### Supported networks
- World Chain
- World Chain Sepolia
## Blocknative
[Blocknative's Gas Price API](https://docs.blocknative.com/gas-prediction/gas-platform) predicts next-block gas prices.
### Supported networks
- World Chain
## QuickNode
Access comprehensive developer tools built for World Chain:
- [RPC API](https://www.quicknode.com/core-api)
- [Streams](https://www.quicknode.com/streams)
- [Functions](https://www.quicknode.com/functions)
- [Dedicated Clusters](https://www.quicknode.com/clusters)
- [Rollup Deployer](https://www.quicknode.com/rollup)
Each tool is designed for production-grade applications with enterprise-level support and documentation.
### Supported networks
- World Chain
- World Chain Sepolia
## Tenderly
[Tenderly](https://tenderly.co/) is a blockchain development platform that provides tools for building, monitoring,
and managing smart contracts on Ethereum and other EVM-compatible chains.
It offers features like real-time transaction monitoring, debugging, and advanced analytics
to help developers optimize and maintain their decentralized applications (dApps).
### Supported networks
- World Chain
- World Chain Sepolia
## Thirdweb
[Thirdweb](https://thirdweb.com/) is a comprehensive web3 development platform that provides a full-stack, open-source toolkit for building decentralized applications on EVM-compatible chains. It offers frontend SDKs for connecting users to web3, backend APIs for scalable smart contract interactions, and a suite of pre-built, audited smart contracts. Thirdweb's platform simplifies the development process by providing tools for wallet integration, NFT minting, payment processing, and user onboarding, allowing developers to create sophisticated web3 applications with ease across various verticals including gaming, creator platforms, and enterprise solutions.
### Supported networks
- World Chain
- World Chain Sepolia
## Worldscan (Etherscan)
[Worldscan](https://worldscan.org/) (provided by [Etherscan](https://etherscan.io/)) provides several valuable features for developers working with the Ethereum blockchain.
Here are some key developer-focused features offered by Etherscan:
- API access to the World Chain Blockchain explorer
- Smart contract verification
- Smart contract analytics
- Gas Tracking
### Supported networks
- [World Chain](https://worldscan.org/)
- [World Chain Sepolia](https://sepolia.worldscan.org/)
# Explorers
## Blockscout
A [Blockscout](https://blockscout.com/) explorer is available for [World Chain](https://worldchain-mainnet.explorer.alchemy.com/) provided by Alchemy.
Blockscout is a comprehensive, open-source blockchain explorer designed for inspecting and analyzing EVM (Ethereum Virtual Machine) based blockchains.
A testnet explorer is also available for [World Chain Sepolia](https://worldchain-sepolia.explorer.alchemy.com/).
## Dora
[Dora](https://www.ondora.xyz/network/worldchain/interactions) is an advanced multi-chain block explorer and unified search engine designed for the evolving blockchain ecosystem.
It offers users the ability to search and interact with data across more than 10 different networks, including World Chain.
It is an innovative blockchain explorer and search engine designed for the multichain and multi-VM world.
## Worldscan (Etherscan)
[Worldscan](https://worldscan.org) (provided by [Etherscan](https://etherscan.io)) is a comprehensive blockchain explorer and analytics platform specifically designed for the World Chain network.
It allows users to search, verify, and analyze transactions, addresses, smart contracts, and tokens on the World Chain blockchain. [World Chain Sepolia](https://sepolia.worldscan.org/) is also supported.
Worldscan provides tools to help you view transaction data and debug smart contracts:
- Search by address, transaction hash, batch, or token
- View, verify, and interact with smart contract source code
- View detailed transaction information
- View L1-to-L2 and L2-to-L1 transactions
# Nodes
## Alchemy
[Alchemy](https://alchemy.com/) is a leading blockchain development platform that provides robust node provisioning services for Web3 applications on World Chain.
Alchemy's node infrastructure services simplify the process of building, deploying, and scaling
blockchain applications by providing developers with access to a network of nodes on an on-demand basis.
For access to a World Chain node, check out the [World Chain Alchemy page](https://www.alchemy.com/world-chain).
### Supported networks
- World Chain
- World Chain Sepolia
## Blast API
Blast API offers standardized blockchain API services for Web3 development, allowing users to generate dedicated endpoints (RPC/WSS/REST) for supported blockchain networks. The platform employs geographically distributed third-party nodes to ensure reliability, low latency, and decentralization.
### Supported networks
- World Chain
## QuickNode
Enterprise-grade infrastructure for World Chain development with global edge delivery. Build with high-performance RPC APIs, real-time data streaming/ETL capabilities, decentralized storage via IPFS, and extensive developer tools through our marketplace. Ideal for teams building production-grade applications on World Chain.
QuickNode offers several benefits for developers building on World Chain, read more [here](https://quicknode.notion.site/QuickNode-Benefits-for-WorldChain-Developers-14b15a82e84c807ba912cc1a6a8a5c4a)!
### Supported networks
- [World Chain](https://www.quicknode.com/chains/worldchain)
- [World Chain Sepolia](https://www.quicknode.com/chains/worldchain)
- [Documentation](https://www.quicknode.com/chains/worldchain)
## Tenderly RPC
[Tenderly](https://tenderly.co/) is a blockchain development platform that provides tools for building, monitoring, and managing smart contracts on Ethereum and other EVM-compatible chains. They also provide node infrastructure services for World Chain.
### Supported networks
- World Chain
- World Chain Sepolia# Onramps
## Ramp Network
[Ramp Network](https://ramp.network/) is a fintech company that provides a seamless, non-custodial fiat-to-crypto and crypto-to-fiat onramp solution for decentralized applications, wallets, and platforms. It enables users to buy, sell, and trade cryptocurrencies directly through integrated services without leaving the app they are using. Ramp focuses on simplifying the process for users by handling complex regulatory compliance, identity verification (KYC), and liquidity provisioning,
making it easier for businesses to integrate crypto transactions into their services.
Their API is widely used by developers to onboard users into the crypto ecosystem with minimal friction.
## Alfred pay
[Alfred Pay](https://www.alfredpay.io/) is a fintech company focused on bridging the gap between traditional financial systems and digital assets, specifically across Latin America. It offers a fiat-to-crypto and crypto-to-fiat gateway service, enabling users and businesses to easily move between digital currencies and local fiat currencies.
## Moonpay
[MoonPay](https://www.moonpay.com/) is a global fintech platform that simplifies the process of buying and selling cryptocurrencies. It provides a seamless fiat-to-crypto and crypto-to-fiat service, allowing users to purchase digital assets like Bitcoin and Ethereum using traditional payment methods such as credit cards, bank transfers, and mobile payment options. MoonPay also offers APIs and SDKs for developers to integrate crypto transactions into their applications.
# Paymasters
## Alchemy
[Alchemy Paymasters](https://www.alchemy.com/overviews/what-is-a-paymaster) are smart contracts that enable decentralized applications (dApps) to implement flexible gas policies, including:
- Sponsoring gas fees for users
- Accepting gas payments in ERC-20 tokens instead of native blockchain currency
### Supported Networks
- World Chain
- World Chain Sepolia
## Pimlico
[Pimlico](https://pimlico.io/) provides account abstraction infrastructure including [paymasters](https://docs.pimlico.io/infra/paymaster) and [bundlers](https://docs.pimlico.io/infra/bundler). They offer two types of paymasters to abstract away gas fees for users in the ERC-4337 ecosystem.
A verifying paymaster allows developers to sponsor on-chain gas fees for users, it utilizes an off-chain Pimlico balance loaded through a dashboard and an ERC-20 paymaster which is a permissionless on-chain smart contract that enables users to pay gas fees using their ERC-20 tokens and operates without requiring developer intervention.
Pimlico's paymasters can be seamlessly integrated with [permissionless.js](https://docs.pimlico.io/permissionless), a TypeScript library built on [viem](https://github.com/wevm/viem/) for ERC-4337 development .
### Supported Networks
- World Chain
- World Chain Sepolia
## Thirdweb
Not only does [Thirdweb](thirdweb.com/) provide developer tools, but they also have [ERC-4337 compliant smart contract accounts](https://portal.thirdweb.com/contracts/build/base-contracts/erc-4337) with role-based permission control. They offer two main types: Simple and Managed smart accounts.
### Supported Networks
- World Chain
- World Chain Sepolia# World Chain data dashboards
Worldcoin has partnered with several [data providers](/world-chain/providers/data) which have indexed World Chain data and serve it to
developers and data analysts through their APIs. As part of our ongoing efforts for transparency and accountability through open-sourcing
our technologies like the orb hardware, orb firmware, biometrics pipeline, World ID protocol and most other components of the Worldcoin ecosystem,
we believe that having open-source data and dashboards that showcase the progress of the Worldcoin project is essential.
You can find all of the main dashboards that track World Chain, World App and Worldcoin metrics in the [World Dune dashboard](https://dune.com/world/world).
If you want to see Dune dashboards that are specific to World Chain, check out [this Dune page](https://dune.com/blockchains/worldchain).
Another very important dashboard is the [L2BEAT World Chain dashboard](https://l2beat.com/scaling/projects/world) which shows all the metrics related to the OP Stack which includes a security,
decentralization and scalability assessment, risk analysis table and a TVL dashboard.# How is World Chain different?
World Chain is built on the OP Stack and is part of the Superchain, it uses the EVM for execution and Ethereum for data availability and finality.
These are standard properties of all Superchain networks, however, there are several features that make World Chain unique. World Chain is a network
built for unique humans and its features reflect that.
## Priority Blockspace for Humans
While it's open for everyone, World Chain was designed to prioritize anonymously verified human interactions over bots and AI through direct protocol integrations
with [World ID](https://world.org/world-id) for proof-of-human verification. One of the initial protocol integrations being worked on is Priority Blockspace for Humans (PBH).
PBH enables verified users to execute transactions guaranteeing top of block inclusion, enabling a more frictionless user experience.
PBH ensures that ordinary users aren't unfairly disadvantaged by automated systems, greatly mitigates the impact of [MEV](https://ethereum.org/en/developers/docs/mev/) attacks and exploits,
and reduces the need to pay significant gas fees to be included in a block. PBH also enables future flexibility, allowing for a separate EIP-1559-style
market for human transactions.
If you want to learn the details of how Priority Blockspace for Humans will work, please read the [World Blog PBH article](https://world.org/blog/engineering/introducing-pbh-priority-blockspace-for-humans).
If you are interested in PBH, how it works or if you would like to apply for a grant to help contribute to the roadmap, check out the [Human Collective Grants section](/world-chain/developers/grants)
or send us a message to grants@worldcoin.org.
## Gas Allowance for Humans
Not only do humans get priority inclusion on World Chain through PBH, but they also will have a gas stipend to transact on World Chain for free.
Initially the stipend to fund this gas allowance will be provided by the [World Foundation](https://worldcoin.foundation) with the goal of progressive
decentralization allowing World governance to set it.
There are two main approaches to implement the gas allowance, one option is on the app/wallet level through the use of account abstraction and the other one
is to set it at the OP Stack level through sequencer reimbursements or separate fee markets for unique humans where unique humans are not charged or their fees are paid for
by non-human transactions in the mempool which are executed by the sequencer. The simplest one is to implement a World ID gatekept [EIP4337](https://www.erc4337.io/) [paymaster](https://www.alchemy.com/overviews/what-is-a-paymaster)
where each `userOp` or group of `userOps` per user requires a World ID proof. More details on gas allowance for humans coming soon.
# Funding a Wallet
<Note>Make sure that whatever assets you are bridging to and from World Chain are always supported by your wallet and the exchange you are using.
Depositing an unsupported asset on an unsupported chain to an unsupported wallet or exchange will result in loss of funds.</Note>
In order to use World Chain you will need an [EVM-compatible wallet](https://ethereum.org/en/wallets/) such as MetaMask, Rabby, or any other wallet where you can add custom EVM networks.
If you are a user of World App then you can use the built-in wallet to interact with World Chain as well as the existing onramps and offramps which are integrated into the app.
The [Ethereum.org website](https://ethereum.org/en/) has [a great explainer on wallets](https://ethereum.org/en/wallets/) which goes into more detail on how to choose a wallet that is right for you.
## Bridging from Ethereum
If you are coming from Ethereum, you can bridge your assets to World Chain using the bridge interface provided by [Alchemy](https://worldchain-mainnet.bridge.alchemy.com/) which is an interface to the native OP Stack bridge contract that allows you to move assets between Ethereum and World Chain natively.
Since World Chain is an optimistic rollup, built on the [OP Stack](https://docs.optimism.io/stack/getting-started) and part of the [Superchain](https://docs.optimism.io/superchain/superchain-explainer) it takes about 7 days to withdraw from World Chain back to Ethereum through the native bridge as
the OP Stack needs to wait for [the fault proof period](https://docs.optimism.io/stack/fault-proofs/explainer) to expire before the L2 finalizes and the assets can be withdrawn back to Ethereum.
## Superchain interop (coming soon)
If you are coming from another OP Stack L2 which is part of the Superchain, you will soon be able to migrate assets seamlessly between the L2s using the Superchain bridge interface which is currently under development and is estimated to come by end of year.
If you want to learn more you can read the [interoperability explainer in the OP Stack documentation](https://docs.optimism.io/stack/interop/explainer).
## Bridging from another network
There are several other bridges live between different L2s that are provided by multiple third parties that leverage different bridging mechanisms. The World Chain documentation has a [bridge section](/world-chain/providers/bridges) that lists several bridges that support the network.
## Bridging from an exchange or onramp provider
If you are coming from an exchange or [onramp provider](/world-chain/providers/onramps) that supports World Chain and you already have a wallet that supports the network then you can deposit your assets directly to your wallet.
import { ButtonWorldChain } from '@/components/ButtonWorldChain';
# How to start using World Chain
In order to start using World Chain, you need to add the World Chain network to your wallet of choice. Either by clicking the button below:
<Row>
<ButtonWorldChain className="h-20 w-80 !text-black !bg-white border border-black hover:!bg-gray-100" >
Add World Chain
</ButtonWorldChain>
<ButtonWorldChain testnet={true} className="h-20 w-80 text-black bg-white border border-black">
Add World Chain Sepolia
</ButtonWorldChain>
</Row>
Or by manually adding the information available in the <a href='/world-chain/quick-start/info/'>World Chain network section below</a>.# Network Information
## World Chain Mainnet
<table>
<tbody>
<tr>
<td className="align-middle">Framework</td>
<td className="align-middle">[OP Stack](https://docs.optimism.io/)</td>
</tr>
<tr>
<td className="align-middle">Chain ID</td>
<td className="align-middle">[ID480 (`0x1e0`)](https://chainlist.org/?search=World+Chain&testnets=false)</td>
</tr>
<tr>
<td className="align-middle">EIP-3770 Short Name:</td>
<td className="align-middle">`wc`</td>
</tr>
<tr>
<td className="align-middle">Settlement layer</td>
<td className="align-middle">Ethereum</td>
</tr>
<tr>
<td className="align-middle">Data availability</td>
<td className="align-middle">Ethereum</td>
</tr>
<tr>
<td className="align-middle">Gas Limit</td>
<td className="align-middle">30M</td>
</tr>
<tr>
<td className="align-middle">Gas Target</td>
<td className="align-middle">15M</td>
</tr>
<tr>
<td className="align-middle">Block Time</td>
<td className="align-middle">2s</td>
</tr>
</tbody>
</table>
<table>
<thead>
<th>Important Links</th>
<th>URLs</th>
</thead>
<tbody>
<tr>
<td className="align-middle">Bridge</td>
<td className="align-middle">[worldchain-mainnet.bridge.alchemy.com](https://worldchain-mainnet.bridge.alchemy.com)</td>
</tr>
<tr>
<td className="align-middle">Block Explorer</td>
<td className="align-middle">[worldscan.org](https://worldscan.org)</td>
</tr>
<tr>
<td className="align-middle">Status Page</td>
<td className="align-middle">[worldchain-mainnet-status.alchemy.com](https://worldchain-mainnet-status.alchemy.com)</td>
</tr>
<tr>
<td className="align-middle">RPC</td>
<td className="align-middle">[worldchain-mainnet.g.alchemy.com/public](https://worldchain-mainnet.g.alchemy.com/public)</td>
</tr>
<tr>
<td className="align-middle">Developer Telegram</td>
<td className="align-middle">[@worldcoindevelopers](https://t.me/worldcoindevelopers)</td>
</tr>
</tbody>
</table>
## World Chain Sepolia Testnet
<table>
<tbody>
<tr>
<td className="align-middle">Framework</td>
<td className="align-middle">[OP Stack](https://docs.optimism.io/)</td>
</tr>
<tr>
<td className="align-middle">Chain ID</td>
<td className="align-middle">[ID4801 (`0x12C1`)](https://chainlist.org/?search=World+Chain&testnets=true)</td>
</tr>
<tr>
<td className="align-middle">EIP-3770 Short Name:</td>
<td className="align-middle">`wcsep`</td>
</tr>
<tr>
<td className="align-middle">Settlement layer</td>
<td className="align-middle">Ethereum Sepolia</td>
</tr>
<tr>
<td className="align-middle">Data availability</td>
<td className="align-middle">Ethereum Sepolia</td>
</tr>
<tr>
<td className="align-middle">Gas Limit</td>
<td className="align-middle">30M</td>
</tr>
<tr>
<td className="align-middle">Gas Target</td>
<td className="align-middle">15M</td>
</tr>
<tr>
<td className="align-middle">Block Time</td>
<td className="align-middle">2s</td>
</tr>
</tbody>
</table>
<table>
<thead>
<th>Important Links</th>
<th>URLs</th>
</thead>
<tbody>
<tr>
<td className="align-middle">Bridge</td>
<td className="align-middle">[worldchain-sepolia.bridge.alchemy.com](https://worldchain-sepolia.bridge.alchemy.com)</td>
</tr>
<tr>
<td className="align-middle">Block Explorer</td>
<td className="align-middle">[worldchain-sepolia.explorer.alchemy.com](https://worldchain-sepolia.explorer.alchemy.com)</td>
</tr>
<tr>
<td className="align-middle">Status Page</td>
<td className="align-middle">[worldchain-sepolia-status.alchemy.com](https://worldchain-sepolia-status.alchemy.com)</td>
</tr>
<tr>
<td className="align-middle">Faucet</td>
<td className="align-middle">[worldchain-sepolia.g.alchemy.com/public](https://www.alchemy.com/faucets/world-chain-sepolia)</td>
</tr>
<tr>
<td className="align-middle">RPC</td>
<td className="align-middle">[worldchain-sepolia.g.alchemy.com/public](https://worldchain-sepolia.g.alchemy.com/public)</td>
</tr>
</tbody>
</table>
import { Link } from '@/components/Link'
# Why World Chain?
The [World App](https://world.org/world-app) has undergone several transitions and it has lived on multiple chains over time.
First it was [Hubble](https://github.com/worldcoin/hubble-commander), an open-source optimismtic rollup with [BLS signature aggregation](https://hackmd.io/@benjaminion/bls12-381) of ERC20 transfers,
then it was [Polygon PoS](https://polygon.technology/polygon-pos), recently [OP mainnet](https://www.optimism.io/) and now [World Chain](https://world.org/world-chain). There were several motivating
factors for all of these changes.
## Onchain evolution
Originally, the main target use case of World App was payments and WLD grants (pre-launch beta version), but as we required other applications such as DeFi and identity,
World App was migrated to Polygon PoS as it provided full EVM programmability and access to tools, infrastructure and applications like
<Link href="https://world.org/blog/announcements/introducing-world-chain">Safe smart contract wallets</Link> DEXes and liquidity like [Uniswap](https://app.uniswap.org/),
and plenty of others that directly provided utility to World App, [World ID](https://world.org/world-id), their users and the wider
World ecosystem of applications and integrations. Another big motivating factor is cost, security,
decentralization and ecosystem network effects which were the main motivators behind the switch from Polygon PoS
to OP mainnet.
As the rollup-centric roadmap became the foundation of Ethereum scalability, solutions became adopted enough and reached a
certain point of maturity, it made sense to migrate World App over as it benefits a lot from all of the other
integrations, applications and infrastructure that were and are available on OP mainnet. We migrated over ahead of
our launch on July 24th 2023 and over the upcoming year World App reached a peak of [60% of OP mainnet blockspace consumption](https://dune.com/queries/491942/932394) (over a 30 day period).
As World App starts demanding more and more blockspace in order to support the goal of the largest digital identity and financial network with over a billion unique humans,
it will require further scaling the network it operates under. Which is why World Chain exists, it has pristine blockspace for the World App and the World ID ecosystem of applications. For more details on
World Chain you can read our <Link href="https://world.org/blog/announcements/introducing-world-chain">Introducing World Chain blogpost</Link>.
World Chain will allow World App, World ID and their ecosystems to scale throughput, increase gas limits, data availability and its overall scalability as the OP Stack improves with better execution clients, higher Ethereum blob counts and sizes (more DA) and plenty
of other technological improvements.
## What is different about World Chain?
The main differentiating properties of World Chain compared to other L2s or other Superchain members are that World Chain is a blockchain made for humans, where the transactions of unique humans have priority and where they also have a free allowance, just for being
a World ID verified unique human using proof of personhood. More on these features in the [Priority Blockspace for Humans and Free Gas Allowance sections](/world-chain/quick-start/features) Compared to other L2s one other very big differentiator is the number of unique users that World App brings with it,
and the possibilities for use cases and applications used by millions of unique humans will bring.
## Further resources
If you want to learn more about World Chain, OP Stack and the Superchain, you can take a look at the resources below:
- [A New World: World Chain and Priority Blockspace for Humans ft. Liam Horne](https://www.youtube.com/watch?v=NSxyKsSwjsc&ab_channel=World)
- [Encode x World Educate Series: World Chain and the OP Stack](https://www.youtube.com/watch?v=7pt8c5fy-xg&ab_channel=EncodeClub)
- [OP Mainnet docs](https://docs.optimism.io/app-developers/building-apps)
- [OP Stack docs](https://docs.optimism.io/stack/getting-started)
- [Superchain docs](https://docs.optimism.io/superchain/superchain-explainer)
# Address Book
## Tokens
<table>
<thead>
<tr>
<th>Contract</th>
<th>World Chain Mainnet Address</th>
</tr>
</thead>
<tbody>
<tr>
<td className="align-middle">WLD</td>
<td className="align-middle">[`0x2cfc85d8e48f8eab294be644d9e25c3030863003`](https://worldscan.org/address/0x2cFc85d8E48F8EAB294be644d9E25C3030863003)</td>
</tr>
<tr>
<td className="align-middle">WBTC</td>
<td className="align-middle">[`0x03c7054bcb39f7b2e5b2c7acb37583e32d70cfa3`](https://worldscan.org/address/0x03c7054bcb39f7b2e5b2c7acb37583e32d70cfa3)</td>
</tr>
<tr>
<td className="align-middle">SDAI</td>
<td className="align-middle">[`0x859dbe24b90c9f2f7742083d3cf59ca41f55be5d`](https://worldscan.org/address/0x859dbe24b90c9f2f7742083d3cf59ca41f55be5d)</td>
</tr> <tr>
<td className="align-middle">WETH</td>
<td className="align-middle">[`0x4200000000000000000000000000000000000006`](https://worldscan.org/address/0x4200000000000000000000000000000000000006)</td>
</tr> <tr>
<td className="align-middle">USDC.e</td>
<td className="align-middle">[`0x79A02482A880bCE3F13e09Da970dC34db4CD24d1`](https://worldscan.org/address/0x79A02482A880bCE3F13e09Da970dC34db4CD24d1)</td>
</tr> <tr>
<td className="align-middle">L1 OpUSDCBridgeAdapter (Ethereum mainnet)</td>
<td className="align-middle">[`0x153A69e4bb6fEDBbAaF463CB982416316c84B2dB`](https://etherscan.io/address/0x153A69e4bb6fEDBbAaF463CB982416316c84B2dB)</td>
</tr>
</tbody>
</table>
## World ID
<table>
<thead>
<tr>
<th>Contract</th>
<th>World Chain Mainnet Address</th>
</tr>
</thead>
<tbody>
<tr>
<td className="align-middle">WorldIDAddressBook</td>
<td className="align-middle">[`0x57b930D551e677CC36e2fA036Ae2fe8FdaE0330D`](https://worldscan.org/address/0x57b930D551e677CC36e2fA036Ae2fe8FdaE0330D)</td>
</tr>
<tr>
<td className="align-middle">WorldIDRouter</td>
<td className="align-middle">[`0x17B354dD2595411ff79041f930e491A4Df39A278`](https://worldscan.org/address/0x17B354dD2595411ff79041f930e491A4Df39A278)</td>
</tr>
</tbody>
</table>
## **Gnosis Safe 1.3.0**
<table>
<thead>
<tr>
<th>Contract</th>
<th>World Chain Mainnet Address</th>
</tr>
</thead>
<tbody>
<tr>
<td className="align-middle">HelperBatch Contract</td>
<td className="align-middle">[`0x8d98006269238CAEd033b2d94661B29312AD09b7`](https://worldscan.org/address/0x8d98006269238CAEd033b2d94661B29312AD09b7)</td>
</tr>
<tr>
<td className="align-middle">SafeL2Singleton</td>
<td className="align-middle">[`0xd9Db270c1B5E3Bd161E8c8503c55cEABeE709552`](https://worldscan.org/address/0xd9Db270c1B5E3Bd161E8c8503c55cEABeE709552)</td>
</tr>
<tr>
<td className="align-middle">SafeProxyFactory</td>
<td className="align-middle">[`0xa6B71E26C5e0845f74c812102Ca7114b6a896AB2`](https://worldscan.org/address/0xa6B71E26C5e0845f74c812102Ca7114b6a896AB2)</td>
</tr>
</tbody>
</table>
## **Gnosis Safe 1.4.1**
<table>
<thead>
<tr>
<th>Contract</th>
<th>World Chain Mainnet Address</th>
</tr>
</thead>
<tbody>
<tr>
<td className="align-middle">HelperBatch Contract</td>
<td className="align-middle">[`0x866087c23a7eE1fD5498ef84D59aF742f3d4b322`](https://worldscan.org/address/0x866087c23a7eE1fD5498ef84D59aF742f3d4b322)</td>
</tr>
<tr>
<td className="align-middle">SafeL2Singleton</td>
<td className="align-middle">[`0x29fcB43b46531BcA003ddC8FCB67FFE91900C762`](https://worldscan.org/address/0x29fcB43b46531BcA003ddC8FCB67FFE91900C762)</td>
</tr>
<tr>
<td className="align-middle">SafeProxyFactory</td>
<td className="align-middle">[`0x4e1DCf7AD4e460CfD30791CCC4F9c8a4f820ec67`](https://worldscan.org/address/0x4e1DCf7AD4e460CfD30791CCC4F9c8a4f820ec67)</td>
</tr>
</tbody>
</table>
## **Gnosis Modules**
<table>
<thead>
<tr>
<th>Contract</th>
<th>World Chain Mainnet Address</th>
</tr>
</thead>
<tbody>
<tr>
<td className="align-middle">TimeBasedAllowance Module</td>
<td className="align-middle">[`0xa9bcF56d9FCc0178414EF27a3d893C9469e437B7`](https://worldscan.org/address/0xa9bcF56d9FCc0178414EF27a3d893C9469e437B7)</td>
</tr>
<tr>
<td className="align-middle">4337 Module</td>
<td className="align-middle">[`0x75cf11467937ce3F2f357CE24ffc3DBF8fD5c226`](https://worldscan.org/address/0x75cf11467937ce3F2f357CE24ffc3DBF8fD5c226)</td>
</tr>
<tr>
<td className="align-middle">AddModules Helper</td>
<td className="align-middle">[`0x4e1DCf7AD4e460CfD30791CCC4F9c8a4f820ec67`](https://worldscan.org/address/0x4e1DCf7AD4e460CfD30791CCC4F9c8a4f820ec67)</td>
</tr>
</tbody>
</table>
## Uniswap
<table>
<thead>
<tr>
<th>Contract</th>
<th>World Chain Mainnet Address</th>
</tr>
</thead>
<tbody>
<tr>
<td className="align-middle">ApprovalSwap</td>
<td className="align-middle">[`0xf4305dd6256dc2b0d07caaf2953688defbc86e9d`](https://worldscan.org/address/0xf4305dd6256dc2b0d07caaf2953688defbc86e9d)</td>
</tr>
<tr>
<td className="align-middle">v3CoreFactoryAddress</td>
<td className="align-middle">[`0x7a5028BDa40e7B173C278C5342087826455ea25a`](https://worldscan.org/address/0x7a5028BDa40e7B173C278C5342087826455ea25a)</td>
</tr>
<tr>
<td className="align-middle">AddModules Helper</td>
<td className="align-middle">[`0x091AD9e2e6e5eD44c1c66dB50e49A601F9f36cF6`](https://worldscan.org/address/0x091AD9e2e6e5eD44c1c66dB50e49A601F9f36cF6)</td>
</tr>
<tr>
<td className="align-middle">Multicall2Address</td>
<td className="align-middle">[`0x0a22c04215c97E3F532F4eF30e0aD9458792dAB9`](https://worldscan.org/address/0x0a22c04215c97E3F532F4eF30e0aD9458792dAB9)</td>
</tr>
<tr>
<td className="align-middle">ProxyAdminAddress</td>
<td className="align-middle">[`0x8B52DaCB7B5d9A959CDcD5419061c0eDD1296c29`](https://worldscan.org/address/0x8B52DaCB7B5d9A959CDcD5419061c0eDD1296c29)</td>
</tr>
<tr>
<td className="align-middle">TickLensAddress</td>
<td className="align-middle">[`0xE61df0CaC9d85876aCE5E3037005D80943570623`](https://worldscan.org/address/0xE61df0CaC9d85876aCE5E3037005D80943570623)</td>
</tr>
<tr>
<td className="align-middle">NftDescriptorLibraryAddressV1_3_0</td>
<td className="align-middle">[`0x38c68A1D60C47973EcE5bc1725B65D8Bec438192`](https://worldscan.org/address/0x38c68A1D60C47973EcE5bc1725B65D8Bec438192)</td>
</tr>
<tr>
<td className="align-middle">NonfungibleTokenPositionDescriptorAddressV1_3_0</td>
<td className="align-middle">[`0x70410a302c4a5c52C659b780941c947Abd437FeB`](https://worldscan.org/address/0x70410a302c4a5c52C659b780941c947Abd437FeB)</td>
</tr>
<tr>
<td className="align-middle">DescriptorProxyAddress</td>
<td className="align-middle">[`0xe6FcB4952b2d3Fab6DA4BC165831f5575e093feC`](https://worldscan.org/address/0xe6FcB4952b2d3Fab6DA4BC165831f5575e093feC)</td>
</tr>
<tr>
<td className="align-middle">NonfungibleTokenPositionManagerAddress</td>
<td className="align-middle">[`0xec12a9F9a09f50550686363766Cc153D03c27b5e`](https://worldscan.org/address/0xec12a9F9a09f50550686363766Cc153D03c27b5e)</td>
</tr>
<tr>
<td className="align-middle">V3MigratorAddress</td>
<td className="align-middle">[`0x9EBDdCBa71C9027E1eB45135672a30bcFEec9de3`](https://worldscan.org/address/0x9EBDdCBa71C9027E1eB45135672a30bcFEec9de3)</td>
</tr>
<tr>
<td className="align-middle">V3StakerAddress</td>
<td className="align-middle">[`0x053956ab1618EcaCc135Ebc18Fd7564979aD4295`](https://worldscan.org/address/0x053956ab1618EcaCc135Ebc18Fd7564979aD4295)</td>
</tr>
<tr>
<td className="align-middle">QuoterV2Address</td>
<td className="align-middle">[`0x10158D43e6cc414deE1Bd1eB0EfC6a5cBCfF244c`](https://worldscan.org/address/0x10158D43e6cc414deE1Bd1eB0EfC6a5cBCfF244c)</td>
</tr>
</tbody>
</table>
## Grants
<table>
<thead>
<tr>
<th>Contract</th>
<th>World Chain Mainnet Address</th>
</tr>
</thead>
<tbody>
<tr>
<td className="align-middle">WLDGrant</td>
<td className="align-middle">[`0x7DD5B6B5A574EFd452AC0cfE3e1B69384a03C6f9`](https://worldscan.org/address/0x7DD5B6B5A574EFd452AC0cfE3e1B69384a03C6f9?tab=contract)</td>
</tr>
<tr>
<td className="align-middle">RecurringGrantDrop</td>
<td className="align-middle">[`0x2c1Ca1FBbD5f28e5492Cc6bF8C4e8c57354eb162`](https://worldscan.org/address/0x2c1Ca1FBbD5f28e5492Cc6bF8C4e8c57354eb162?tab=contract)</td>
</tr>
<tr>
<td className="align-middle">WLDGrantReservations</td>
<td className="align-middle">[`0x3a00fe3254c94c4689cb5163c91ee501d942e710`](https://worldscan.org/address/0x3a00fE3254c94C4689CB5163c91Ee501D942E710?tab=contract)</td>
</tr>
<tr>
<td className="align-middle">RecurringGrantDropReservations</td>
<td className="align-middle">[`0xc2D270651cEF0AA3734c9A7fEaCd3b3B39e36e18`](https://worldscan.org/address/0xc2D270651cEF0AA3734c9A7fEaCd3b3B39e36e18?tab=contract)</td>
</tr>
<tr>
<td className="align-middle">Grants4FirstBatch</td>
<td className="align-middle">[`0xae3f204c75e46c27f66c843bc9f3bbd04a6374c5`](https://worldscan.org/address/0xaE3f204c75E46C27f66C843bC9F3Bbd04a6374c5?tab=contract)</td>
</tr>
<tr>
<td className="align-middle">WLDVault</td>
<td className="align-middle">[`0x14a028cC500108307947dca4a1Aa35029FB66CE0`](https://worldscan.org/address/0x14a028cC500108307947dca4a1Aa35029FB66CE0?tab=contract)</td>
</tr>
</tbody>
</table>
## MiniKit
<table>
<thead>
<tr>
<th>Contract</th>
<th>World Chain Mainnet Address</th>
</tr>
</thead>
<tbody>
<tr>
<td className="align-middle">MinikitTransfer</td>
<td className="align-middle">[`0x9CC547e0Ca60dC249Eea2d91Ba12F00C4ca12787`](https://worldscan.org/address/0x9CC547e0Ca60dC249Eea2d91Ba12F00C4ca12787?tab=contract)</td>
</tr>
</tbody>
</table>
# How to set up a World Chain node
Follow this guide to set up your own World Chain node.
## Overview
World Chain mainnet and testnet run on the OP Stack as part of the Superchain. We provide a simple Docker Compose configuration for running World Chain nodes, [simple-worldchain-node](https://github.com/worldcoin-foundation/simple-worldchain-node). If you're interested in building a node from source, see the [documentation from Optimism](https://docs.optimism.io/builders/node-operators/tutorials/node-from-souce).
## Using `simple-worldchain-node`
`simple-worldchain-node` supports World Chain Mainnet and Sepolia, full nodes and archive nodes, and two execution clients: [op-geth](https://github.com/ethereum-optimism/op-geth) and [op-reth](https://github.com/paradigmxyz/reth).
### Installation
First, download [`simple-worldchain-node`](https://github.com/worldcoin-foundation/simple-worldchain-node) and create your `.env` file.
```bash {{ title: "Download simple-worldchain-node"}}
git clone https://github.com/worldcoin-foundation/simple-worldchain-node.git
cd simple-worldchain-node
cp .env.example .env
```
Ensure you have installed Docker and Docker Compose by following [this guide](https://docs.docker.com/compose/install/#scenario-three-install-the-docker-compose-standalone).
### Configuration
Open your `.env` file in an editor of your choice. The following values must be configured before starting your node.
<Properties>
<Property name="NETWORK_NAME" type="worldchain-mainnet | worldchain-sepolia" required={true}>
Used to select which network the node connects to, either `worldchain-mainnet` or `worldchain-sepolia`.
</Property>
<Property name="COMPOSE_PROFILES" type="geth | reth" required={true}>
Used to select your execution client, either `geth` (default) or `reth` (experimental).
</Property>
<Property name="GETH_NODE_TYPE" type="full | archive" required={true}>
When using `op-geth`, determines which type of node to run. Either `full` (less storage, but only recent history) or `archive` (more storage, all history).
</Property>
<Property name="L1_RPC_ENDPOINT" type="URL" required={true}>
An L1 (Ethereum) RPC endpoint. We recommend using [Alchemy](https://www.alchemy.com/) or [QuickNode](https://www.quicknode.com), but any Ethereum RPC provider or archive node will work.
</Property>
<Property name="L1_BEACON_RPC_ENDPOINT" type="URL" required={true}>
An L1 Beacon Archive RPC endpoint. Note that this is not the same as a standard RPC endpoint, as this is used to retrieve Blobs from the Ethereum Beacon Chain. We recommend using [QuickNode](https://www.quicknode.com/).
</Property>
<Property name="L1_RPC_TYPE" type="string" required={true}>
Selects which RPC provider is set in `OP_NODE__RPC_ENDPOINT`. This allows for more efficient syncing given different RPC capabilities. Choose from `alchemy`, `quicknode`, `erigon`, or `basic` for other RPC providers.
</Property>
</Properties>
For details on optional settings, see the `simple-worldchain-node` [README](https://github.com/worldcoin-foundation/simple-worldchain-node?tab=readme-ov-file#optional-configurations).
### Running your node
To start your node in the background, run the following command from the `simple-worldchain-node` folder:
```bash
docker compose up -d --build
```
To view logs for your node, run the following command:
```bash
docker compose logs -f --tail 10
```
To shut down your node:
```bash
docker compose down
```
### Monitoring your node
A Grafana dashboard is included to monitor your node. Access it by visiting [http://localhost:3000](http://localhost:3000) and logging in with these credentials:
- Username: `admin`
- Password: `worldchain`
### Upgrading your Node
When new versions of `op-geth`, `op-reth`, or `op-node` are released, we will update the `simple-worldchain-node` repository to use these new versions. You can then update your node to use these versions with the following commands:
```bash
git pull
docker compose pull
docker compose up -d --build
```# Bridging an Ethereum token to World Chain
## 1. Deploy your token on World Chain
Choose your preferred bridging framework and use it to deploy an ERC-20 for your token on World Chain.
We recommend using the framework provided by World Chain's [standard bridge contracts](https://github.com/ethereum-optimism/specs/blob/main/specs/protocol/bridges.md),
and deploying your token with the [OptimismMintableERC20Factory](/world-chain/developers/world-chain-contracts).
This deployment method offers guarantees that will streamline the approval process. If you opt for a different bridging framework,
it must be compatible with the standard bridge interface, or we may have difficulty supporting it.
## 2. Submit details for your token
Follow the instructions in the [GitHub repository](https://github.com/ethereum-optimism/ethereum-optimism.github.io) and submit a PR with the required details for your token.
You must specify a section for `worldchain-sepolia` and/or `worldchain` in your token’s data.json file.
The submission is straightforward if your token is already listed on the Superchain token list.
{/* TODO: confirm data.json slug*/}
## 3. Await final approval
The World team regularly reviews submissions, and you should receive a response within 24-72 hours, depending on whether the PR is submitted on a weekday, weekend, or holiday.# Superchain token bridging (coming soon)
<Note>The SuperchainERC20 standard will become the default standard for issuing tokens on the Superchain once the OP Stack Interop features are live on mainnet.
Currently the [Superchain token bridging standard](https://github.com/ethereum-optimism/specs/blob/main/specs/interop/token-bridging.md) documentation is a work in progress, so please stay tuned.</Note>
The [Superchain token bridging standard](https://github.com/ethereum-optimism/specs/blob/main/specs/interop/token-bridging.md) (`SuperchainERC20`) is a set of properties and an interface designed to enable ERC20 tokens
to be fungible across the Superchain using the official `SuperchainERC20Bridge`. This standard builds
upon the existing [ERC20 token standard](https://docs.openzeppelin.com/contracts/4.x/erc20) and implements the `ICrosschainERC20` interface, which includes
two key properties: only allowing the `SuperchainERC20Bridge` to call `crosschainMint` and `crosschainBurn` functions,
and ensuring the token is deployed at the same address on every chain in the Superchain.
The `SuperchainERC20Bridge` is a predeploy that works as an abstraction on top of the `L2ToL2CrossDomainMessenger` for token bridging.
It includes two main functions: `sendERC20`, which initiates a cross-chain transfer by burning tokens locally and sending a message
to the target chain, and `relayERC20`, which processes incoming messages and mints the corresponding amount of tokens on the destination
chain. This bridge utilizes the `L2ToL2CrossDomainMessenger` for replay protection, domain binding, and access to additional message information.
By implementing the `SuperchainERC20` standard, tokens can achieve fungibility across the Superchain while maintaining a trust-minimized bridging
solution. The standard's design ensures liquidity availability, which is fundamental to achieving fungibility, and removes the need for cross-chain
access control lists. Additionally, the standard allows for potential future enhancements, such as cross-chain transferFrom functionality and concatenated
actions for more complex cross-chain operations.
import { Link } from '@/components/Link'
# Core Concepts
World ID is built for easy integration, but here are a few core concepts that are helpful to understand before you start.
## Proof of Personhood
"Proof of Personhood" is distinct from many existing identity systems. It is a way to prove that a person is unique, without revealing any personal information. World ID is not KYC, and it does not disclose your identity or previous actions to anyone.
World ID supports multiple "Verification Levels" to prove that a person is a unique human. These levels provide different degrees of humanness assurance, accessibility, and protection against fraud.
<table>
<thead>
<tr>
<th>Verification Level</th>
<th>Humanness Level</th>
<th>Description</th>
</tr>
</thead>
<tbody>
<tr>
<td className="flex items-center"><img src="/icons/credential-phone.svg" alt="" className="h-8 w-8 m-0 mr-2" />Device</td>
<td className="align-middle">Medium</td>
<td className="align-middle">Unique mobile device check.</td>
</tr>
<tr>
<td className="align-middle"><img src="/icons/credential-orb.svg" alt="" className="h-8 w-8 m-0 mr-2 inline" />Orb</td>
<td className="align-middle">Strong</td>
<td className="align-middle">Biometric verification, uniqueness through iris (<Link href="https://world.org/blog/engineering/opening-orb-look-inside-worldcoin-biometric-imaging-device">details</Link>).</td>
</tr>
<tr>
<td className="flex items-center"><img src="/icons/credential-face.svg" alt="" className="h-8 w-8 m-0 mr-2" />Orb+</td>
<td className="align-middle">Very Strong</td>
<td className="align-middle">Orb verification, plus authentication which verifies the person using World ID is the legitimate holder.</td>
</tr>
</tbody>
</table>
## Vocabulary
Some terms are used throughout the World ID documentation. Here are a few of the most important ones:
- **World ID**: A user's self-custodial identity, as well as the name of the protocol.
- **Zero-Knowledge Proof (ZKP)**: A cryptographic method to prove that a statement is true without revealing any information about the statement itself. World ID uses ZKPs to prove that a user is verified without revealing the user's identity.
- **Nullifier Hash**: A component of the World ID ZKP; a unique identifier for a combination of a user, `app_id`, and action. It is used to prevent sybil attacks and ensure a user is only able to perform an action once.
- **Signal**: A component of the World ID ZKP; data attached to the proof that cannot be tampered with. An example may be a user's choice for a governance proposal.# OIDC Explainer
The following diagram outlines the general authentication flow for an integrating app:
<Fence className="bg-gray-50"></Fence>
## Registration
Before OIDC authentication can take place, developers must register their applications with Worldcoin. This is a one-time action. You can create a new application on the [Developer Portal](https://developer.worldcoin.org).
During registration, you will need to provide the following values:
- Redirect URIs: **Required**, list of approved websites the user can be redirected to after successful authentication.
- App name (also called client name): **Optional**, the name of the application that's displayed to users
<Note>
All redirect URIs must be over HTTPS, and contain no port numbers or URL fragments. For example, `https://app.example.com/login` is valid, but `https://app.example.com:3000/login` is not. Similarly, `https://app.example.com/login#foo` is not valid, but `https://app.example.com/login?foo=bar` is.
</Note>
After registration is complete, you will have a valid `app_id` that will be needed for every other step in the authentication process. This value is equivalent to `client_id` from the [OIDC specification](https://openid.net/specs/openid-connect-core-1_0.html#AuthRequest)
## Flows
World ID supports the [authorization code](https://openid.net/specs/openid-connect-core-1_0.html#CodeFlowAuth), [implicit](https://openid.net/specs/openid-connect-core-1_0.html#ImplicitFlowAuth), and [hybrid](https://openid.net/specs/openid-connect-core-1_0.html#HybridFlowAuth) flows from the OIDC spec. Applications can use any one of these flows to authenticate users.
_Generally_, applications should implement the authorization code flow, as it is more secure than the implicit flow. Applications without backend servers (that may be running purely client-side) are more suited to implicit authentication.
## Authentication
Authentication begins with a request to the `/authorize` endpoint.
When using the native Sign in with World ID page, most of the OIDC process is handled for you. You can begin the authentication cycle by redirecting your users to:
```
https://id.worldcoin.org/authorize?client_id={app_id}&response_type={code|token|id_token}&redirect_uri={encoded_redirect_url}&scope={scope}&state={state_value}&nonce={nonce_value}
```
Example values could be:
{/* cSpell:disable */}
- `client_id`: obtained from the Developer Portal (example: `app_lshSNnaJfdt6Sohu6YAA`).
- `response_type`: response type as specified in OIDC spec, remember to URL encode (example: `code%20id_token`).
- `redirect_uri`: where the user is redirected upon successful authentication. Must be on the approved redirect URI list which can always be updated in the Developer Portal (example: `https%3A%2F%2Fapp.example.com%2Flogin`).
- `scope`: space-separated list of scopes to request. Defaults to `openid` if not provided. (example: `openid%20profile%20email`).
- `state`: unique value used to track a user's session (example: `session_102030405060708090`).
- `nonce`: random value to prevent replay attacks (example: `z-dkEmoy_ujfk7B8uTiQpp`). Required when using the `id_token` response type.
{/* cSpell:enable */}
The user will then authenticate with their World ID via the World app. Once successfully authorized, the user is redirected back to your application. The redirect URL will contain a number of values, depending on the flow you are using.
### Redirect Responses
If using the default authorization code flow, the redirect URL will contain the following params:
- `code`: An authorization code that can be exchanged for an ID token
- `state`: The optional state value passed to the `/authorize` endpoint
If you received a response containing an _authorization code_, you must exchange it for an ID token on the `/token` endpoint. Request details can be [seen here](/world-id/reference/sign-in#exchange-code).
If using implicit flow, the redirect URL will contain the following params:
- `id_token`: A signed JWT identifying the user, and any requested scope information
<Note type="warning">ID tokens must always be verified, and should not be blindly accepted! Additionally, you must validate that the `nonce` within the ID token matches the nonce you provided.</Note>
To verify an ID token, fetch the public key from the `/jwks` endpoint. You can read more about this process at the [Auth0 blog](https://auth0.com/blog/navigating-rs256-and-jwks/) or [JWT.io](https://jwt.io/), but one example method could be:
```ts
import * as jose from 'jose'
const verifyJwt = (token: string) => {
const JWKS = jose.createRemoteJWKSet(new URL('https://id.worldcoin.org/jwks.json'))
const { payload, header } = await jose.jwtVerify(token, JWKS, {
issuer: 'https://id.worldcoin.org',
aud: 'app_lshSNnaJfdt6Sohu6YAA',
})
return payload
}
verifyJwt('eyJhbGciOiJSUzI1NiIsInR5cCI6Ikp.eyAs.XVCJ9...')
```
# Protocol Internals
<Note type="danger">
Documentation of certain protocol elements.
</Note>
## Universal Link
The universal link is used so that the World App can recognize a World ID request and handle it correctly. As more clients are built, the universal link will be extended to other wallets. The structure of the universal link is documented here. The source of truth function for this can be found [on GitHub](https://github.com/worldcoin/idkit-js/blob/main/packages/core/src/bridge.ts).
- The universal link base is: `https://worldcoin.org/verify`.
- If the query string `t` is equal to `wld`, the request is using the Wallet Bridge, and the following requirements apply:
- `i` is a **required** query string, which contains the `requestId`, a UUIDv4 used to identify the request
- `k` is a **required** query string, which contains the URL Base64 encoded AES-GCM key
- `b` is an **optional** query string, which contains the URL of the Wallet Bridge. This defaults to `https://bridge.worldcoin.org/`.
- **Coming Soon:** If the query string `t` is equal to `wmobile`, the request is passed directly from a native mobile app to World App, and the following requirements apply:
- `app_id` is a **required** query string. This is the `app_id` from the Developer Portal, or is equal to `self_hosted`.
- `action` is a **required** query string, which contains the action ID
- `credential_types` is an **optional** query string, which is a comma-separated string of accepted credentials.
- `signal` is an **optional** query string, which is the signal to be used during proof generation.
- Either `return_to` or `callback_url` is a **required** query string, which is the URL to return to after the proof is generated.
- `return_to` is the URL to return to after the proof is generated. This is used for web-based applications.
- `callback_url` is the URL to which the proof will be submitted directly. This is used for native mobile applications.
## Wallet Bridge
The Wallet Bridge acts as the intermediary between IDKit and the user's World ID wallet (e.g. World App). It is responsible for relaying a verification request to the user's identity wallet (e.g. World App), and returning the proof to IDKit. A functional diagram is shown here, with a step-by-step explanation to follow:

<Note>
All requests to the Wallet Bridge must include a `Content-Type: application/json` header, a `User-Agent` header, and a valid JSON body.
</Note>
1. IDKit initiates the proof request session on the Wallet Bridge.
- An app configures and opens IDKit with the required parameters `app_id` and `action`, and the optional parameters `signal`, `credential_types`, and `action_description`.
- If an application is self-hosted, the `app_id` must be equal to `self_hosted`. See more details about self-hosted applications [here](/world-id/reference/idkit#self-hosted-applications).
- IDKit generates an AES-GCM `key` and `iv`, used to encrypt the verification request. IDKit temporarily stores the `key` in memory.
- IDKit encrypts the above parameters with the `key` and `iv`, forming the encrypted body of the request to the Wallet Bridge. The `iv` is included unencrypted in the request body.
<CodeGroup title="Bridge POST Request">
```json {{ title: "Unencrypted JSON" }}
{
"app_id": "app_2cde98081f4673c86082d418e6a59f58", // starts with "app_", or is equal to "self_hosted"
"action": "verify-account",
"signal": "@username", // optional, defaults to ""
"credential_types": ["orb", "device"], // optional, defaults to ["orb"]
"action_description": "Verify your account on an example social media website!", // optional
"return_to": "https://your-application.com/world-id" // coming soon -- only used when deeplinking to mobile application. must be a valid https URL
}
```
{/* cSpell: disable */}
```json {{ title: "Encrypted Request Body" }}
{
"iv": "a2xhanNsbnJ2b2VzanJ2YTtvanNpZWZubGFp", // Base64 encoded
"payload": "YWVvbmJybGFpc2VudWJybGFvbTtvdmNubGRrZmE..." // Base64 encoded encrypted body
}
```
{/* cSpell: enable */}
</CodeGroup>
- IDKit sends a POST request to the Bridge: `https://bridge.worldcoin.org/request`, with the encrypted JSON body described above, thus initiating the session and sending the payload required to generate a proof. The Bridge returns a UUIDv4 `requestId` to IDKit, which is used to identify the request.
- The universal link is formed as described in the above section, with the `requestId` and AES-GCM `key` included in the query string.
2. World App or the Worldcoin Simulator (referred to going forward as the client) receives the payload from the bridge, generates the zero-knowledge proof, and returns the proof as a payload in a proof response session on the Bridge.
- The client receives the universal link via QR code, mobile app deeplink, or pasting from the clipboard (only for the Worldcoin Simulator).
- The client parses the query string to extract the `requestId` and `key`. The `key` is used to decrypt the payload, and the `requestId` is used to identify the request.
- The client sends a GET request to the Wallet Bridge to fetch the payload: `https://bridge.worldcoin.org/request/${requestId}`. The payload is returned to the client and removed from the Bridge, thus ending the proof request session.
- The client can optionally send a HEAD request to check if a payload is available for the given `requestId`. A `200` response indicates a payload is available, while a `404` response indicates no payload is available. The payload is not returned, nor removed from the bridge if it is present.
- The client parses the payload to get the AES-GCM `iv` and encrypted body. The `key` from the universal link and `iv` are used to decrypt the body, which contains the `app_id` and `action` for the request, as well as the optional `signal`, `credential_types`, and `action_description` parameters.
- The client calculates the `externalNullifier` from the `app_id` and `action`, and generates the zero-knowledge proof using the local Semaphore identity after receiving the user's consent.
- The client forms the body, which either contains the successful proof or an error response.
- The client encrypts the body with the `key` and a newly-generated `iv`, and sends a PUT request to the Wallet Bridge: `https://bridge.worldcoin.org/response/${requestId}`, with the new iv alongside the encrypted proof or error as the body.
- The client must delete any information received from the Bridge, as this could be used to disclose which actions a user has performed.
3. IDKit polls the Bridge for the response from the client, receives the encrypted response, decrypts it, and calls the callback with the proof or handles the returned error.
<Note>The response will only be returned once, and will be deleted from the Bridge after being returned.</Note>
- IDKit sends a GET request to `https://bridge.worldcoin.org/response/${requestId}` to check if the proof is available. The JSON returned will include a `status` field with one of the following values:
- `initialized`: The verification request has been received by the Bridge, but not yet received by the client.
- `retrieved`: The verification request has been received by the client, but the proof has not yet been returned.
- `completed`: The proof (or an error) has been returned by the client, and will be included in this response.
<CodeGroup title="Bridge Response">
{/* cSpell: disable */}
```json {{ title: "Completed" }}
{
"status": "completed",
"response": {
"iv": "a2xhanNsbnJ2b2VzanJ2YTtvanNpZWZubGFp", // Base64 encoded
"payload": "YWVvbmJybGFpc2VudWJybGFvbTtvdmNubGRrZmE..." // Base64 encoded encrypted body
}
}
```
{/* cSpell: enable */}
```json {{ title: "Initialized" }}
{
"status": "initialized",
"response": null
}
```
```json {{ title: "Retrieved" }}
{
"status": "retrieved",
"response": null
}
```
</CodeGroup>
- IDKit decrypts the response using the `key` it generated earlier and the `iv` included in the response, and either handles the error or calls the configured callback function(s) with the proof.
<CodeGroup title="Decrypted Bridge Response">
```json {{ title: "Proof" }}
{
"proof": "0x...",
"merkle_root": "0x...",
"nullifier_hash": "0x...",
"credential_type": "orb", // <-- or "device"
}
```
```json {{ title: "Error" }}
{
"error_code": "verification_rejected"
}
```
</CodeGroup>
<Note>View the [Errors Reference](/world-id/reference/errors) for more information on potential error codes.</Note>
## External Nullifier
Within [Semaphore](https://docs.semaphore.pse.dev/), the [zero knowledge](/world-id/further-reading/zero-knowledge-proofs) protocol that World ID is based on, the external nullifier is a public 32-byte value that scopes the uniqueness of verifications. It is one of two inputs in the ZK circuit, the other being the secret identity nullifier. These two values are hashed to produce the nullifier hash, which identifies the user.
World ID actions (whether for Sign In or Incognito Actions) are identified by their external nullifiers. This value is derived from the `app_id` and stringified action passed by IDKit to the World app. Our implementation can be [found here](https://github.com/worldcoin/idkit-js/blob/main/packages/core/src/lib/hashing.ts).
Generally you won't need to generate the external nullifier yourself. IDKit will handle this automatically, but for custom integrations it's helpful to keep this in mind. When performing a request to the `/precheck` endpoint, you must pass the valid external nullifier for the given `app_id` and `action`. You can accomplish this with the `generateExternalNullifier` function from IDKit:
```js
import { IDKitInternal } from '@worldcoin/idkit'
const getExternalNullifier = (app_id: string, action: string) => {
return IDKitInternal.generateExternalNullifier(app_id, action).digest
}
getExternalNullifier('app_staging_7550e829082fc558e112e0620c1c7a59', 'test action')
```
## OpenID Connect Claims
Within the ID token returned by the World ID provider, a minimal number of [OIDC claims](https://openid.net/specs/openid-connect-core-1_0.html#IDToken) are set. This is due to the privacy-focused nature of the protocol. The set claims are:
- `iss`: The issuer of the token, always "https://id.worldcoin.org"
- `sub`: The unique user identifier for the specific application (this is the `nullifier_hash` from the World ID ZKP)
- `aud`: The identifier of the requesting application. This is always the `app_id` from the Developer Portal or `/register` endpoint
- `jti`: A unique identifier for this ID token, only used once
- `iat`: The timestamp of the token issuance
- `exp`: The timestamp of the token's expiration
- `alg`: The algorithm used to sign the ID token, only RS256 is supported
- `scope`: The scopes requested by the application. Must always contain `openid`. The `profile` and `email` scopes are also supported for compatibility, but use should be avoided.
- `https://worldcoin.org/beta`: Describes claims specific to World ID. **Deprecated and replaced by `https://id.worldcoin.org/v1`**.
- `likely_human`: "strong" or "weak", corresponding to whether the user has strong sybil protection or likelihood of being human. Biometrically verified users have a `strong` value.
- `credential_type`: `orb` or `device`, represents the credential the user used to authenticate. In general, for Sign in with World ID, the highest credential available to the user will be used.
- `https://worldcoin.org/v1`: Describes claims specific to World ID.
- `verification_level`: `orb` or `device`, represents the verification level of the user. In general, for Sign in with World ID, the highest verification level available to the user will be used.
## Signup Sequencer
World ID utilizes a sequencer to insert identity commitments on-chain, generate inclusion proofs, and track the state of the contract Merkle trees. This is done to simplify the amount of state applications need to handle to work with World ID.
The sequencer utilizes a batching process to reduce gas costs and improve performance. When verifying a proof from the World app, the Developer Portal will query the sequencer to determine if the proof is valid, since the user could be a part of the current batch (which is not yet on-chain). To interact with the sequencer, you can use these endpoints:
### Staging
- Orb credential: `https://signup-batching.stage-crypto.worldcoin.org`
- Device credential: `https://phone-signup.stage-crypto.worldcoin.org`
### Production
- Orb credential: `https://signup.crypto.worldcoin.org`
- Device credential: `https://phone-signup.crypto.worldcoin.org`
### Endpoints
The sequencer exposes the following endpoints:
- `/inclusionProof`: Fetches the inclusion proof for a given identity commitment
- `/insertIdentity`: Inserts an identity commitment into the current sequencer batch
- `/verifySemaphoreProof`: Verifies the given ZK proof (from the World app) is valid, even if it is not yet on-chain
More details about these endpoints can be found in our [Swagger documentation.](https://editor.swagger.io/?url=https://raw.githubusercontent.com/worldcoin/signup-sequencer/batching/main/schemas/openapi.yaml)
# World ID Reset
World ID 2.0 allows a user to reset their World ID in case their World ID has been lost or stolen. The user reverifies at the Orb, and their old World ID is invalidated. The user is then issued a new World ID and this new identity is verified at the Orb. A user will not be able to perform a World ID Reset more than once every 14 days.
## Impact on Sign In with World ID
When a user signs in with World ID, their Nullifier Hash is returned as the `sub` claim in the ID Token. Recall that the Nullifier Hash is the unique identifier of a user in the context of a specific action -- a different identity will return a different Nullifier Hash.
<Note type="danger">A user who performs a World ID Reset will appear as a new user to your application.</Note>
### Suggested Action
A second sign-in method, such as an email address or phone number, is **highly recommended** to ensure that the user can continue to use their account in the event of a World ID Reset. The user should be able to verify that second factor after a World ID Reset and link their new World ID to their existing account.
<Note>For comparison, if your application were to use Sign In with Ethereum, this is identical to a user migrating to a new Ethereum address.</Note>
## Impact on Incognito Actions
When a user performs a World ID Reset, they are issued a new World ID and their old World ID is invalidated. This means that any Incognito Actions performed by the user will no longer be associated with their new World ID.
<Note type="danger">If your application uses Incognito Actions for sybil-resistance, this means that a user will be able to perform the action again with a new Nullifier Hash after performing a World ID Reset.</Note>
### Suggested action
We recommend using **time-bound sybil resistance** in your application to mitigate the impact of a World ID Reset. Time-bound sybil resistance requires a user to verify with World ID periodically, rather than a single verification lasting indefinitely.
<Note>This is a similar concept to a user being logged out of an email account after two weeks, and being required to re-enter their password to log back in.</Note>
Time-bound sybil resistance is used for Worldcoin Grants, where a new grant is issued every two weeks. Every grant is a new action in World ID, requiring a separate World ID verification to claim each grant.
As another example, a social media application may use World ID to mark a user's account as verified. The application could require the user to perform a new verification every 30 days to maintain their verified badge.
In this situation, a user who performs a World ID Reset may be able to mark a second account as "verified" immediately after performing the reset, but will only be able to verify a single account at the end of the 30 day period.# Zero-knowledge proofs
A zero-knowledge proof is a cryptographic mechanism to prove you know a secret without revealing the secret. This is possible through the use of complex math under the hood. Thanks to the cryptographers who worked on the moonmath for us.
A simple example of a ZKP is that you can cryptographically prove you are above 18 years of age without revealing your date of birth, actual age or any other information.
A ZKP should have the following properties:
- Completeness: If you are above 18, verifier will be convinced with a high probability.
- Soundness: Very low probability of cheating.
- Zero knowledge: Your exact age is not shared.
## Why does World ID use ZKPs?
After the orb verifies you are a unique human, your identity commitment is added to a public list of verified humans. Everytime you want to prove you are a unique person, your World app generates a ZKP that proves you know the secret to **an** identity commitment, without revealing which one. Holistically, World ID ZKPs prove these three things:
- Membership: "I'm a member of this group". You prove you are a member of the verified identities list.
- One-shot: "I haven't done this before _in this context_". This is achieved through [nullifiers](/about/glossary#nullifier-hash). Nullifiers are random numbers, unique to each user for each context (i.e. for each action ID).
- Signal: "I want to include this message". This allows the user to add extra data to the request. It could be a receiver address when claiming an airdrop, or a vote when participating in governance. This mitigates an attack where an attacker could intercept a transaction with a proof and change the vote.
### How does it work?
A user's World ID lives in their device, and only in their device. The user installs a compatible identity wallet (such as the [World App](https://world.org/world-app)). A unique and random private key is generated on-device, where it is securely stored. Identity wallets may incorporate their own recovery mechanisms, however Protocol-level recovery is being implemented soon.
From the user's private key, a public _identity commitment_ is generated and published on-chain (currently Ethereum Mainnet), which acts as the source of truth for the protocol. An identity commitment is analogous to a public key in an asymmetric key-pair, or a wallet address, but in the World ID protocol this value is not broadly shared. The private key is used as input to each World ID verification, specifically as part of the [ZKP](/world-id/further-reading/zero-knowledge-proofs).
The user's wallet (e.g. World App) generates a ZKP for every verification a user makes. Verifications cannot be linked across applications or actions, which means that the user's privacy is cryptographically protected.
After a user verifies, a _nullifier hash_ is returned to the application. The nullifier hash is the user's unique identifier for the application (and the action, if using [Incognito Actions](/world-id/id/cloud)). Nullifiers are unique to the application, and cannot be linked to other nullifiers from the same person, even resistant to colluding applications.
If you want to learn more about ZKPs, [Ingopedia](https://www.ingonyama.com/ingopedia/communityguide) is a great resource.
# Verify with World ID
IDKit is required in your app's frontend for verifying with World ID, and the [zero-knowledge proof](/world-id/concepts#vocabulary) received from the user will be verified via the **Developer Portal API** in your backend.
## Creating actions
An "action" is the term we use to describe a user interaction or operation that needs to be protected by World ID verification.
Create an action for your app in the Developer Portal. You must provide the following values:
- **Action Name**: The stringified action to be taken by the user.
- **Description**: This is shown to your user in the World app as they sign with their World ID. Make sure to fully describe the exact action the user is taking.
- **Max Verifications**: The number of times a user can take this action. A value of `0` indicates that unlimited verifications can take place.
<Note>
An action scopes uniqueness for users, which means users will always generate the same ID (nullifier hash) when
performing the same action. **Cloud actions** natively handle sybil-resistance with a limit set in the Developer
Portal.
</Note>
## Installing IDKit
The JS package can be included in your project either as a module (which supports tree shaking to reduce bundle size) or you can add the script directly to your website.
<CodeGroup title="Install IDKit">
```bash {{ title: "npm" }}
npm install @worldcoin/idkit
```
```bash {{ title: "yarn" }}
yarn add @worldcoin/idkit
```
```bash {{ title: "pnpm" }}
pnpm add @worldcoin/idkit
```
</CodeGroup>
## Usage
Import and render IDKit. You'll want to do this on the screen where the user executes the protected action (e.g. before they click "Claim airdrop" or "Vote on proposal").
```tsx
import { IDKitWidget, VerificationLevel } from '@worldcoin/idkit'
<IDKitWidget
app_id="app_GBkZ1KlVUdFTjeMXKlVUdFT" // obtained from the Developer Portal
action="vote_1" // this is your action id from the Developer Portal
onSuccess={onSuccess} // callback when the modal is closed
handleVerify={handleVerify} // optional callback when the proof is received
verification_level={VerificationLevel.Device}
>
{({ open }) => <button onClick={open}>Verify with World ID</button>}
</IDKitWidget>
```
More configuration options can be found in the [IDKit reference](/world-id/reference/idkit).
When a user clicks the button, the IDKit modal will open and prompt them to scan a QR code and verify with World ID. Once this proof is received, the optional `handleVerify` callback is called immediately and the `onSuccess` callback will be called when the modal is closed.
One of these callbacks should begin the process of verifying the proof.
{/* ### IDKit with Dynamic Actions
To accommodate dynamic content, actions can also be created at the time a user completes a World ID verification. Simply pass the desired `action` and `action_description` values in [IDKit's parameters](/world-id/reference/idkit#parameters). A new action will automatically be created and tracked, and will appear the next time you log into the Developer Portal.
As an example, using IDKit with Dynamic Actions may look like this:
```tsx
const getUserChoice = userId => {
const choice = userChoices['userId']
return choice
}
return (
<IDKitWidget
// ...
action={getUserChoice(userId)}
action_description="verify for an action"
// ...
>
</IDKitWidget>
)
``` */}
## Response
Upon successful completion of the World ID flow, you will receive a response object. This response object of type `ISuccessResult` has the following attributes. **Normally, you will forward these parameters to your backend for verification.**
```json {{ title: 'ISuccessResult' }}
{
"merkle_root": "0x1f38b57f3bdf96f05ea62fa68814871bf0ca8ce4dbe073d8497d5a6b0a53e5e0",
"nullifier_hash": "0x0339861e70a9bdb6b01a88c7534a3332db915d3d06511b79a5724221a6958fbe",
"proof": "0x063942fd7ea1616f17787d2e3374c1826ebcd2d41d2394...",
"verification_level": "orb"
}
```
<Properties>
<Property name="merkle_root" type="string">
This is the hash pointer to the root of the Merkle tree that proves membership of the user's identity in the
list of identities verified by the Orb.
</Property>
<Property name="nullifier_hash" type="string">
The unique identifier for this combination of user, app, and action.
</Property>
<Property name="proof" type="string">
The Zero-knowledge proof of the verification.
</Property>
<Property name="verification_level" type='"orb" | "device"'>
Either `orb` or `device`. Returns the verification_level used to generate the proof.
</Property>
</Properties>
## Verifying Proofs
This section describes how to verify proofs via the **Developer Portal API**.
<Note type="warning">
You should pass the proof to your backend when verifying proofs via the API. Users can manipulate information in the
frontend, so the proof must be verified in a trusted environment.
</Note>
Your backend should receive the `ISuccessResult` object returned by IDKit, as well as the `signal` that was input into IDKit, and send it to the **Developer Portal API** for verification using the `verifyCloudProof` helper.
The `action` ID should be accessible in your backend as an environment variable{/* unless using Dynamic Actions, in which case you should pass the `action` ID to the backend with the proof and signal */}.
After performing your own backend actions based on the result, you then pass the success or error messages back to your frontend.
```typescript {{ title: 'pages/api/verify.ts' }}
import { type IVerifyResponse, verifyCloudProof } from '@worldcoin/idkit'
export default async function handler(req: NextApiRequest, res: NextApiResponse) {
const { proof, signal } = req.body
const app_id = process.env.APP_ID
const action = process.env.ACTION_ID
const verifyRes = (await verifyCloudProof(proof, app_id, action, signal)) as IVerifyResponse
if (verifyRes.success) {
// This is where you should perform backend actions if the verification succeeds
// Such as, setting a user as "verified" in a database
res.status(200).send(verifyRes);
} else {
// This is where you should handle errors from the World ID /verify endpoint.
// Usually these errors are due to a user having already verified.
res.status(400).send(verifyRes);
}
};
```
## Post-Verification
If `handleVerify` does not throw an error, the user will see a success state and the `onSuccess` callback will be called when the modal is closed. The `onSuccess` callback should redirect a user to a success page, or perform any other actions you want to take after a user has been verified.
```tsx {{ title: 'pages/index.tsx' }}
const onSuccess = (result: ISuccessResult) => {
// This is where you should perform frontend actions once a user has been verified
window.alert(
`Successfully verified with World ID!
Your nullifier hash is: ` + result.nullifier_hash
)
}
```
<Note>
For more information on configuration, see the [IDKit](/world-id/reference/idkit) and [Cloud API](/world-id/reference/api) reference
pages.
</Note>
import { Link } from '@/components/Link'
# Supported Libraries
World ID is available on a variety of platforms. Below is a list of native libraries we currently support.
<table>
<thead>
<tr>
<th>Library</th>
<th>Description</th>
</tr>
</thead>
<tbody>
<tr>
<td className="align-middle"><Link href="https://www.npmjs.com/package/@worldcoin/idkit">React</Link></td>
<td className="align-middle">Our most popular library. Integrate easily into any React app</td>
</tr>
<tr>
<td className="align-middle"><Link href="https://www.npmjs.com/package/@worldcoin/idkit-standalone">JS</Link></td>
<td className="align-middle">Standalone version for vanilla javascript.</td>
</tr>
<tr>
<td className="align-middle"><Link href="https://swiftpackageindex.com/worldcoin/idkit-swift">Swift</Link></td>
<td className="align-middle">Native Swift library for IOS apps.</td>
</tr>
<tr>
<td className="align-middle"><Link href="https://crates.io/crates/idkit">Rust</Link></td>
<td className="align-middle">Rust library. Use this to compile other native binaries, eg. Kotlin.</td>
</tr>
<tr>
<td className="align-middle"><Link href="https://github.com/worldcoin/idkit-kotlin/packages/2232016">Kotlin</Link></td>
<td className="align-middle">Native Kotlin library for Android apps</td>
</tr>
</tbody>
</table>import { Tag } from '@/components/Tag'
# Verifying Proofs On-Chain
World ID proofs can be fully verified on-chain. After all, the source of truth for the decentralized protocol is on-chain. To verify a World ID proof, your smart contract will embed a call to the `verifyProof` method of the World ID contract, and then execute the rest of its logic as usual.
The [smart contract starter kit](https://github.com/worldcoin/world-id-onchain-template) and the [frontend & on-chain monorepo template](https://github.com/worldcoin/world-id-onchain-template) are great resources to help you get started with World ID.
Using one of these repositories is strongly recommended to get started with World ID on-chain.
The following examples demonstrate the most common use case: verifying proofs from only Orb-verified users, for a single action, with a user's wallet address as the signal, while also enabling sybil-resistance.
This setup is recommended for most users, as it is the most gas-efficient. For more information on use cases that require more complex setups (such as multiple actions or other types of signals), see the [Advanced On-Chain Verification](/world-id/id/on-chain) page.
<Note>
At the core of the World ID Protocol is the use of [Semaphore](https://docs.semaphore.pse.dev/). Semaphore is a zk-SNARK based privacy protocol that allows for the creation of anonymous credential systems developed by the Ethereum Foundation.
Read more about [The Protocol](https://whitepaper.world.org/#world-network-protocol) and [Semaphore](https://docs.semaphore.pse.dev/).
</Note>
## IDKit Configuration
When verifying proofs on-chain, there are a few changes you have to make to your IDKit configuration. You must ensure that the app created in the Developer Portal is configured as an on-chain app, and you should only accept Orb credentials in IDKit, as World ID Device is not currently supported on-chain.
```tsx
import { IDKitWidget } from '@worldcoin/idkit'
const { address } = useAddress() // get the user's wallet address
<IDKitWidget
app_id="app_GBkZ1KlVUdFTjeMXKlVUdFT" // must be an app set to on-chain in Developer Portal
action="claim_nft"
signal={address} // proof will only verify if the signal is unchanged, this prevents tampering
onSuccess={onSuccess} // use onSuccess to call your smart contract
// no use for handleVerify, so it is removed
// use default verification_level (orb-only), as device credentials are not supported on-chain
>
{({ open }) => <button onClick={open}>Verify with World ID</button>}
</IDKitWidget>
```
## Contract Addresses
The World ID Router contract is what you should use to verify proofs. It is deployed on multiple chains, and you can find the addresses for each chain in our contracts [Address Book](/world-id/reference/address-book).
## `hashToField` Helper Function
Our contracts use a custom hash function that returns a `uint256` that is guaranteed to be in the field of the elliptic curve we use. This is necessary to ensure that the `uint256` returned by the hash function can be used in our zero-knowledge proofs.
```solidity
library ByteHasher {
/// @dev Creates a keccak256 hash of a bytestring.
/// @param value The bytestring to hash
/// @return The hash of the specified value
/// @dev `>> 8` makes sure that the result is included in our field
function hashToField(bytes memory value) internal pure returns (uint256) {
return uint256(keccak256(abi.encodePacked(value))) >> 8;
}
}
```
To use this function, simply import the `ByteHasher` library and call `hashToField` on your bytestring.
```solidity
import { ByteHasher } from './helpers/ByteHasher.sol';
contract HelloWorld {
using ByteHasher for bytes;
// {...}
abi.encodePacked('hello world').hashToField(); // returns the keccak256 hash of 'hello world' as a uint256
// {...}
```
## Constructor
The `externalNullifier` is the unique identifier of the action performed in Semaphore, and its keccak256 hash (named `externalNullifierHash`) is what is passed to the World ID Router contract. It is a combination of the app ID and the action.
You should typically set it in the constructor to save gas (as is done in this example), as it will not change if all users are performing the same action.
We additionally set the `groupId` to `1`, which limits this example to Orb-verified users only. World ID Device is currently not supported on-chain.
```solidity
/// @dev This allows us to use our hashToField function on bytes
using ByteHasher for bytes;
/// @notice Thrown when attempting to reuse a nullifier
error InvalidNullifier();
/// @dev The address of the World ID Router contract that will be used for verifying proofs
IWorldID internal immutable worldId;
/// @dev The keccak256 hash of the externalNullifier (unique identifier of the action performed), combination of appId and action
uint256 internal immutable externalNullifierHash;
/// @dev The World ID group ID (1 for Orb-verified)
uint256 internal immutable groupId = 1;
/// @dev Whether a nullifier hash has been used already. Used to guarantee an action is only performed once by a single person
mapping(uint256 => bool) internal nullifierHashes;
/// @param _worldId The address of the WorldIDRouter that will verify the proofs
/// @param _appId The World ID App ID (from Developer Portal)
/// @param _actionId The World ID Action (from Developer Portal)
constructor(
IWorldID _worldId,
string memory _appId,
string memory _action
) {
worldId = _worldId;
externalNullifierHash = abi
.encodePacked(abi.encodePacked(_appId).hashToField(), _action)
.hashToField();
}
```
## verifyProof
The `verifyProof` method reverts if the proof is invalid, meaning you can just call it as part of your smart contract's logic and execute the rest of your logic after as usual.
<Note type="warning">
Note that calling the `verifyProof` function by itself does not provide sybil-resistance, or prevent proof reuse -- it
just verifies that the proof is valid.
However, this example **does** implement sybil-resistance by checking that the `nullifierHash` has not been verified before.
</Note>
The `verifyProof` method takes the arguments below.
- `root` - The World ID root to verify against. This is obtained from the IDKit widget, and should be passed as-is.
- `groupId` - This must be `1` for Orb-verified users. World ID Device is currently not supported on-chain.
- `signalHash` - The keccak256 hash of the signal to verify.
- `nullifierHash` - Anonymous user ID for this action. This is obtained from the IDKit widget, and should just be passed as-is.
- `externalNullifierHash` - The externalNullifierHash, which identifies which app and action the user is verifying for.
- `proof` - The proof to verify. This is obtained from the IDKit widget.
```solidity
/// @param signal An arbitrary input from the user that cannot be tampered with. In this case, it is the user's wallet address.
/// @param root The root (returned by the IDKit widget).
/// @param nullifierHash The nullifier hash for this proof, preventing double signaling (returned by the IDKit widget).
/// @param proof The zero-knowledge proof that demonstrates the claimer is registered with World ID (returned by the IDKit widget).
function verifyAndExecute(
address signal,
uint256 root,
uint256 nullifierHash,
uint256[8] calldata proof
) public {
// First, we make sure this person hasn't done this before
if (nullifierHashes[nullifierHash]) revert InvalidNullifier();
// We now verify the provided proof is valid and the user is verified by World ID
worldId.verifyProof(
root,
groupId, // set to "1" in the constructor
abi.encodePacked(signal).hashToField(),
nullifierHash,
externalNullifierHash,
proof
);
// We now record the user has done this, so they can't do it again (sybil-resistance)
nullifierHashes[nullifierHash] = true;
// Finally, execute your logic here, knowing the user is verified
}
```
<Note>
All arguments are of type `uint256`, with the exception of `proof`, which is of type `uint256[8]`. Depending on how you're calling your smart contract, you might be required to unpack it into a `uint256[8]` before passing it to the verifyProof method. To unpack it, use the following code:
<CodeGroup>
```ts {{ title: "viem" }}
import { decodeAbiParameters } from 'viem'
const unpackedProof = decodeAbiParameters([{ type: 'uint256[8]' }], proof)[0]
```
```ts {{ title: "ethers.js" }}
import { defaultAbiCoder as abi } from '@ethers/utils'
const unpackedProof = abi.decode(['uint256[8]'], proof)[0]
```
</CodeGroup>
</Note># Incognito Actions Common Pitfalls
<br/>
## Not Verifying Proofs
When using Incognito Actions, it's important to **always verify the proof received from IDKit.** This proof is a _claim_ that the user has been verified by World ID, and verifying that proof with our API or smart contracts is the only way to ensure that the claim is true.
## Improper Signal (Proof fails verification)
If you specify a signal as an input to IDKit, ensure you include the same signal when verifying the proof with our API or smart contracts. Otherwise, the proof will not verify.
## Compilation/Runtime Errors
IDKit must be run client-side. Ensure that your frontend framework isn't attempting to render IDKit server-side.
# World ID {{ className: 'text-5xl' }}
Building the world's largest identity and financial network as a public utility, giving ownership to everyone. {{ className: 'text-2xl' }}
<hr className="my-10" />

<span className="grid lg:grid-flow-col gap-8">
<Col>
## World App
Enables payment, purchases and transfers globally using the Worldcoin token, digital assets and traditional currencies.
[Learn more](https://world.org/world-app).
</Col>
<Col>
## Worldcoin Token
The first token (WLD) to be globally and freely distributed to people, for both utility and future governance, just for
being a unique individual.
[Learn more](https://world.org/).
</Col>
<Col>
## World ID
Digital identity that proves you are a real and unique person while fully protecting your privacy.
<div className="mt-12">
[Learn more](https://world.org/world-id).
</div>
</Col>
</span>
# Configuring IDKit
IDKit is a single React component, and we'll be writing two callback functions: `handleVerify` and `onSuccess`.
## IDKitWidget
First, add the `IDKitWidget` component to your site. The values for the `app_id` and `action` props were obtained from the Developer Portal in [Installation](/world-id/quick-start/installation). We'll define the `handleVerify` and `onSuccess` callbacks next.
```tsx {{ title: "/verify.tsx"}}
'use client' // for Next.js app router
import { IDKitWidget, VerificationLevel, ISuccessResult } from '@worldcoin/idkit'
// ...
<IDKitWidget
app_id="your app id" // obtained from the Developer Portal
action="your action id" // obtained from the Developer Portal
onSuccess={onSuccess} // callback when the modal is closed
handleVerify={handleVerify} // callback when the proof is received
verification_level={VerificationLevel.Orb}
>
{({ open }) =>
// This is the button that will open the IDKit modal
<button onClick={open}>Verify with World ID</button>
}
</IDKitWidget>
```
## handleVerify
The `handleVerify` callback is called when the user's proof is received. This will send the proof to your backend for verification:
```tsx {{ title: "/verify.tsx"}}
const handleVerify = async (proof: ISuccessResult) => {
const res = await fetch("/api/verify", { // route to your backend will depend on implementation
method: "POST",
headers: {
"Content-Type": "application/json",
},
body: JSON.stringify(proof),
})
if (!res.ok) {
throw new Error("Verification failed."); // IDKit will display the error message to the user in the modal
}
};
```
## Backend Verification
The `handleVerify` callback sends the proof to your backend for verification. The backend handler should verify the proof with the Developer Portal API:
<Note type="warning">The call to the Developer Portal API must be made from your backend, not from the frontend.</Note>
```tsx {{ title: "/api/verify.ts"}}
import { type IVerifyResponse, verifyCloudProof } from '@worldcoin/idkit'
export default async function handler(req: NextApiRequest, res: NextApiResponse) {
const proof = req.body
const app_id = process.env.APP_ID
const action = process.env.ACTION_ID
const verifyRes = (await verifyCloudProof(proof, app_id, action)) as IVerifyResponse
if (verifyRes.success) {
// This is where you should perform backend actions if the verification succeeds
// Such as, setting a user as "verified" in a database
res.status(200).send(verifyRes);
} else {
// This is where you should handle errors from the World ID /verify endpoint.
// Usually these errors are due to a user having already verified.
res.status(400).send(verifyRes);
}
};
```
## onSuccess
The `onSuccess` callback is called when the user closes the modal. This is where you can perform any necessary actions, such as redirecting the user to a new page.
```tsx {{ title: "/verify.tsx"}}
const onSuccess = () => {
// This is where you should perform any actions after the modal is closed
// Such as redirecting the user to a new page
window.location.href = "/success";
};
```import Image from 'next/image'
import appProfile from './images/app-profile.png'
import appConfig from './images/app-config.png'
import createAction from './images/create-action.png'
# Installing IDKit
IDKit is our official library for integrating World ID into your application. This section will guide you through creating your application in the [Worldcoin Developer Portal](https://developer.worldcoin.org) and installing IDKit.
## IDKit Installation
To install IDKit, use your package manager of choice:
For other languages, see [supported libraries](/world-id/id/libraries).
<CodeGroup title="Install IDKit">
```bash {{ title: "npm" }}
npm install @worldcoin/idkit
```
```bash {{ title: "yarn" }}
yarn add @worldcoin/idkit
```
```bash {{ title: "pnpm" }}
pnpm add @worldcoin/idkit
```
</CodeGroup>
<Note>The Quick Start guide will use Next.js.</Note>
## Developer Portal
Sign in to the [Worldcoin Developer Portal](https://developer.worldcoin.org). The Developer Portal will prompt you to create an application, and configure it as a Staging app for Cloud verification:
<div align="center">
<Image src={appConfig} width="500"/>
</div>
The Developer Portal will then prompt you to create an Action. Give it a name, and note the **action identifier**:
<div align="center">
<Image src={createAction} width="500"/>
</div>
Finally, navigate to _App Profile_ and note the **application ID**:
<div align="center">
<Image src={appProfile} width="500"/>
</div>
Proceed to [Configuration](/world-id/quick-start/configuration) to configure IDKit in your application.import { Link } from '@/components/Link'
# Supported Libraries
World ID is available on a variety of platforms. Below is a list of native libraries we currently support.
<table>
<thead>
<tr>
<th>Library</th>
<th>Description</th>
</tr>
</thead>
<tbody>
<tr>
<td className="align-middle"><Link href="https://www.npmjs.com/package/@worldcoin/idkit">React</Link></td>
<td className="align-middle">Our most popular library. Integrate easily into any React app</td>
</tr>
<tr>
<td className="align-middle"><Link href="https://www.npmjs.com/package/@worldcoin/idkit-standalone">JS</Link></td>
<td className="align-middle">Standalone version for vanilla javascript.</td>
</tr>
<tr>
<td className="align-middle"><Link href="https://swiftpackageindex.com/worldcoin/idkit-swift">Swift</Link></td>
<td className="align-middle">Native Swift library for IOS apps.</td>
</tr>
<tr>
<td className="align-middle"><Link href="https://crates.io/crates/idkit">Rust</Link></td>
<td className="align-middle">Rust library. Use this to compile other native binaries, eg. Kotlin.</td>
</tr>
<tr>
<td className="align-middle"><Link href="https://github.com/worldcoin/idkit-kotlin/packages/2232016">Kotlin</Link></td>
<td className="align-middle">Native Kotlin library for Android apps</td>
</tr>
</tbody>
</table>
# Template Repositories
If you're looking for the fastest way to bootstrap an app using World ID, we have multiple template repositories available for you to use. To integrate World ID into an existing app, proceed to [Installation](/world-id/quick-start/installation).
<span className="flex items-center align-center justify-start gap-4 mt-10">
<h2 className="my-0">World ID Cloud Template</h2>
<a
className="w-1/6 rounded-lg bg-gray-200 px-2 py-1 text-gray-900 border-black no-underline hover:no-underline"
href="https://github.com/new?template_name=world-id-cloud-template&template_owner=worldcoin"
target="_blank"
>
<p className="m-0 p-0 text-sm hover:no-underline">Use this Template</p>
</a>
</span>
This template repository is a simple example of how to use World ID and our Developer Portal API. Once you've created a new repository from this template, set your `app_id` and `action` in the `.env` file and run the following command to get started:
```bash {{ title: "Usage" }}
pnpm i && pnpm dev
```
<span className="flex items-center align-center justify-start gap-4 mt-10">
<h2 className="my-0">Sign In with World ID Template</h2>
<a
className="w-1/6 rounded-lg bg-gray-200 px-2 py-1 text-gray-900 border-black no-underline hover:no-underline"
href="https://github.com/new?template_name=world-id-nextauth-template&template_owner=worldcoin"
target="_blank"
>
<p className="m-0 p-0 text-sm hover:no-underline">Use this Template</p>
</a>
</span>
This template repository is a simple example of how to use Sign In with World ID using [NextAuth](https://next-auth.js.org/). Once you've created a new repository from this template, set your `NEXTAUTH_URL`, `WLD_CLIENT_ID` and `WLD_CLIENT_SECRET` in the `.env` file and run the following command to get started:
```bash {{ title: "Usage" }}
pnpm i && pnpm dev
```
<span className="flex items-center align-center justify-start gap-4 mt-10">
<h2 className="my-0">World ID On-Chain Template</h2>
<a
className="w-1/6 rounded-lg bg-gray-200 px-2 py-1 text-gray-900 border-black no-underline hover:no-underline"
href="https://github.com/new?template_name=world-id-onchain-template&template_owner=worldcoin"
target="_blank"
>
<p className="m-0 p-0 text-sm hover:no-underline">Use this Template</p>
</a>
</span>
This template repository is a simple example of how to use World ID in an on-chain application.
Developers should be familiar with [Foundry](https://github.com/foundry-rs/foundry) to use this template.# Testing your Integration
To test your integration, we provide the [Worldcoin Simulator](https://simulator.worldcoin.org) to simulate a user using World App in a staging environment.
You can use the simulator from another browser tab and copy the QR code from IDKit with a single click:
<div align="center">
<video className="m-auto" width="320" height="240" autoPlay muted loop playsInline>
<source src="/images/docs/introduction/qr-copy.mp4" type="video/mp4" />
Your browser does not support the video tag.
</video>
</div>
And then paste the QR code data into the simulator:
<div align="center">
<video className="m-auto" width="320" height="240" autoPlay muted loop playsInline>
<source src="/images/docs/introduction/qr-paste.mp4" type="video/mp4" />
Your browser does not support the video tag.
</video>
</div>
You should see a successful outcome in IDKit!
<div align="center">
<video className="m-auto" width="320" height="240" autoPlay muted loop playsInline>
<source src="/images/docs/introduction/idkit-success.mp4" type="video/mp4" />
Your browser does not support the video tag.
</video>
</div># Address Book
Here you can find the address and associated ENS name (if available) for all of the World ID contracts. For verifying proofs, the only contract you need to interact with is the `WorldIdRouter` contract, which will properly route the call to the correct contract based on the `groupId` argument.
<Note>Only the Orb verification level is supported on-chain, so your `groupId` should always be `1`.</Note>
<Tabs>
<TabItem label="Ethereum">
<table>
<thead>
<tr>
<th>Contract</th>
<th>Ethereum Mainnet</th>
<th>Ethereum Sepolia Testnet</th>
</tr>
</thead>
<tbody>
<tr>
<td className="align-middle">World ID Router</td>
<td className="align-middle">[`id.worldcoin.eth`](https://etherscan.io/address/0x163b09b4fe21177c455d850bd815b6d583732432#code)</td>
<td className="align-middle">[`0x469449f251692e0779667583026b5a1e99512157`](https://sepolia.etherscan.io/address/0x469449f251692e0779667583026b5a1e99512157#code)</td>
</tr>
<tr>
<td className="align-middle">Identity Manager</td>
<td className="align-middle">[`0xf7134CE138832c1456F2a91D64621eE90c2bddEa`](https://etherscan.io/address/0xf7134CE138832c1456F2a91D64621eE90c2bddEa#code)</td>
<td className="align-middle">[`0xb2ead588f14e69266d1b87936b75325181377076`](https://sepolia.etherscan.io/address/0xb2ead588f14e69266d1b87936b75325181377076#code)</td>
</tr>
</tbody>
</table>
</TabItem>
<TabItem label="World Chain">
<table>
<thead>
<tr>
<th>Contract</th>
<th>World Chain</th>
<th>World Chain Sepolia Testnet</th>
</tr>
</thead>
<tbody>
<tr>
<td className="align-middle">World ID Router</td>
<td className="align-middle">[`0x17B354dD2595411ff79041f930e491A4Df39A278`](https://worldscan.org/address/0x17B354dD2595411ff79041f930e491A4Df39A278)</td>
<td className="align-middle">[`0x57f928158C3EE7CDad1e4D8642503c4D0201f611`](https://sepolia.worldscan.org/address/0x57f928158C3EE7CDad1e4D8642503c4D0201f611)</td>
</tr>
<tr>
<td className="align-middle">Bridged World ID</td>
<td className="align-middle">[`0x047eE5313F98E26Cc8177fA38877cB36292D2364`](https://worldscan.org/address/0x047eE5313F98E26Cc8177fA38877cB36292D2364)</td>
<td className="align-middle">[`0xE177F37AF0A862A02edFEa4F59C02668E9d0aAA4`](https://sepolia.worldscan.org/address/0xE177F37AF0A862A02edFEa4F59C02668E9d0aAA4)</td>
</tr>
</tbody>
</table>
</TabItem>
<TabItem label="Optimism">
<table>
<thead>
<tr>
<th>Contract</th>
<th>Optimism Mainnet</th>
<th>Optimism Sepolia Testnet</th>
</tr>
</thead>
<tbody>
<tr>
<td className="align-middle">World ID Router</td>
<td className="align-middle">[`optimism.id.worldcoin.eth`](https://optimistic.etherscan.io/address/0x57f928158C3EE7CDad1e4D8642503c4D0201f611#code)</td>
<td className="align-middle">[`0x11cA3127182f7583EfC416a8771BD4d11Fae4334`](https://sepolia-optimism.etherscan.io/address/0x11cA3127182f7583EfC416a8771BD4d11Fae4334#code)</td>
</tr>
<tr>
<td className="align-middle">Bridged World ID</td>
<td className="align-middle">[`0xB3E7771a6e2d7DD8C0666042B7a07C39b938eb7d`](https://optimistic.etherscan.io/address/0xB3E7771a6e2d7DD8C0666042B7a07C39b938eb7d#code)</td>
<td className="align-middle">[`0xf07d3efadD82A1F0b4C5Cc3476806d9a170147Ba`](https://sepolia-optimism.etherscan.io/address/0xf07d3efadD82A1F0b4C5Cc3476806d9a170147Ba#code)</td>
</tr>
</tbody>
</table>
</TabItem>
<TabItem label="Polygon">
<Note type="warning">World ID is currently unavailable on Polygon testnets. Support for [Polygon Amoy](https://polygon.technology/blog/introducing-the-amoy-testnet-for-polygon-pos) is coming soon.</Note>
<table>
<thead>
<tr>
<th>Contract</th>
<th>Polygon Mainnet</th>
{/* <th>Polygon Mumbai Testnet</th> */}
</tr>
</thead>
<tbody>
<tr>
<td className="align-middle">World ID Router</td>
<td className="align-middle">[`polygon.id.worldcoin.eth`](https://polygonscan.com/address/0x515f06B36E6D3b707eAecBdeD18d8B384944c87f#code)</td>
{/* <td className="align-middle">[`mumbai.id.worldcoin.eth`](https://mumbai.polygonscan.com/address/0x719683F13Eeea7D84fCBa5d7d17Bf82e03E3d260#code)</td> */}
</tr>
<tr>
<td className="align-middle">Bridged World ID</td>
<td className="align-middle">[`0xa6d85F3b3bE6Ff6DC52C3aaBe9A35d0ce252b79F`](https://polygonscan.com/address/0xa6d85F3b3bE6Ff6DC52C3aaBe9A35d0ce252b79F#code)</td>
{/* <td className="align-middle">[`0xCDfDF72065493bDDb2131478c89C1D5482BD1dF6`](https://mumbai.polygonscan.com/address/0xCDfDF72065493bDDb2131478c89C1D5482BD1dF6#code)</td> */}
</tr>
</tbody>
</table>
</TabItem>
<TabItem label="Base (Sepolia)">
<table>
<thead>
<tr>
<th>Contract</th>
<th>Base Sepolia Testnet</th>
</tr>
</thead>
<tbody>
<tr>
<td className="align-middle">World ID Router</td>
<td className="align-middle">[`0x42FF98C4E85212a5D31358ACbFe76a621b50fC02`](https://sepolia.basescan.org/address/0x42FF98C4E85212a5D31358ACbFe76a621b50fC02#code)</td>
</tr>
<tr>
<td className="align-middle">Bridged World ID</td>
<td className="align-middle">[`0x163b09b4fE21177c455D850BD815B6D583732432`](https://sepolia.basescan.org/address/0x163b09b4fE21177c455D850BD815B6D583732432#code)</td>
</tr>
</tbody>
</table>
</TabItem>
</Tabs># API Reference
The Worldcoin Developer Portal offers an API to enable easy verification of World IDs and relevant credentials.
### Base URL
```
https://developer.worldcoin.org
```
<Note>
All requests to the Developer Portal API must include a `Content-Type: application/json` header, a `User-Agent`
header, and a valid JSON body.
</Note>
## Verify Proof {{ tag: "POST", label: "/api/v2/verify/{app_id}" }}
<Row><Col>
Enables you to verify a World ID proof for a **Cloud action.** To ensure sybil-resistance, by default, a single person can only verify once for every action. The number of allowed verifications for a single user can be configured in the Developer Portal.
<Note>
This endpoint is now on **version 2**. The previous version at `/api/v1/verify/{app_id}` will be unavailable after
June 30, 2024.
</Note>
### Request Body
<Properties>
<Property name="nullifier_hash" type="string" required={true}>
The unique user identifier (called the nullifier hash in the ZKP), as provided by IDKit. See [IDKit
response](/world-id/reference/idkit#types) for details.
</Property>
<Property name="proof" type="string" required={true}>
The zero-knowledge proof, as provided by IDKit. See [IDKit response](/world-id/reference/idkit#types) for
details.
</Property>
<Property name="merkle_root" type="string" required={true}>
Part of the ZKP, the hash of the Merkle root that proves membership to the set of credentials. As provided by
IDKit. See [IDKit response](/world-id/reference/idkit#types) for details.
</Property>
<Property name="verification_level" type="string" required={true}>
The verification level, as provided by IDKit. See [IDKit response](/world-id/reference/idkit#types) for details.
</Property>
<Property name="action" type="string" required={true}>
Same action identifier as passed to IDKit.
</Property>
<Property name="signal_hash" type="string" defaultValue="hashToField('').digest">
The hash of the signal that was used to generate the proof. Defaults to the hash of an empty string.
</Property>
</Properties>
### Possible Responses
- `200 OK` - The proof was successfully verified.
- `400 Bad Request` - The proof was invalid or the user has already verified for this action.
</Col><Col sticky>
<CodeGroup title="Request" tag="POST" label="/api/v2/verify/{app_id}">
```bash {{ title: "cURL" }}
curl -X POST "/api/v2/verify/{app_id}" \
-H "Content-Type: application/json" \
-d '{
"nullifier_hash": "0x2bf8406809dcefb1486dadc96c0a897db9bab002053054cf64272db512c6fbd8",
"merkle_root": "0x2264a66d162d7893e12ea8e3c072c51e785bc085ad655f64c10c1a61e00f0bc2",
"proof": "0x1aa8b8f3b2d2de5ff452c0e1a83e29d6bf46fb83ef35dc5957121ff3d3698a1119090fb...",
"verification_level": "orb",
"action": "my_action",
"signal_hash": "0x00c5d2460186f7233c927e7db2dcc703c0e500b653ca82273b7bfad8045d85a4"
}'
```
```js
fetch(apiUrl, {
method: 'POST',
headers: {
'Content-Type': 'application/json',
},
body: JSON.stringify({
nullifier_hash: '0x2bf8406809dcefb1486dadc96c0a897db9bab002053054cf64272db512c6fbd8',
merkle_root: '0x2264a66d162d7893e12ea8e3c072c51e785bc085ad655f64c10c1a61e00f0bc2',
proof: '0x1aa8b8f3b2d2de5ff452c0e1a83e29d6bf46fb83ef35dc5957121ff3d3698a1119090fb...',
verification_level: 'orb',
action: 'my_action',
signal_hash: '0x00c5d2460186f7233c927e7db2dcc703c0e500b653ca82273b7bfad8045d85a4',
}),
})
```
</CodeGroup>
<CodeGroup title="Response">
```json {{ title: "200 OK" }}
{
"success": true,
"action": "my_action",
"nullifier_hash": "0x2bf8406809dcefb1486dadc96c0a897db9bab002053054cf64272db512c6fbd8",
"created_at": "2023-02-18T11:20:39.530041+00:00"
}
```
```json {{ title: "400 Invalid Proof" }}
{
"code": "invalid_proof",
"detail": "The provided proof is invalid and it cannot be verified. Please check all inputs and try again.",
"attribute": null
}
```
```json {{ title: "400 Invalid Merkle Root" }}
{
"code": "invalid_merkle_root",
"detail": "The provided Merkle root is invalid. User appears to be unverified.",
"attribute": null
}
```
```json {{ title: "400 Invalid Credential Type" }}
{
"code": "invalid",
"detail": "Invalid credential type.",
"attribute": "credential_type"
}
```
```json {{ title: "400 User Exceeded Maximum Verifications" }}
{
"code": "exceeded_max_verifications",
"detail": "This user has exceeded the maximum number of verifications allowed for this proof.",
"attribute": null
}
```
```json {{ title: "400 User Already Verified" }}
{
"code": "already_verified",
"detail": "This person has already verified for this action.",
"attribute": null
}
```
</CodeGroup>
</Col></Row>
## Get Action Metadata {{ tag: "GET", label: "/api/v1/precheck/{app_id}" }}
Enables fetching information about a particular app to determine eligibility for verification. This endpoint is also used by the World ID Kiosk, Sign in with World ID, and World App to show metadata about the action being verified. This endpoint will only return information for active actions. <br/> Primarily intended for internal use.
### Request Body
<Row><Col>
<Properties>
<Property name="action" type="string" defaultValue='""' required={true}>
The action to check. This is the same action that was passed to IDKit. Defaults to an empty string for Sign in
with World ID.
</Property>
<Property name="nullifier_hash" type="string" defaultValue='""'>
The ZKP's nullifier hash, as provided by IDKit. See [IDKit response](/world-id/reference/api#response) for
details. Defaults to an empty string.
</Property>
<Property name="external_nullifier" type="string" deprecated={true}>
The ZKP's external nullifier. This parameter is deprecated and will be removed in a future release, and should
no longer be used. Instead, pass the `action` parameter.
</Property>
</Properties>
</Col><Col sticky>
<CodeGroup title="Request" tag="GET" label="/api/v1/precheck/{app_id}">
```bash {{ title: "cURL" }}
curl -X POST "/api/v1/precheck/{app_id}" \
-H "Content-Type: application/json" \
-d '{
"action": "my_custom_action",
"nullifier_hash": "0x2bf8406809dcefb1486dadc96c0a897db9bab002053054cf64272db512c6fbd8",
"external_nullifier": "0x00949dd9a8c5b600304d010ce3a3cf012352070ae4b77504e17af77ee894cda"
}'
```
```js
fetch(`/api/v1/precheck/${appId}`, {
method: 'POST',
headers: {
'Content-Type': 'application/json',
},
body: JSON.stringify({
action: 'my_custom_action',
nullifier_hash: '0x2bf8406809dcefb1486dadc96c0a897db9bab002053054cf64272db512c6fbd8',
external_nullifier: '0x00949dd9a8c5b600304d010ce3a3cf012352070ae4b77504e17af77ee894cda',
}),
})
```
</CodeGroup>
</Col></Row>
### Response
<Row><Col>
<Properties>
<Property name="__typename" type="string" defaultValue="app">
Always returns `app`.
</Property>
<Property name="id" type="string">
The `app_id` from the Developer Portal.
</Property>
<Property name="engine" type='"cloud" | "on-chain"'>
Whether the app is configured for use with **Cloud** or **On-Chain** proof verifications.
</Property>
<Property name="is_staging" type="boolean">
Whether the app is a staging app. If `true`, the [Worldcoin Simulator](https://simulator.worldcoin.org) must be
used to verify.
</Property>
<Property name="is_verified" type="string">
Whether the app has been verified by Worldcoin.
</Property>
<Property name="name" type="string">
The app's name as configured in the Developer Portal.
</Property>
<Property name="verified_app_logo" type="string">
The URL of the app's logo. Only returned if the app has been verified, otherwise returns an empty string.
</Property>
<Property name="is_sign_in" type="boolean">
Whether the action request is for Sign in with World ID.
</Property>
<Property name="can_user_verify" type='"yes" | "no" | "on-chain" | "undetermined"'>
If the user is eligible to verify for this action.
- `"yes"`: The user has not reached the maximum number of verifications for this action based on the `nullifier_hash` provided. Always returned when `is_sign_in` is `true`.
- `"no"`: The user has reached the maximum number of verifications for this action based on the `nullifier_hash` provided.
- `"undetermined"`: A nullifier_hash was not provided, so the user's eligibility cannot be determined.
- `"on-chain"`: The app is configured for **On-Chain** verifications, so the user's eligibility cannot be determined. Verification eligibility is determined solely by the application's smart contract.
</Property>
<Property name="action" type="JSON">
Information about the action being verified.
- `name`: The action's human-readable name as configured in the Developer Portal.
- `action`: The action identifier as configured in the Developer Portal. Typically a slugified version of the action's name.
- `description`: The action's description as configured in the Developer Portal.
- `max_verifications`: The maximum number of verifications allowed for this action. Will be `0` if the action is configured for unlimited verifications.
- `max_accounts_per_user`: The maximum number of accounts allowed per user for Sign in with World ID. Will always be `1`.
- `external_nullifier`: The action's external nullifier. **Intended for internal use only.**
- `status`: Will return `active` if the action is active, otherwise will return `inactive`.
- `__typename`: Always returns `action`.
</Property>
</Properties>
</Col><Col sticky>
<CodeGroup title="Response">
```json {{ title: "200 OK" }}
{
"id": "app_staging_4cfd049031b0da1e8b62084b09a9f430",
"is_staging": true,
"is_verified": false,
"name": "Default App",
"verified_app_logo": "",
"engine": "cloud",
"__typename": "app",
"sign_in_with_world_id": true,
"can_user_verify": "yes",
"action": {
"external_nullifier": "0x00949dd9a8c5b600304d010ce3a3cf012352070ae4b77504e17af77ee894cda",
"name": "My action",
"action": "my_custom_action",
"description": "My action",
"max_verifications": 0,
"max_accounts_per_user": 1,
"__typename": "action"
}
}
```
```json {{ title: "400 Required" }}
{
"code": "required",
"detail": "This attribute is required.",
"attribute": "action"
}
```
```json {{ title: "400 Action Inactive" }}
{
"code": "action_inactive",
"detail": "This action is inactive.",
"attribute": "status"
}
```
```json {{ title: "404 Not Found" }}
{
"code": "not_found",
"detail": "We couldn't find an app with this ID.",
"attribute": null
}
```
```json {{ title: "405 Method Not Allowed" }}
{
"code": "method_not_allowed",
"detail": "HTTP method POST is not allowed for this endpoint.",
"attribute": null
}
```
</CodeGroup>
</Col></Row>
## Get JWK Keys {{ tag: "GET", label: "/api/v1/jwks" }}
<Row><Col>
This endpoint lets you retrieve the JWKs (public keys) used to verify the signature on JSON web tokens that authenticate a verification request from the Developer Portal. This verification method is only used if you are using the **Hosted page user interface.**
</Col><Col sticky>
<CodeGroup>
```bash {{ title: "cURL" }}
curl /api/v1/jwks
```
```js
fetch('/api/v1/jwks')
```
</CodeGroup>
{/* cSpell:disable */}
```json {{ title: "Response" }}
{
"keys": [
{
"e": "AQAB",
"n": "09ETz2k4_9IbDBYK_Tcr6DzbDdJPeqIgvoeUvXNVjNU8mYzFbhdqh8jRH80FwtuoFqyw5oyuG9ILHxfGaG_SeutPWSxBsqulXhxTnTAx2i8HtF0i2toMuvsEtiAjQ3hD4_w2xInBVOO98WAGcNA_UgWAG2DlWpe2km_V5bv3iKteCsSTZtzT3RjEO6FeOlVr8rmx9EGwWITdPIvrEXm_3REFqvDOnQvLu2-Au8m1V3U_6404m4RV_wlWGPnhHfG57VTkkqjgrnFKGUDniG-VMJs-WFX4VIQRvy2z1A5nQsmYpobK_clGyV0D0i5P1A_lmWGDEXBLSjEW9zH_o0d2DQ",
"kty": "RSA",
"kid": "jwk_8934bcc47ec5b86dd490cc2a46f18a5e"
}
]
}
```
{/* cSpell:enable */}
</Col></Row>
## Authenticated Endpoints
<Note>You can generate API Keys on the **My Team** page of the Developer Portal.</Note>
- API keys are intended for use by third-party applications and for server-to-server communication. They are long-lived and can be revoked at any time.
- API keys are scoped to a team and have full permissions for any actions as any user of the Developer Portal.
- Once you have an API key, use it as the value of the `Authorization` header in your requests. For example:
```
Authorization: Bearer $API_KEY
```
### GraphQL {{ tag: "POST", label: "/v1/graphql" }}
<Row><Col>
Interaction with the Developer Portal API is mostly done through a GraphQL endpoint, which enables retrieving information and interacting with any of the API objects. You can read more about [queries](https://hasura.io/docs/latest/graphql/core/api-reference/graphql-api/query/) and [mutations](https://hasura.io/docs/latest/graphql/core/api-reference/graphql-api/mutation/) for GraphQL to help you construct your query.
</Col><Col sticky>
<CodeGroup title="Request" tag="POST" label="/api/v1/graphql">
```bash {{ title: "cURL" }}
curl -X POST "/v1/graphql" \
-H "Content-Type: application/json" \
-H "Authorization: Bearer $WORLD_ID_TOKEN" \
-d '{
"query": "YOUR_GRAPHQL_QUERY_HERE"
}'
```
```js
fetch('/v1/graphql', {
method: 'POST',
headers: {
'Content-Type': 'application/json',
Authorization: `Bearer ${WORLD_ID_TOKEN}`,
},
body: JSON.stringify({
query: 'YOUR_GRAPHQL_QUERY_HERE',
}),
})
```
</CodeGroup>
<CodeGroup title="Example Queries">
```graphql {{ title: "Listing Apps" }}
query MyApps {
app {
id
name
}
}
```
```graphql {{ title: "Listing nullifiers for action" }}
query ActionNullifiers($action_id: String) {
action(where: { id: { _eq: $action_id }, status: { _eq: "active" } }) {
id
status
max_accounts_per_user
max_verifications
nullifiers {
nullifier_hash
}
}
}
```
</CodeGroup>
</Col></Row>
import { Tag } from '@/components/Tag'
# Smart Contracts
All of our smart contracts are available on GitHub:
- [World ID Smart Contracts](https://github.com/worldcoin/world-id-contracts)
- [State Bridge Smart Contracts](https://github.com/worldcoin/world-id-state-bridge)
<Note>
If you're interested in using World ID and verifying proofs on-chain, see our [On-Chain Verification
guide](/world-id/id/on-chain).
</Note>
## Supported Chains
<table>
<thead>
<tr>
<th>Chain</th>
<th>Testnet</th>
<th>Role</th>
<th>Identity Availability</th>
</tr>
</thead>
<tbody>
<tr>
<td className="flex items-center">
<img src="/icons/ethereum.svg" alt="Ethereum logo" className="m-0 mr-2 h-8 w-8" />
<p>
<b>Ethereum</b>
</p>
</td>
<td className="align-middle">Sepolia</td>
<td className="align-middle">
<Tag>Canonical</Tag>
</td>
<td className="align-middle">~60 minutes after verification</td>
</tr>
<tr>
<td className="flex items-center">
<img src="/icons/optimism.svg" alt="Optimism logo" className="m-0 mr-2 h-8 w-8" />
<p>
<b>Optimism</b>
</p>
</td>
<td className="align-middle">Optimism Sepolia</td>
<td className="align-middle">
<Tag color="amber">Bridged</Tag>
</td>
<td className="align-middle">~5 Minutes after Ethereum</td>
</tr>
<tr>
<td className="flex items-center">
<img src="/icons/polygon.svg" alt="Polygon logo" className="m-0 mr-2 inline h-8 w-8" />
<p>
<b>Polygon</b>
</p>
</td>
<td className="align-middle">N/A</td>
<td className="align-middle">
<Tag color="amber">Bridged</Tag>
</td>
<td className="align-middle">~40 Minutes after Ethereum</td>
</tr>
<tr>
<td className="flex items-center">
<img src="/icons/base.svg" alt="Base logo" className="m-0 mr-2 h-8 w-8" />
<p>
<b>Base (Testnet Only)</b>
</p>
</td>
<td className="align-middle">Base Sepolia</td>
<td className="align-middle">
<Tag color="amber">Bridged</Tag>
</td>
<td className="align-middle">~5 Minutes after Ethereum Sepolia</td>
</tr>
</tbody>
</table>
<Note>Find our smart contract [address book here](/world-id/reference/address-book).</Note>
## Architecture
This section offers a high-level overview of the various smart contracts that make up World ID. This structure (including state bridging) is replicated on testnets -- currently Sepolia, Optimism Sepolia, and Base Sepolia.
### Identity Managers: `WorldIdIdentityManager`
Identity Managers are only deployed on Ethereum. The Identity Manager contracts are responsible for managing the Semaphore instance. Worldcoin's signup sequencers call the Identity Manager contracts to add or remove identities from the merkle tree.
### State Bridges: `OpStateBridge`/`PolygonStateBridge`
One State Bridge contract is deployed on Ethereum for each bridged chain. It publishes the root of the merkle tree to its configured chain's World ID contract, allowing proofs to be verified on that chain.
### Bridged World ID: `OpWorldId`/`PolygonWorldId`
One World ID contract is deployed on each bridged chain, with an associated State Bridge contract on Ethereum. It is responsible for receiving merkle roots from its State Bridge contract, and verifying World ID proofs against those roots.
<Note>You can deploy your own State Bridge contract on Ethereum and Bridged World ID contract to any chain to bridge World ID to that chain permissionlessly.</Note>
### World ID Router: `WorldIdRouter`
**This is the contract you should interact with.**
The World ID Router will route your call to the correct Identity Manager contract (Ethereum) or World ID contract (L2 Chains) based on the `groupId` argument. This contract is proxied, so you will not need to update your code if the underlying contracts are upgraded.
<Note>Only Orb credentials are supported on-chain, so the `groupId` must be `1`.</Note>
## Usage
The `verifyProof` method of the **World ID Router** is used to verify proofs on-chain.
### Arguments
<Properties>
<Property name="root" type="uint256" required={true}>
The World ID root to verify against.
</Property>
<Property name="groupId" type="uint256" required={true}>
<Row><Col>
Determines which Credential Type to verify against. As only Orb credentials are supported on-chain, this must be `1`.
</Col><Col>
```solidity {{ title: "Orb-Only groupId" }}
uint256 internal immutable groupId = 1;
```
</Col></Row>
</Property>
<Property name="signalHash" type="uint256" required={true}>
<Row><Col>
The `keccak256` hash of the signal to verify.
</Col><Col>
```solidity {{ title: "signalHash" }}
abi.encodePacked(signal).hashToField();
```
</Col></Row>
</Property>
<Property name="nullifierHash" type="uint256" required={true}>
The root of the merkle tree to verify against. This is obtained from the IDKit widget as a hex string `nullifier_hash`, and must be converted to a `uint256` before passing it to the `verifyProof` method.
</Property>
<Property name="externalNullifierHash" type="uint256" required={true}>
<Row><Col>
The `keccak256` hash of the `externalNullifier` to verify. The `externalNullifier` is computed from the `app_id` and `action`.
</Col><Col>
```solidity {{ title: "externalNullifierHash" }}
externalNullifier = abi.encodePacked(abi.encodePacked(appId).hashToField(), action)
externalNullifierHash = externalNullifier.hashToField();
```
</Col></Row>
<Note>Read more about the External Nullifier in [Protocol Internals](/world-id/further-reading/protocol-internals#external-nullifier).</Note>
</Property>
<Property name="proof" type="uint256[8]" required={true}>
<Row><Col>
The zero-knowledge proof to verify. This is obtained from the IDKit widget as a hex string `proof`, and must be converted to a `uint256[8]` before passing it to the `verifyProof` method.
</Col><Col><CodeGroup title="Unpacking Proof">
```ts {{ title: "viem" }}
import { decodeAbiParameters } from 'viem'
const unpackedProof = decodeAbiParameters([{ type: 'uint256[8]' }], proof)[0]
```
```ts {{ title: "ethers.js" }}
import { defaultAbiCoder as abi } from '@ethers/utils'
const unpackedProof = abi.decode(['uint256[8]'], proof)[0]
```
</CodeGroup></Col></Row>
</Property>
</Properties>
### Sybil resistance
While the World ID protocol makes it very easy to make your contracts sybil resistant, this takes a little more than just calling the `verifyProof` function. To make your contract sybil-resistant, you'll need to do the following:
- Store the `nullifierHash` of each user that has successfully verified a proof.
- When a user attempts to verify a proof, check that the `nullifierHash` is not already in the list of used `nullifierHash`es.
Here's an example function doing the above. You can also use the [World ID starter kits](/world-id/id/on-chain) to get started with sybil resistance.
```solidity
/// @param root The root (returned by the IDKit widget).
/// @param groupId The group ID
/// @param signal An arbitrary input from the user, usually the user's wallet address
/// @param nullifierHash The nullifier hash for this proof, preventing double signaling (returned by the IDKit widget).
/// @param proof The zero-knowledge proof that demonstrates the claimer is registered with World ID (returned by the IDKit widget).
function verifyAndExecute(
address signal,
uint256 root,
uint256 nullifierHash,
uint256[8] calldata proof
) public {
// First make sure this person hasn't done this before
if (nullifierHashes[nullifierHash]) revert InvalidNullifier();
// Now verify the provided proof is valid and the user is verified by World ID
worldId.verifyProof(
root,
groupId,
abi.encodePacked(signal).hashToField(),
nullifierHash,
externalNullifierHash,
proof
);
// Record the user has done this, so they can't do it again (proof of uniqueness)
nullifierHashes[nullifierHash] = true;
// Finally, execute your logic here, for example issue a token, NFT, etc...
}
```
# Errors
This page acts as a reference for the error codes returned by IDKit, the Developer Portal API, and the Wallet Bridge.
## IDKit
These error codes are returned in the `onError` callback. The source described if the error originates from within IDKit or the Wallet Bridge response.
<table>
<thead>
<tr>
<th>Code</th>
<th>Source</th>
<th>Description</th>
<th>How to fix?</th>
</tr>
</thead>
<tbody>
<tr>
<td>`failed_by_host_app`</td>
<td>IDKit</td>
<td>An error was thrown in the `handleVerify` callback.</td>
<td>
Assess the error thrown in your `handleVerify` callback and resolve the issue.
</td>
</tr>
<tr>
<td>`connection_failed`</td>
<td>IDKit</td>
<td>Could not establish a connection to World App.</td>
<td>
Ask the user to check their internet connection on both devices running your application and World App.
Additionally, make sure the user has the latest version of World App.
</td>
</tr>
<tr>
<td>`verification_rejected`</td>
<td>Wallet Bridge</td>
<td>User rejected the World ID request in World App.</td>
<td>If this was a mistake, ask the user to go through the flow again.</td>
</tr>
<tr>
<td>`max_verifications_reached`</td>
<td>Wallet Bridge</td>
<td>This person has already verified for this particular action the maximum number of times allowed.</td>
<td>Nothing to do. User cannot verify for this action again.</td>
</tr>
<tr>
<td>`credential_unavailable`</td>
<td>Wallet Bridge</td>
<td>This user does not have the requested credential.</td>
<td>The user must verify at the Orb or verify their unique device in World App to receive the credential required.</td>
</tr>
<tr>
<td>`malformed_request`</td>
<td>Wallet Bridge</td>
<td>The request payload couldn't be decrypted or did not conform to the standard.</td>
<td>Ensure IDKit is configured properly and all parameters are valid. See [above](#id-kit-react) for configuration details.</td>
</tr>
<tr>
<td>`invalid_network`</td>
<td>Wallet Bridge</td>
<td>The application is configured for a different environment than the verifying user's client.</td>
<td>Ensure you use the [Worldcoin Simulator](https://simulator.worldcoin.org) for Staging applications and World App for Production applications.</td>
</tr>
<tr>
<td>`inclusion_proof_failed`</td>
<td>Wallet Bridge</td>
<td>The sequencer returned an unexpected error when retrieving the inclusion proof.</td>
<td>Ask the user to try again. This may be due to a temporary network issue, or a bug with World App or the Signup Sequencer.</td>
</tr>
<tr>
<td>`inclusion_proof_pending`</td>
<td>Wallet Bridge</td>
<td>The user might have the requested credential, but it is not available on-chain yet. It might be available for API verification.</td>
<td>Ask the user to verify again in approximately one hour.</td>
</tr>
<tr>
<td>`metadata_failed`</td>
<td>Wallet Bridge</td>
<td>Unable to load metadata for the app from the Developer Portal.</td>
<td>Ensure your `app_id` is configured correctly in IDKit and exactly matches the `app_id` from the Developer Portal.</td>
</tr>
<tr>
<td>`unexpected_response`</td>
<td>IDKit</td>
<td>There was a problem with the response obtained from the WLD app.</td>
<td>
Check the JS console for further details, though in most cases these will require contacting us to
report the bug.
</td>
</tr>
<tr>
<td>`generic_error`</td>
<td>Wallet Bridge or IDKit</td>
<td>An unhandled exception occurred.</td>
<td>
Check the JS console for further details, though in most cases these will require contacting us to
report the bug.
</td>
</tr>
</tbody>
</table>
## Developer Portal API
These error codes are returned in the `error` property of the response body.
<table>
<thead>
<tr>
<th>Code</th>
<th>Description</th>
<th>How to fix?</th>
</tr>
</thead>
<tbody>
<tr>
<td>`required`</td>
<td>The attribute named in the `attribute` property is required, but was not included in the request.</td>
<td>Provide the required attribute in your API request.</td>
</tr>
<tr>
<td>`invalid_format`</td>
<td>The attribute named in the `attribute` property was provided, but was in an unexpected format.</td>
<td>See the error message for the proper format.</td>
</tr>
<tr>
<td>`unauthenticated`</td>
<td>The credentials (if provided) were invalid.</td>
<td>Provide the required credentials in your API request and ensure they are correct.</td>
</tr>
<tr>
<td>`permission_denied`</td>
<td>The credentials provided were valid, but you do not have the required permissions.</td>
<td>Contact your Developer Portal team's owner to be granted permissions, or the Worldcoin team if you are unable to resolve the issue.</td>
</tr>
<tr>
<td>`max_verifications_reached`</td>
<td>This person has already verified for this particular action the maximum number of times allowed.</td>
<td>Nothing to do. User cannot verify for this action again.</td>
</tr>
<tr>
<td>`invalid_proof`</td>
<td>The provided proof is invalid and it cannot be verified.</td>
<td>Ensure your `app_id`, `action`, `signal`, and `verification_level` are unchanged between the proof request and proof verification.</td>
</tr>
<tr>
<td>`invalid_merkle_root`</td>
<td>The merkle root provided is not recognized.</td>
<td>Ask the user to generate a new proof, the existing proof may be stale.</td>
</tr>
<tr>
<td>`invalid_network`</td>
<td>The application is configured for a different environment than the verifying user's client.</td>
<td>Ensure you use the [Worldcoin Simulator](https://simulator.worldcoin.org) for Staging applications and World App for Production applications.</td>
</tr>
<tr>
<td>`invalid_engine`</td>
<td>The application is configured for on-chain verification and cannot be verified via API.</td>
<td>Either verify the proof on-chain or create a new application configured for Cloud verifications.</td>
</tr>
<tr>
<td>`metadata_failed`</td>
<td>Unable to load metadata for the app from the Developer Portal.</td>
<td>Ensure your `app_id` is configured correctly in IDKit and exactly matches the `app_id` from the Developer Portal.</td>
</tr>
<tr>
<td>`action_inactive`</td>
<td>The requested action is disabled in the Developer Portal.</td>
<td>Enable the action or create a new action.</td>
</tr>
<tr>
<td>`verification_error`</td>
<td>The Developer Portal faced an internal error verifying the proof.</td>
<td>Contact the Worldcoin team.</td>
</tr>
<tr>
<td>`internal_error`</td>
<td>The Developer Portal faced an internal error verifying the proof.</td>
<td>Contact the Worldcoin team.</td>
</tr>
<tr>
<td>`unexpected_response`</td>
<td>There was a problem with the response obtained from the WLD app.</td>
<td>
Check the JS console for further details, though in most cases these will require contacting us to
report the bug.
</td>
</tr>
<tr>
<td>`generic_error`</td>
<td>An unhandled exception occurred.</td>
<td>
Check the JS console for further details, though in most cases these will require contacting us to
report the bug.
</td>
</tr>
</tbody>
</table># IDKit
<Note>
IDKit is open source and accepts contributions! Head over to [GitHub](https://github.com/worldcoin/idkit-js) and
submit a pull request.
</Note>
There are three packages available in the IDKit Monorepo: `@worldcoin/idkit`, `@worldcoin/idkit-standalone`, and `@worldcoin/idkit-core`. The `@worldcoin/idkit` package is the main package that should be used with the React JS framework. The `@worldcoin/idkit-standalone` package is a standalone package that can be used in vanilla JavaScript applications. The `@worldcoin/idkit-core` package is a core functionality package that is used by the other two packages, and should be used only when creating a new IDKit package.
## IDKit (React)
The `@worldcoin/idkit` package is the main package that should be used with the [React framework](https://react.dev/) or any other framework that supports React components, such as [Next.JS](https://nextjs.org/).
### Components
#### `IDKitWidget`
The `IDKitWidget` component is the main component that renders the World ID widget. It should be mounted in your React app and passed the relevant parameters. Accepts a function as a child that receives an `open` function to open the widget.
```jsx
import { IDKitWidget } from '@worldcoin/idkit'
<IDKitWidget
app_id="app_GBkZ1KlVUdFTjeMXKlVUdFT" // obtained from the Developer Portal
action="vote_1" // this is your action name from the Developer Portal
signal="user_value" // any arbitrary value the user is committing to, e.g. a vote
onSuccess={onSuccess}
verification_level="device" // minimum verification level accepted, defaults to "orb"
>
{({ open }) => <button onClick={open}>Verify with World ID</button>}
</IDKitWidget>
```
### Parameters
The following parameters can be passed as props to the `IDKitWidget` component:
<Properties>
<Property name="app_id" type="string" required={true}>
Unique identifier for the app verifying the action. This should be the App ID obtained from the [Developer
Portal](https://developer.worldcoin.org).
</Property>
<Property name="action" type="string" required={true}>
Identifier for the action the user is performing. This should be the action name set in the Developer Portal.
</Property>
<Property name="onSuccess" type="function(ISuccessResult)" required={true}>
Function to trigger when verification is successful and the modal is closed. Should receive a single parameter of type `ISuccessResult`
which contains [the proof details.](#response)
</Property>
<Property name="handleVerify" type="function(ISuccessResult)">
Called after the proof is returned from the user's identity wallet (e.g. World App), but before showing the success screen. Should receive a single parameter of type `ISuccessResult`
which contains [the proof details.](#response) Throwing an error in this screen will show the user a custom error.
<Note>`handleVerify` should be used for API proof verifications to create the best user experience. This will show a pending state while the proof is verified and present any errors thrown in a user-readable fashion.</Note>
</Property>
<Property name="onError" type="function(IErrorState)">
Called when IDKit is closed after an error. Should receive a single parameter of type `IErrorState` which contains [the error details.](#error-handling)
</Property>
<Property name="verification_level" type="string" defaultValue="orb">
The minimum verification level accepted. Can be `orb` or `device`. Defaults
to `orb`. **TypeScript apps can use the `VerificationLevel` enum.**
</Property>
<Property name="signal" type="string" defaultValue='""'>
The signal to be included in the zero-knowledge proof. Typically used for on-chain actions, read more in [the On-chain section](/world-id/id/on-chain).
</Property>
<Property name="bridge_url" type="string" defaultValue='"https://bridge.worldcoin.org"'>
The URL of the [Wallet Bridge](https://github.com/worldcoin/wallet-bridge) to use for establishing a connection between IDKit and the user's World ID Wallet. Defaults to the bridge service hosted by Worldcoin.
**Only change this if you are running your own bridge service.** Read more in [Protocol Internals](/world-id/further-reading/protocol-internals#wallet-bridge).
<Note type="warning">World App will temporarily prevent users from connecting to a Wallet Bridge that is not hosted by Worldcoin or Tools for Humanity while security reviews are ongoing, so we **recommend using the default value** by leaving the `bridge_url` parameter undefined.</Note>
</Property>
{/* <Property name="action_description" type="string">
The description of the specific action (shown to users in World App). **Only used for Dynamic Actions.**
</Property> */}
<Property name="autoClose" type="boolean" defaultValue="true">
Whether to automatically close the widget after completion. Defaults to `true`.
</Property>
<Property name="advanced" type="JSON">
A JSON object containing advanced configuration options that may be unstable or subject to change. See [Advanced Configuration](#advanced-configuration) for more details.
</Property>
</Properties>
### Hooks
#### `useIDKit`
The `useIDKit` hook allows you to programmatically open the IDKit widget without mounting any buttons on screen. Note that you still need to mount the component for this to work.
```jsx focus=1,3,6,11
import { IDKitWidget, useIDKit } from '@worldcoin/idkit'
const { open, setOpen } = useIDKit()
useEffect(() => {
setOpen(true)
}, [])
return (
<div>
<IDKitWidget app_id="..." action="..." />
</div>
)
```
### Functions
#### `verifyCloudProof`
The `verifyCloudProof` function is used to verify a proof returned from the user's identity wallet (e.g. World App) against the Developer Portal API. This function is useful for verifying proofs on the server side.
<Properties>
<Property name="proof" type="ISuccessResult" required={true}>
The proof object returned from IDKit.
</Property>
<Property name="app_id" type="app_${string}" required={true}>
The app_id obtained from the Developer Portal.
</Property>
<Property name="action" type="string" required={true}>
The action id from the Developer Portal.
</Property>
<Property name="signal" type='string' defaultValue='""'>
The signal as input to IDKit.
</Property>
<Property name="endpoint" type='URL | string' defaultValue='https://developer.worldcoin.org/api/v2/verify/${app_id}'>
The endpoint to send the proof to for verification. Defaults to the Worldcoin Developer Portal.
</Property>
</Properties>
```ts {{ title: 'verifyCloudProof' }}
export default async function handler(req: NextApiRequest, res: NextApiResponse) {
const { proof, action, signal } = req.body
const app_id = process.env.APP_ID
const response = (await verifyCloudProof(proof, app_id, action, signal)) as IVerifyResponse
res.status(response.success ? 200 : 400).json(response)
}
```
### Types
#### `ISuccessResult`
<Properties>
<Property name="merkle_root" type="string">
This is the hash pointer to the root of the Merkle tree that proves membership of the user's identity in the
list of identities verified by the Orb. ABI encoded.
</Property>
<Property name="nullifier_hash" type="string">
Essentially the user's unique identifier for your app (and specific action if using Incognito Actions). ABI
encoded.
</Property>
<Property name="proof" type="string">
The Zero-knowledge proof of the verification. ABI encoded.
</Property>
<Property name="verification_level" type='"orb" | "device"'>
Either `orb` or `device`. Returns the verification level used to generate the proof.
</Property>
<Property name="credential_type" type='"orb" | "device"' deprecated={true}>
Either `orb` or `device`. Will always return the strongest credential with which a user has been verified.
<Note type="warning">This property is deprecated and will be removed in a future release. Use `verification_level` instead.</Note>
</Property>
</Properties>
```json {{ title: 'ISuccessResult' }}
{
"merkle_root": "0x1f38b57f3bdf96f05ea62fa68814871bf0ca8ce4dbe073d8497d5a6b0a53e5e0",
"nullifier_hash": "0x0339861e70a9bdb6b01a88c7534a3332db915d3d06511b79a5724221a6958fbe",
"proof": "0x063942fd7ea1616f17787d2e3374c1826ebcd2d41d2394...",
"verification_level": "orb"
}
```
#### `IErrorState`
<Properties>
<Property name="code" type="string">The error code.</Property>
<Property name="detail" type="string">
A human-readable description of the error.
</Property>
</Properties>
```json {{ title: 'IErrorState' }}
{
"code": "already_signed",
"detail": "User has previously signed and submitted proof for this action."
}
```
#### `IVerifyResult`
<Properties>
<Property name="success" type="boolean">If the proof verification succeeded.</Property>
<Property name="code" type="string | undefined">The error code.</Property>
<Property name="detail" type="string | undefined">
A human-readable description of the error.
</Property>
<Property name="attribute" type="string | null | undefined">The attribute causing the error.</Property>
</Properties>
```json {{ title: 'IVerifyResult' }}
{
"success": false,
"code": "invalid_proof",
"detail": "The provided proof is invalid and it cannot be verified. Please check all inputs and try again.",
"attribute": null,
}
```
### Error Handling
An error in IDKit will generally be returned as the input to the `onError` callback. IDKit will display an error to the user and call the `onError` callback with an `IErrorState` object when the modal is closed.
<Note>View the [Errors Reference](/world-id/reference/errors) for assistance when troubleshooting.</Note>
## IDKit Standalone
The `@worldcoin/idkit-standalone` package is intended for vanilla JS applications. It is a standalone package that acts as a wrapper around the `@worldcoin/idkit` package.
### Methods
<Note>
The `.init()` and `.update()` methods take the same parameters as the React package's IDKitWidget component. See [above](#parameters) for more details.
</Note>
#### .init()
The `.init()` method is the main initialization method used for vanilla JS apps. It should be called to start up IDKit and configure the widget.
{/* cSpell:disable */}
```js
import { IDKit } from '@worldcoin/idkit-standalone'
const onSuccess = (result) => {
// handle success
}
IDKit.init({
app_id: 'app_lshSNnaJfdt6Sohu6YAA',
action: 'my_action',
onSuccess: onSuccess,
})
```
{/* cSpell:enable */}
#### .update()
The `.update()` method reinitializes the widget with new parameters. It can only be called after the `.init()` method.
{/* cSpell:disable */}
```js
IDKit.update({
app_id: 'app_lshSNnaJfdt6Sohu6YAA',
action: 'my_new_action',
onSuccess: onSuccess,
})
```
{/* cSpell:enable */}
#### .open()
The `.open()` method is used to open the widget. It can only be called after the `.init()` method, typically in response to a button click.
This method returns a Promise object that will resolve when the `onSuccess` callback is called, or reject when the `onError` callback is called.
```js
IDKit.open()
```
## Advanced configuration
This section outlines advanced configuration options that may be unstable or subject to change. These options are passed as a JSON object to the `advanced` prop of the `IDKitWidget` component.
### Self-Hosted Applications
Self-hosted applications bypass the Worldcoin Developer Portal entirely. The proof returned **can not be verified by the Developer Portal API.** Instead, you must verify the proof on-chain or with a custom prover service.
When using self-hosted mode, no `app_id` is required, and any value passed to IDKit will be ignored. The `action` you set must have sufficient uniqueness to avoid collisions with other applications. We recommend using a prefix that includes your application name, e.g. `your_app_name_vote_1`.
```jsx
import { IDKitWidget } from '@worldcoin/idkit'
<IDKitWidget
// no app_id is set for self-hosted applications
action="your_app_name_vote_1" // this is your action, set to whatever you'd like
signal="user_value"
onSuccess={onSuccess}
verification_level="orb" // only orb verifications are supported for self-hosted applications
advanced={
self_hosted, // enable the self-hosted mode
}
>
{({ open }) => <button onClick={open}>Verify with World ID</button>}
</IDKitWidget>
```# Internal Endpoints
<Note title="caution" type="warning">
These endpoints are intended only for **internal use**, and should generally **not be used by developers**. They are
documented here to assist with development.
</Note>
## App endpoints
The following endpoints are intended to be used only by the Developer Portal's frontend. If you're looking to connect to the API, check out the [Sign in with World ID](/world-id/sign-in) page.
## Login {{ tag: "POST", label: "/v1/login" }}
<Row><Col>
This endpoint is used to authenticate a user and obtain a JWT token. The token is used to authenticate all other requests.
### Required attributes
<Properties>
<Property name="email" type="string">
The user's email address.
</Property>
<Property name="password" type="string">
The user's password.
</Property>
</Properties>
</Col><Col sticky>
<CodeGroup>
```bash {{ title: "cURL" }}
curl -X POST '/api/v1/login' \
-H 'Content-Type: application/json' \
-d '{
"email": "alice@worldidbot.com",
"password": "12345678"
}'
```
```js
fetch('/api/v1/login', {
method: 'POST',
headers: {
'Content-Type': 'application/json',
},
body: JSON.stringify({
email: 'alice@worldidbot.com',
password: '12345678',
}),
})
```
</CodeGroup>
<CodeGroup>
```json {{ title: "200 OK" }}
{
"token": "eyJhbGciOiJIUzI1NiIsInR5cCI6IkpXVCJ9.eyJzdWIiOiIxMjM0NTY3ODkwIiwibmFtZSI6IkFsaWNlIiwiaWF0IjoxNTE2MjM5MDIyfQ.HThTAuYC6RyvZgF5h2cJCVEUQZ9g8Y18Tf-IU2gaYBc"
}
```
```json {{ title: "400 Bad Request" }}
{
"code": "invalid_credentials",
"detail": "Invalid email or password.",
"attribute": null
}
```
</CodeGroup>
</Col></Row>
## Sign Up {{ tag: "POST", label: "/v1/signup" }}
<Row><Col>
This endpoint is used to sign up a new user. The user will receive an email with a verification link. The user must click the link to verify their email address.
### Required attributes
<Properties>
<Property name="email" type="string">
The user's email address.
</Property>
<Property name="password" type="string">
The user's password. Must be at least 8 characters long.
</Property>
<Property name="name" type="string">
The user's name.
</Property>
<Property name="team_name" type="string">
The name of the team the user is registering for.
</Property>
</Properties>
</Col><Col sticky>
<CodeGroup title="Request" tag="POST" label="/api/v1/signup">
```bash {{ title: "cURL" }}
curl -X POST "/api/v1/signup" \
-H "Content-Type: application/json" \
-d '{
"email": "bob@worldidbot.com",
"password": "987654321",
"name": "Bob",
"team_name": "The Bob Project"
}'
```
```js
fetch('/api/v1/signup', {
method: 'POST',
headers: {
'Content-Type': 'application/json',
},
body: JSON.stringify({
email: 'bob@worldidbot.com',
password: '987654321',
name: 'Bob',
team_name: 'The Bob Project',
}),
})
```
</CodeGroup>
{/* cSpell:disable */}
<CodeGroup title="Response">
```json {{ title: "201 Created" }}
{
"token": "eyJhbGciOiJIUzI1NiIsInR5cCI6IkpXVCJ9.eyJzdWIiOiIxMjM0NTY3ODkwIiwibmFtZSI6IkFsaWNlIiwiaWF0IjoxNTE2MjM5MDIyfQ.HThTAuYC6RyvZgF5h2cJCVEUQZ9g8Y18Tf-IU2gaYBc"
}
```
```json {{ title: "400 Bad Request" }}
{
"code": "already_registered",
"detail": "This email address is already registered.",
"attribute": "email"
}
```
</CodeGroup>
{/* cSpell:enable */}
</Col></Row>
## Management endpoints
<Note>
These endpoints can only be called from the Hasura backend and they require a special token which is only shared
between the two.
</Note>
## ENS Lookup {{ tag: "POST", label: "/_ens" }}
<Row><Col>
Fetches the Semaphore contract addresses from an ENS lookup and caches them locally.
</Col><Col sticky>
<CodeGroup title="Request" tag="POST" label="/api/_ens">
```bash {{ title: "cURL" }}
curl -X POST "/api/_ens" \
-H "Content-Type: application/json" \
-H "Authorization: Bearer <secret>"
```
```js
fetch('/api/_ens', {
method: 'POST',
headers: {
'Content-Type': 'application/json',
Authorization: 'Bearer <secret>',
},
})
```
</CodeGroup>
<CodeGroup title="Response">
```json {{ title: "200 OK" }}
{
"success": true
}
```
```json {{ title: "500 Server Error" }}
{
"success": false,
"error": "Production address (0x) or staging address (0x) not found."
}
```
</CodeGroup>
</Col></Row>
## JWK Generation {{ tag: "POST", label: "/_jwk-gen" }}
<Row><Col>
Generates a new JWK to use for signing verification JWTs. Old keys are not rotated automatically, they can still be used until they reach their expiration date. Expiration date may be updated directly through Hasura's portal.
</Col><Col sticky>
<CodeGroup title="Request" tag="POST" label="/api/_jwk-gen">
```bash {{ title: "cURL" }}
curl -X POST "/api/_jwk-gen" \
-H "Content-Type: application/json" \
-H "Authorization: Bearer <secret>"
```
```js
fetch('/api/_jwk-gen', {
method: 'POST',
headers: {
'Content-Type': 'application/json',
Authorization: 'Bearer <secret>',
},
})
```
</CodeGroup>
```json { "title": "Response" }
{
"success": true,
"jwk": {
"id": "jwk_4bce24487b429dff79c8cfee38483308",
"expires_at": "2023-06-14T06:29:35.794+00:00",
"__typename": "jwks"
}
}
```
</Col></Row>
# Sign in with World ID Reference
<Note>Sign in with World ID uses a different base API endpoint than the Developer Portal.</Note>
**Base domain**
```
https://id.worldcoin.org
```
<Note>
This page primarily describes options that are OIDC-compliant. We additionally support using access tokens as described in the OAuth2 standards. No actions can be taken on behalf of a user with OAuth2 access tokens, but you may retrieve the same information about a user as would be contained in an `id_token`. [See below for details.](#OAuth2)
</Note>
## OpenID Connect discovery {{ tag: 'GET', label: '/.well-known/openid-configuration' }}
<Row>
<Col>
Fetches the OpenID Connect discovery document.
### Common Errors
- `method_not_allowed`: HTTP method is not allowed. Only GET and OPTIONS may be used
</Col>
<Col sticky>
<CodeGroup title="Request" tag="GET" label="/.well-known/openid-configuration">
```bash {{ title: 'cURL' }}
curl https://id.worldcoin.org/.well-known/openid-configuration
```
</CodeGroup>
```json {{ title: 'Response' }}
{
"issuer": "https://id.worldcoin.org",
"authorization_endpoint": "https://id.worldcoin.org/authorize",
"token_endpoint": "https://id.worldcoin.org/token",
"userinfo_endpoint": "https://id.worldcoin.org/userinfo",
"jwks_uri": "https://id.worldcoin.org/jwks",
"scopes_supported": ["openid", "email", "profile"],
"response_types_supported": ["code", "id_token", "id_token token", "code id_token"],
"grant_types_supported": ["authorization_code", "implicit"],
"subject_types_supported": ["pairwise"],
"id_token_signing_alg_values_supported": ["RSA"]
}
```
</Col>
</Row>
## Authorize {{ tag: 'GET', label: '/authorize' }}
<Row>
<Col>
Redirect your users to this page to begin the sign-in flow.
### Required attributes
All attributes are formatted as URL query parameters.
<Properties>
<Property name="response_type" type="string">
Must be `code` for authorization code flow, `id_token` for implicit flow, or a space-separated combination of `code`, `id_token`, and `token` for hybrid flow. We generally recommend using the authorization code or implicit flows.
</Property>
<Property name="scope" type="string">
Space-separated list of the requested OIDC scopes. Must include `openid`, and may optionally include `email` and `profile`.
</Property>
<Property name="client_id" type="string">
The Client ID of your app. Get this from the Developer Portal.
</Property>
<Property name="redirect_uri" type="string">
URL the user will be redirected to after authentication. Must match one of your app's configured `redirect_uris`.
</Property>
</Properties>
### Optional attributes
<Properties>
<Property name="state" type="string">
An opaque value used to maintain state between the request and the callback.
</Property>
<Property name="nonce" type="string">
**Required when using the implicit flow.** Used to prevent replay attacks. Should be randomly generated for each sign-in, and checked to ensure it's unchanged after the callback.
</Property>
<Property name="response_mode" type="string">
Determines how the authorization code, ID token, and/or access token are returned. Must be one of `query`, `fragment`, or `form_post`. `query` is only supported for the authorization code flow. Defaults to `query` for authorization code flow, and `fragment` for all others.
</Property>
</Properties>
### Common Errors
- `required`: A necessary attribute was not set. Required attributes are: `response_type scope client_id redirect_uri`
- `invalid_redirect_uri`: The provided redirect URI is invalid. Ensure you've set the correct `redirect_uri` in the Developer Portal.
</Col>
<Col sticky>
<CodeGroup title="Request" tag="GET" label="/authorize">
```http
https://id.worldcoin.org/authorize?redirect_uri=https%3A%2F%2Fdocs.worldcoin.org%2Fworld-id%2Ftry-callback&response_type=code&scope=openid+profile+email&client_id=app_ce4cb73cb75fc3b73b71ffb4de178410
```
</CodeGroup>
<CodeGroup title="Response">
```http {{ title: 'Authorization Code' }}
https://example.app/api/auth/callback/worldcoin?code=e777d780f437330bbd79535b
```
```http {{ title: 'ID Token' }}
https://example.app/api/auth/callback/worldcoin#id_token=eyJhbGciOiJSUzI1NiIsInR5cCI6I...
```
</CodeGroup>
</Col>
</Row>
## Exchange Code {{ tag: 'POST', label: '/token' }}
<Row>
<Col>
Exchanges an authorization code for an `id_token` for the given user.
### Required attributes
<Properties>
<Property name="code" type="string">
The authorization code to exchange.
</Property>
<Property name="grant_type" type="string">
The type of grant to exchange. Must be `authorization_code`.
</Property>
<Property name="redirect_uri" type="string">
The same redirect URI used in the `/authorize` request.
</Property>
</Properties>
### Common Errors
- `method_not_allowed`: HTTP method is not allowed. Only POST and OPTIONS may be used
- `invalid_content_type`: The provided content type is invalid, only `application/x-www-form-urlencoded` is supported
- `unauthenticated`: The provided authorization token is invalid, try checking your credentials
- `invalid_grant_type`: The provided grant type is invalid, only `authorization_code` is supported
- `required`: A necessary attribute was not set. Required attributes are: `code`
- `invalid_grant`: The authorization code was invalid, and may be expired. Try generating a new code via `/authorize`
</Col><Col sticky>
{/* cSpell:disable */}
<CodeGroup title="Request" tag="POST" label="/token">
```shell {{ title: 'cURL' }}
curl -X POST https://id.worldcoin.org/token \
-H "Authorization: Basic YXBwXzU1MGU4MjkwODJmYzU1OGUxMTJlMDYyMGMxYzdhNT..." \
-H "Content-Type: application/x-www-form-urlencoded" \
-d "code=23e5edda0f731dfdddace390&grant_type=authorization_code&redirect_uri=https%3A%2F%2Fdocs.worldcoin.org%2Fapi%2Fauth"
```
{/* cSpell:enable */}
```js
const data = new URLSearchParams()
data.append('code', '23e5edda0f731dfdddace390')
data.append('grant_type', 'authorization_code')
data.append('redirect_uri', 'https://docs.worldcoin.org/api/auth')
fetch('https://id.worldcoin.org/token', {
method: 'POST',
headers: {
Authorization: `Basic ${btoa(`${client_id}:${client_secret}`)}`,
'Content-Type': 'application/x-www-form-urlencoded',
},
body: data,
})
```
</CodeGroup>
```json {{ title: "Response" }}
{
"access_token": "eyJhbGciOiJSUzI1NiIsImtpZCI6Imp3a1.ey8yZmVi.ZjY3MDc3N2UyY2NlNzY5YzUxOG...",
"token_type": "Bearer",
"expires_in": 3600,
"scope": "openid",
"id_token": "eyJhbGciOiJSUzI1NiIsImtpZCI6Imp3a1.ey8yZmVi.ZjY3MDc3N2UyY2NlNzY5YzUxOG..."
}
```
</Col></Row>
## OAuth2
If you selected `token` as one of your `response_types` for the `/authorize` endpoint, you'll receive an OAuth2 access token. Typically an access token would allow you to perform certain actions on a user's behalf, but there are no actions to perform for a user in this case.
You can retrieve the same information about a user with an access token as you'd receive in an ID token. While we support this functionality for broader compatibility, we generally recommend using the authorization code or implicit flows, rather than the hybrid flow.
The endpoints below are only used with an OAuth2 access token.
## Introspect {{ tag: 'POST', label: '/introspect' }}
<Row><Col>
Validates the given access token is active for the user.
<Note>
For introspect, [Basic
Authentication](https://developer.mozilla.org/en-US/docs/Web/HTTP/Authentication#basic_authentication_scheme) is
used. The `Authorization` header contains the word "Basic ", followed by a base64 encoding of the
"client_id:client_secret" values. You obtain your client_id (also called app_id) and client_secret from the Developer Portal.
</Note>
### Required attributes
<Properties>
<Property name="token" type="string">
The access token to validate.
</Property>
</Properties>
### Common Errors
- `method_not_allowed`: HTTP method is not allowed. Only POST may be used
- `invalid_content_type`: The provided content type is invalid, only `application/x-www-form-urlencoded` is supported
- `required`: A necessary attribute was not set. Required attributes are: `token`
- `unauthenticated`: The authorization header is missing, please pass the Bearer authorization token
- `invalid_token`: The authorization token was invalid, and may be expired. Try generating a new token via `/token`
</Col><Col sticky>
{/* cSpell:disable */}
<CodeGroup title="Request" tag="POST" label="/introspect">
```shell {{ title: 'cURL' }}
curl -X POST https://id.worldcoin.org/introspect \
-H "Authorization: Basic YXBwXzU1MGU4MjkwODJmYzU1OGUxMTJlMDYyMGMxYzdhNT..." \
-H "Content-Type: application/x-www-form-urlencoded" \
--data-urlencode "token=eyJhbGciOiJSUzI1NiIsImtpZCI6Imp3a18yZmViZjY3MDc3N2UyY2NlNzY5YzUxOGM3MDNkNTNjMStN..."
```
{/* cSpell:enable */}
```js
fetch('https://id.worldcoin.org/introspect', {
method: 'POST',
headers: {
Authorization: `Basic ${btoa(`${client_id}:${client_secret}`)}`,
'Content-Type': 'application/x-www-form-urlencoded',
},
body: new URLSearchParams({ token }),
})
```
</CodeGroup>
```json {{ title: "Response" }}
{
"active": true,
"client_id": "app_staging_7550e829082fc558e112e0620c1c7a59",
"exp": 1678330528,
"sub": "0x2ae86d6d747702b3b2c81811cd2b39875e8fa6b780ee4a207bdc203a7860b535"
}
```
</Col></Row>
## Get User Info {{ tag: 'POST', label: '/userinfo' }}
<Row><Col>
Retrieves all user information, based on the approved scopes, with the given access token.
<Note>
For userinfo, [Bearer
Authentication](https://developer.mozilla.org/en-US/docs/Web/HTTP/Authentication#bearer_authentication_scheme) is
used. The `Authorization` header contains the word "Bearer ", followed by the access token returned from the
`/token` endpoint.
</Note>
### Common Errors
- `method_not_allowed`: HTTP method is not allowed. Only GET, POST, and OPTIONS may be used
- `unauthenticated`: The authorization header is missing, please pass the Bearer authorization token
- `invalid_token`: The authorization token was invalid, and may be expired. Try generating a new token via `/token`
</Col><Col sticky>
<CodeGroup title="Request" tag="POST" label="/userinfo">
```shell {{ title: 'cURL' }}
curl -X POST https://id.worldcoin.org/userinfo \
-H "Authorization: Bearer eyJhbGciOiJSUzI1NiIsImtpZ.eyCI6I.mp3a18yZmViZjY3MDc3N2UyY2NlN..."
```
```js
fetch('https://id.worldcoin.org/userinfo', {
method: 'POST',
headers: {
Authorization: `Bearer ${access_token}`,
},
})
```
</CodeGroup>
```json {{ title: "Response" }}
{
"sub": "0x2ae86d6d747702b3b2c81811cd2b39875e8fa6b780ee4a207bdc203a7860b535",
"https://id.worldcoin.org/beta": { // deprecated, will be removed in the future
"likely_human": "strong",
"credential_type": "orb"
},
"https://id.worldcoin.org/v1": {
"verification_level": "orb", // "orb" or "device"
},
// if `email` scope is included:
"email": "0x2ae86d6d747702b3b2c81811cd2b39875e8fa6b780ee4a207bdc203a7860b535@id.worldcoin.org",
// if `profile` scope is included:
"name": "World ID User",
"given_name": "World ID",
"family_name": "User"
}
```
</Col></Row>
# World ID 2.0 Migration Guide
This guide will help you migrate your application to use World ID 2.0, including upgrading from the beta version of IDKit (v0.5.1 or earlier) to the new release of IDKit (v1.1.0 or later).
We recommend you read the [World ID 2.0 Announcement](/world-id-2) to understand the new features and changes.
<Note>
The [Breaking Changes](#breaking-changes) section outlines changes that must be addressed in order to successfully migrate your application to IDKit v1.
The [New Features](#new-features) and [Deprecated Functionality](#deprecated-functionality) sections outline changes that do not require immediate action.
</Note>
## Breaking Changes
IDKit v1 introduces a number of breaking changes that must be addressed in order to successfully migrate.
<Note type="warning">
The minimum versions of World App compatible with IDKit v1 are **2.5.0.1 on Android** and **2.5.1 on iOS**.
If your users experience issues after migrating your application to IDKit v1, please ensure they are using the latest version of World App.
</Note>
### World ID Device
The `phone` credential has been replaced by World ID Device. This credential is used to verify a user's unique device rather than a phone number. This allows for a more secure and private verification flow.
<Note>Read more about World ID Device and important considerations for your application in the [Verification Levels documentation](/world-id/concepts#proof-of-personhood).</Note>
### Migrate from `credential_types` to `verification_level`
The `credential_types` parameter has been replaced with the `verification_level` parameter. This parameter is used to specify the minimum level of verification required for a user to complete the World ID verification flow. This change also includes replacing `phone` with `device` for users who have not been verified at the Orb.
<Note>Instead of passing an array of accepted credential types, you now pass the minimum verification level to accept.</Note>
<CodeGroup title="Verification Level">
```tsx {{ title: "Accept Device or Orb" }}
import { IDKitWidget, VerificationLevel } from '@worldcoin/idkit'
<IDKitWidget
app_id="app_GBkZ1KlVUdFTjeMXKlVUdFT"
action="vote_1"
onSuccess={onSuccess}
handleVerify={handleVerify}
verification_level={VerificationLevel.Device} // or "device"
>
{({ open }) => <button onClick={open}>Verify with World ID</button>}
</IDKitWidget>
```
```tsx {{ title: "Accept only Orb" }}
import { IDKitWidget, VerificationLevel } from '@worldcoin/idkit'
<IDKitWidget
app_id="app_GBkZ1KlVUdFTjeMXKlVUdFT"
action="vote_1"
onSuccess={onSuccess}
handleVerify={handleVerify}
verification_level={VerificationLevel.Orb} // or "orb"
>
{({ open }) => <button onClick={open}>Verify with World ID</button>}
</IDKitWidget>
```
</CodeGroup>
### New Package for Vanilla JavaScript
If your application uses vanilla JavaScript, you will need to install the new `@worldcoin/idkit-standalone` package instead of `@worldcoin/idkit`.
This package acts as a wrapper around the `@worldcoin/idkit` package for applications that do not use React.
<Note>See the [IDKit Standalone](/world-id/reference/idkit#id-kit-standalone) reference documentation for integration details.</Note>
## New Features
This section outlines new features introduced in IDKit v1 and other developer tools. These features are optional, and you can safely upgrade to IDKit v1 without making any changes described in this section.
### Wallet Bridge
The Wallet Bridge is a lightweight, open-source, and secure message passing service that allows IDKit to request and receive a zero-knowledge proof from a user's identity wallet, such as World App. This replaces WalletConnect, which was previously used for this functionality.
The Wallet Bridge enables increased performance both in terms of speed and stability.
<Note>
You can view the [Protocol Internals](/world-id/further-reading/protocol-internals#wallet-bridge) page or [Wallet Bridge](https://github.com/worldcoin/wallet-bridge) GitHub repository to learn more about how the Wallet Bridge works.
Usage information can be found in the [IDKit Reference Documentation](/world-id/reference/idkit#parameters).
</Note>
### World ID Reset
World ID Reset is a new feature that allows users to reset their World ID in case their World ID is lost or stolen.
<Note>Read more about World ID Reset and important considerations for your application in the [World ID Reset documentation](/world-id/further-reading/world-id-reset).</Note>
### `onError` Callback
The new `onError` callback allows you to gracefully handle errors that occur during the World ID verification flow. This optional callback is called when the IDKit Widget is closed from an error state.
<Note>Read more about the `onError` callback in the [IDKit reference documentation](/world-id/reference/idkit#parameters).</Note>
### Self-Hosted Applications
Self-hosted applications are more clearly supported in IDKit v1. These applications completely bypass the Worldcoin Developer Portal, allowing for permissionless use of the World ID protocol with IDKit.
<Note>Read more about self-hosted applications in the [IDKit Reference](/world-id/reference/idkit#self-hosted-applications).</Note>
### `idkit-core` Package
The `@worldcoin/idkit-core` package is a new package that contains the core functionality of IDKit, primarily interactions with the Wallet Bridge. This package is used by the `@worldcoin/idkit` and `@worldcoin/idkit-standalone` packages.
**Intended only for use within another IDKit package**, and not intended to be used directly by applications.
### `idkit-js` Monorepo
The [GitHub repository for IDKit](https://github.com/worldcoin/idkit-js) has been updated to a monorepo, which contains the source code for the `@worldcoin/idkit-core`, `@worldcoin/idkit`, and `@worldcoin/idkit-standalone` packages.
This refactor allows for easier maintenance and development of IDKit, and allows for much simpler creation of new IDKit packages for various frontend frameworks.
<Note>Want support for a new frontend framework? Let us know by [opening an issue](https://github.com/worldcoin/idkit-js/issues) or build it and [submit a pull request](https://github.com/worldcoin/idkit-js/pulls)!</Note>
### Use Email Address to Sign In to the Developer Portal
The [Worldcoin Developer Portal](https://developer.worldcoin.org) now supports signing in with an email address in addition to Sign In with Worldcoin.
## Deprecated Functionality
This section outlines deprecated functionality in IDKit v1. These features have been removed or will be removed in the near future.
### Telemetry
All telemetry has been removed from the IDKit package. The `enableTelemetry` parameter should be removed.
### IDKit Theme
The `theme` parameter has been removed from IDKit. Dark mode will be re-enabled in a future release.
### WalletConnect
WalletConnect was previously used to pass messages between IDKit and a user's identity wallet. This has been replaced with the new Wallet Bridge, which is a lightweight, open-source, and secure message passing service.
If you previously set `walletConnectProjectId` in IDKit's parameters, you should remove it.
<Note>More information about the new Wallet Bridge can be found [above](#wallet-bridge).</Note>
### `SignInWithWorldID` Component
The `SignInWithWorldID` and `SignInButton` components have been removed from IDKit. All applications that wish to use Sign In with Worldcoin should do so through our [OIDC Provider](/world-id/reference/sign-in).
## Other Changes
World ID 2.0 includes other changes that are noted here.
### Terminology
The following terminology changes have been made:
- 'Sign In with Worldcoin' has been updated to 'Sign In with World ID'
- 'Anonymous Actions' has been updated to 'Incognito Actions'<UseCaseHeader
color="196, 85, 77"
image="/images/docs/use-cases/icons/customer-incentives.svg"
title="Customer Incentives"
description="Using World ID, and particularly relying on global proof of personhood, can be used to build a truly democratic, one person one vote, system as well as novel voting systems"
/>
<UseCasePagination
prev={(
<UseCasePaginationItem
image="/images/docs/use-cases/icons/nfts.svg"
title="NFTs"
url="/use-cases/nfts"
/>
)}
next={(
<UseCasePaginationItem
image="/images/docs/use-cases/icons/marketplaces.svg"
title="Marketplaces"
url="/use-cases/marketplaces"
/>
)}
/>
<UseCaseHeader
color="157, 80, 255"
image="/images/docs/use-cases/icons/defi-and-fintech.svg"
title="DeFi and Fintech"
description="Using World ID, and particularly relying on global proof of personhood, can be used to build a truly democratic, one person one vote, system as well as novel voting systems"
/>
<UseCasePagination
next={
<UseCasePaginationItem
image="/images/docs/use-cases/icons/voting-platforms.svg"
title="Voting platforms"
url="/use-cases/voting"
/>
}
/>
<UseCaseHeader
color="138, 103, 171"
image="/images/docs/use-cases/icons/events.svg"
title="Events"
description="Using World ID, and particularly relying on global proof of personhood, can be used to build a truly democratic, one person one vote, system as well as novel voting systems"
/>
<UseCasePagination
prev={(
<UseCasePaginationItem
image="/images/docs/use-cases/icons/marketplaces.svg"
title="Marketplaces"
url="/use-cases/marketplaces"
/>
)}
/>
<UseCasesList/>
<UseCaseHeader
color="57, 184, 168"
image="/images/docs/use-cases/icons/marketplaces.svg"
title="Marketplaces"
description="Using World ID, and particularly relying on global proof of personhood, can be used to build a truly democratic, one person one vote, system as well as novel voting systems"
/>
<UseCasePagination
prev={(
<UseCasePaginationItem
image="/images/docs/use-cases/icons/customer-incentives.svg"
title="Customer Incentives"
url="/use-cases/customer-incentives"
/>
)}
next={(
<UseCasePaginationItem
image="/images/docs/use-cases/icons/events.svg"
title="Events"
url="/use-cases/events"
/>
)}
/>
<UseCaseHeader
color="255, 90, 118"
image="/images/docs/use-cases/icons/nfts.svg"
title="NFTs"
description="Using World ID, and particularly relying on global proof of personhood, can be used to build a truly democratic, one person one vote, system as well as novel voting systems"
/>
<UseCasePagination
prev={(
<UseCasePaginationItem
image="/images/docs/use-cases/icons/token-airdrops.svg"
title="Token Airdrops"
url="/use-cases/token-airdrops"
/>
)}
next={(
<UseCasePaginationItem
image="/images/docs/use-cases/icons/customer-incentives.svg"
title="Customer Incentives"
url="/use-cases/customer-incentives"
/>
)}
/>
<UseCaseHeader
color="72, 124, 165"
image="/images/docs/use-cases/icons/social-media.svg"
title="Social Media"
description="Social networks where humans, not bots, engage. With World ID and progressive proof of personhood social networks can be enhanced and several abuse problems solved."
/>
## What?
The bot problems in social media have been around for years now. Bots not only undermine the network and the overall quality, but it can lead to misinformation, manipulation and other adverse effects. Adding an anonymous proof of personhood layer to any social media can significantly diminish this adverse effects (particularly at scale), while enhancing the overall quality of the network.
## Applications & Problems Solved
### Bot Protection {{style: { marginTop: 0, marginBottom: 0}}}
Bot protection for posting, views, likes. Only humans allowed. Prevent fake engagement, manipulation, and abuse. {{style: { marginBottom: 16}}}
### Improved engagement {{style: { marginTop: 0, marginBottom: 0}}}
Content from humans prioritized. This can be further coupled with a continuous scale (e.g. content from a biometric-verified human is ranked higher than content from a device-verified account). {{style: { marginBottom: 16}}}
### Community moderation tools {{style: { marginTop: 0, marginBottom: 0}}}
For example, mutes and bans for breaking community guidelines can no longer be circumvented. {{style: { marginBottom: 16}}}
### Preventing deep fakes & misinformation {{style: { marginTop: 0, marginBottom: 0}}}
Content attribution to prevent deep fakes & misinformation. {{style: { marginBottom: 16}}}
<Cta />
## For Developers
### Ideas
- Integration with social network where a single person can only have 2 or 3 accounts. Each account is authenticated with a World ID. {{style: {margin: 0}}}
- Posts in a feed are ranked based on level of personhood. {{style: {margin: 0}}}
- Likes from verified humans are worth more. {{style: {margin: 0}}}
### Integrations
In addition to building new applications, there is already some great projects in the social space which could leverage World ID. {{style: {marginBottom: 0}}}
- [Farcaster](https://www.farcaster.xyz/) {{style: {margin: 0}}}
- [Twitter](https://twitter.com/) {{style: {margin: 0}}}
- Extend [Discord](https://discord.com) integration {{style: {margin: 0}}}
<ExploreUseCases className="mt-12" />
<UseCasePagination
prev={
<UseCasePaginationItem
image="/images/docs/use-cases/icons/voting-platforms.svg"
title="Voting"
url="/use-cases/voting"
color="#4940E0"
/>
}
next={
<UseCasePaginationItem
image="/images/docs/use-cases/icons/wealth-distribution.svg"
title="Wealth Distribution"
url="/use-cases/defi-and-fintech"
color="#9D50FF"
/>
}
/>
<UseCaseHeader
color="255, 177, 27"
image="/images/docs/use-cases/icons/token-airdrops.svg"
title="Token Airdrops"
description="Using World ID, and particularly relying on global proof of personhood, can be used to build a truly democratic, one person one vote, system as well as novel voting systems"
/>
<UseCasePagination
prev={(
<UseCasePaginationItem
image="/images/docs/use-cases/icons/wealth-distribution.svg"
title="Wealth Distribution"
url="/use-cases/wealth-distribution"
/>
)}
next={(
<UseCasePaginationItem
image="/images/docs/use-cases/icons/nfts.svg"
title="NFTs"
url="/use-cases/nfts"
/>
)}
/>
<UseCaseHeader
color="73, 64, 224"
image="/images/docs/use-cases/icons/voting-platforms.svg"
title="Voting platforms"
description="Using World ID, and particularly relying on global proof of personhood, can be used to build a truly democratic, one person one vote, system as well as novel voting systems"
/>
## What?
Using World ID, and particularly relying on global proof of personhood, can be used to build a truly democratic, one person one vote, system as well as novel voting systems centered around unique humans. What’s more, with World ID, these systems can be made in a fully privacy-preserving way, supporting fully anonymous voting, and making sure votes cannot be tracked across different proposals.
## Applications & Problems Solved
### Novel DAOs
(Decentralized Autonomous Organizations) governance. Have governance proposals where individual’s voices are more important than the number of tokens held.
### Anonymous online polls
This can apply for anything from city council elections, governors to referendums, plebiscites, and much more.
### Government
Public elections without duplicate votes, where each voter can only vote once. Further, this can be done in a public way where anyone can verify each election vote. This can apply for anything from city council elections, governors to referendums, plebiscites, and much more.
<Cta />
## For Developers
### Building an MVP
The most basic version of a voting platform could look something as follows.
- Users can create proposals to vote on. They provide a description on the proposal and a time limit. Proposals support yes/no/abstain.
- Voters can then go into a proposal and cast a vote only once. The vote is verified with a World ID Incognito Action (to ensure proof of personhood, uniqueness, and prevent cross-proposals tracking).
- Votes are recorded in a backend, smart contract or decentralized database (like Ceramic).
- Anyone can view the vote results.
You can find some conceptual wireframes below on how this could look like.

 {{style: {marginBottom: 0}}}
The above can also be further extended to support multiple-option votes, combine with eligibility criteria (e.g. only users with a Twitter account can vote), support multiple World ID credentials for votes where the credential type determines the weight (e.g. Orb credential = 1 vote, device credential = 0.1 vote).
## More feature ideas
- **Quadratic voting**. Allow only one person, one vote, but votes are counted quadratically, […]
- **Conviction voting**. Consider for example public goods funding, where funds are allocated based on votes received continuously over time. [This article](https://medium.com/giveth/conviction-voting-a-novel-continuous-decision-making-alternative-to-governance-aa746cfb9475) explains more on conviction voting.
- **Anonymous proof-of-vote NFT**. You get an NFT that you can use to prove you voted in a certain proposal. Could be done with [Sismo](https://docs.sismo.io/sismo-docs/technical-documentation/zk-badge-protocol) to preserve privacy.
<ExploreUseCases className="mt-12" />
<UseCasePagination
next={
<UseCasePaginationItem
image="/images/docs/use-cases/icons/social-media.svg"
title="Social Media"
url="/use-cases/social-media"
color="#487CA5"
/>
}
/>
<UseCaseHeader
color="0, 195, 19"
image="/images/docs/use-cases/icons/wealth-distribution.svg"
title={(<>Non-profit and refugee aid distribution</>)}
titleClassName="lg:w-[600px]"
description="Using World ID, and particularly relying on global proof of personhood, can be used to build a truly democratic, one person one vote, system as well as novel voting systems"
/>
## What?
Using World ID’s proof of personhood, a system could be built to ensure aid from NGOs, non-profits, government programs, etc. is distributed equitably to recipients. An example of this is in refugee centers where forms of identification may even be scarcer. Proof of personhood can be used to ensure each individual is receiving each benefit once. Furthermore, it can further be done privately, which can even be a life threatening matter in some cases.
Such system could be built on a decentralized blockchain, further increasing auditability and accountability, as anyone can verify the proper benefit distribution.
## Applications & Problems Solved
- Benefit distribution in situations where identification methods are scarce and/or privacy is critical.
- Fraud and abuse prevention of benefits (e.g. double claiming).
- Improved beneficiary system auditability.
<Cta />
<ExploreUseCases className="mt-12" />
<UseCasePagination
prev={(
<UseCasePaginationItem
image="/images/docs/use-cases/icons/social-media.svg"
title="Social Media"
url="/use-cases/social-media"
/>
)}
/>
# World ID {{ className: 'text-5xl' }}
The protocol to bring privacy-preserving global proof of personhood to the internet. {{ className: 'text-2xl' }}
<Note>
You can find the Protocol Whitepaper at [whitepaper.world.org](https://whitepaper.world.org).
</Note>
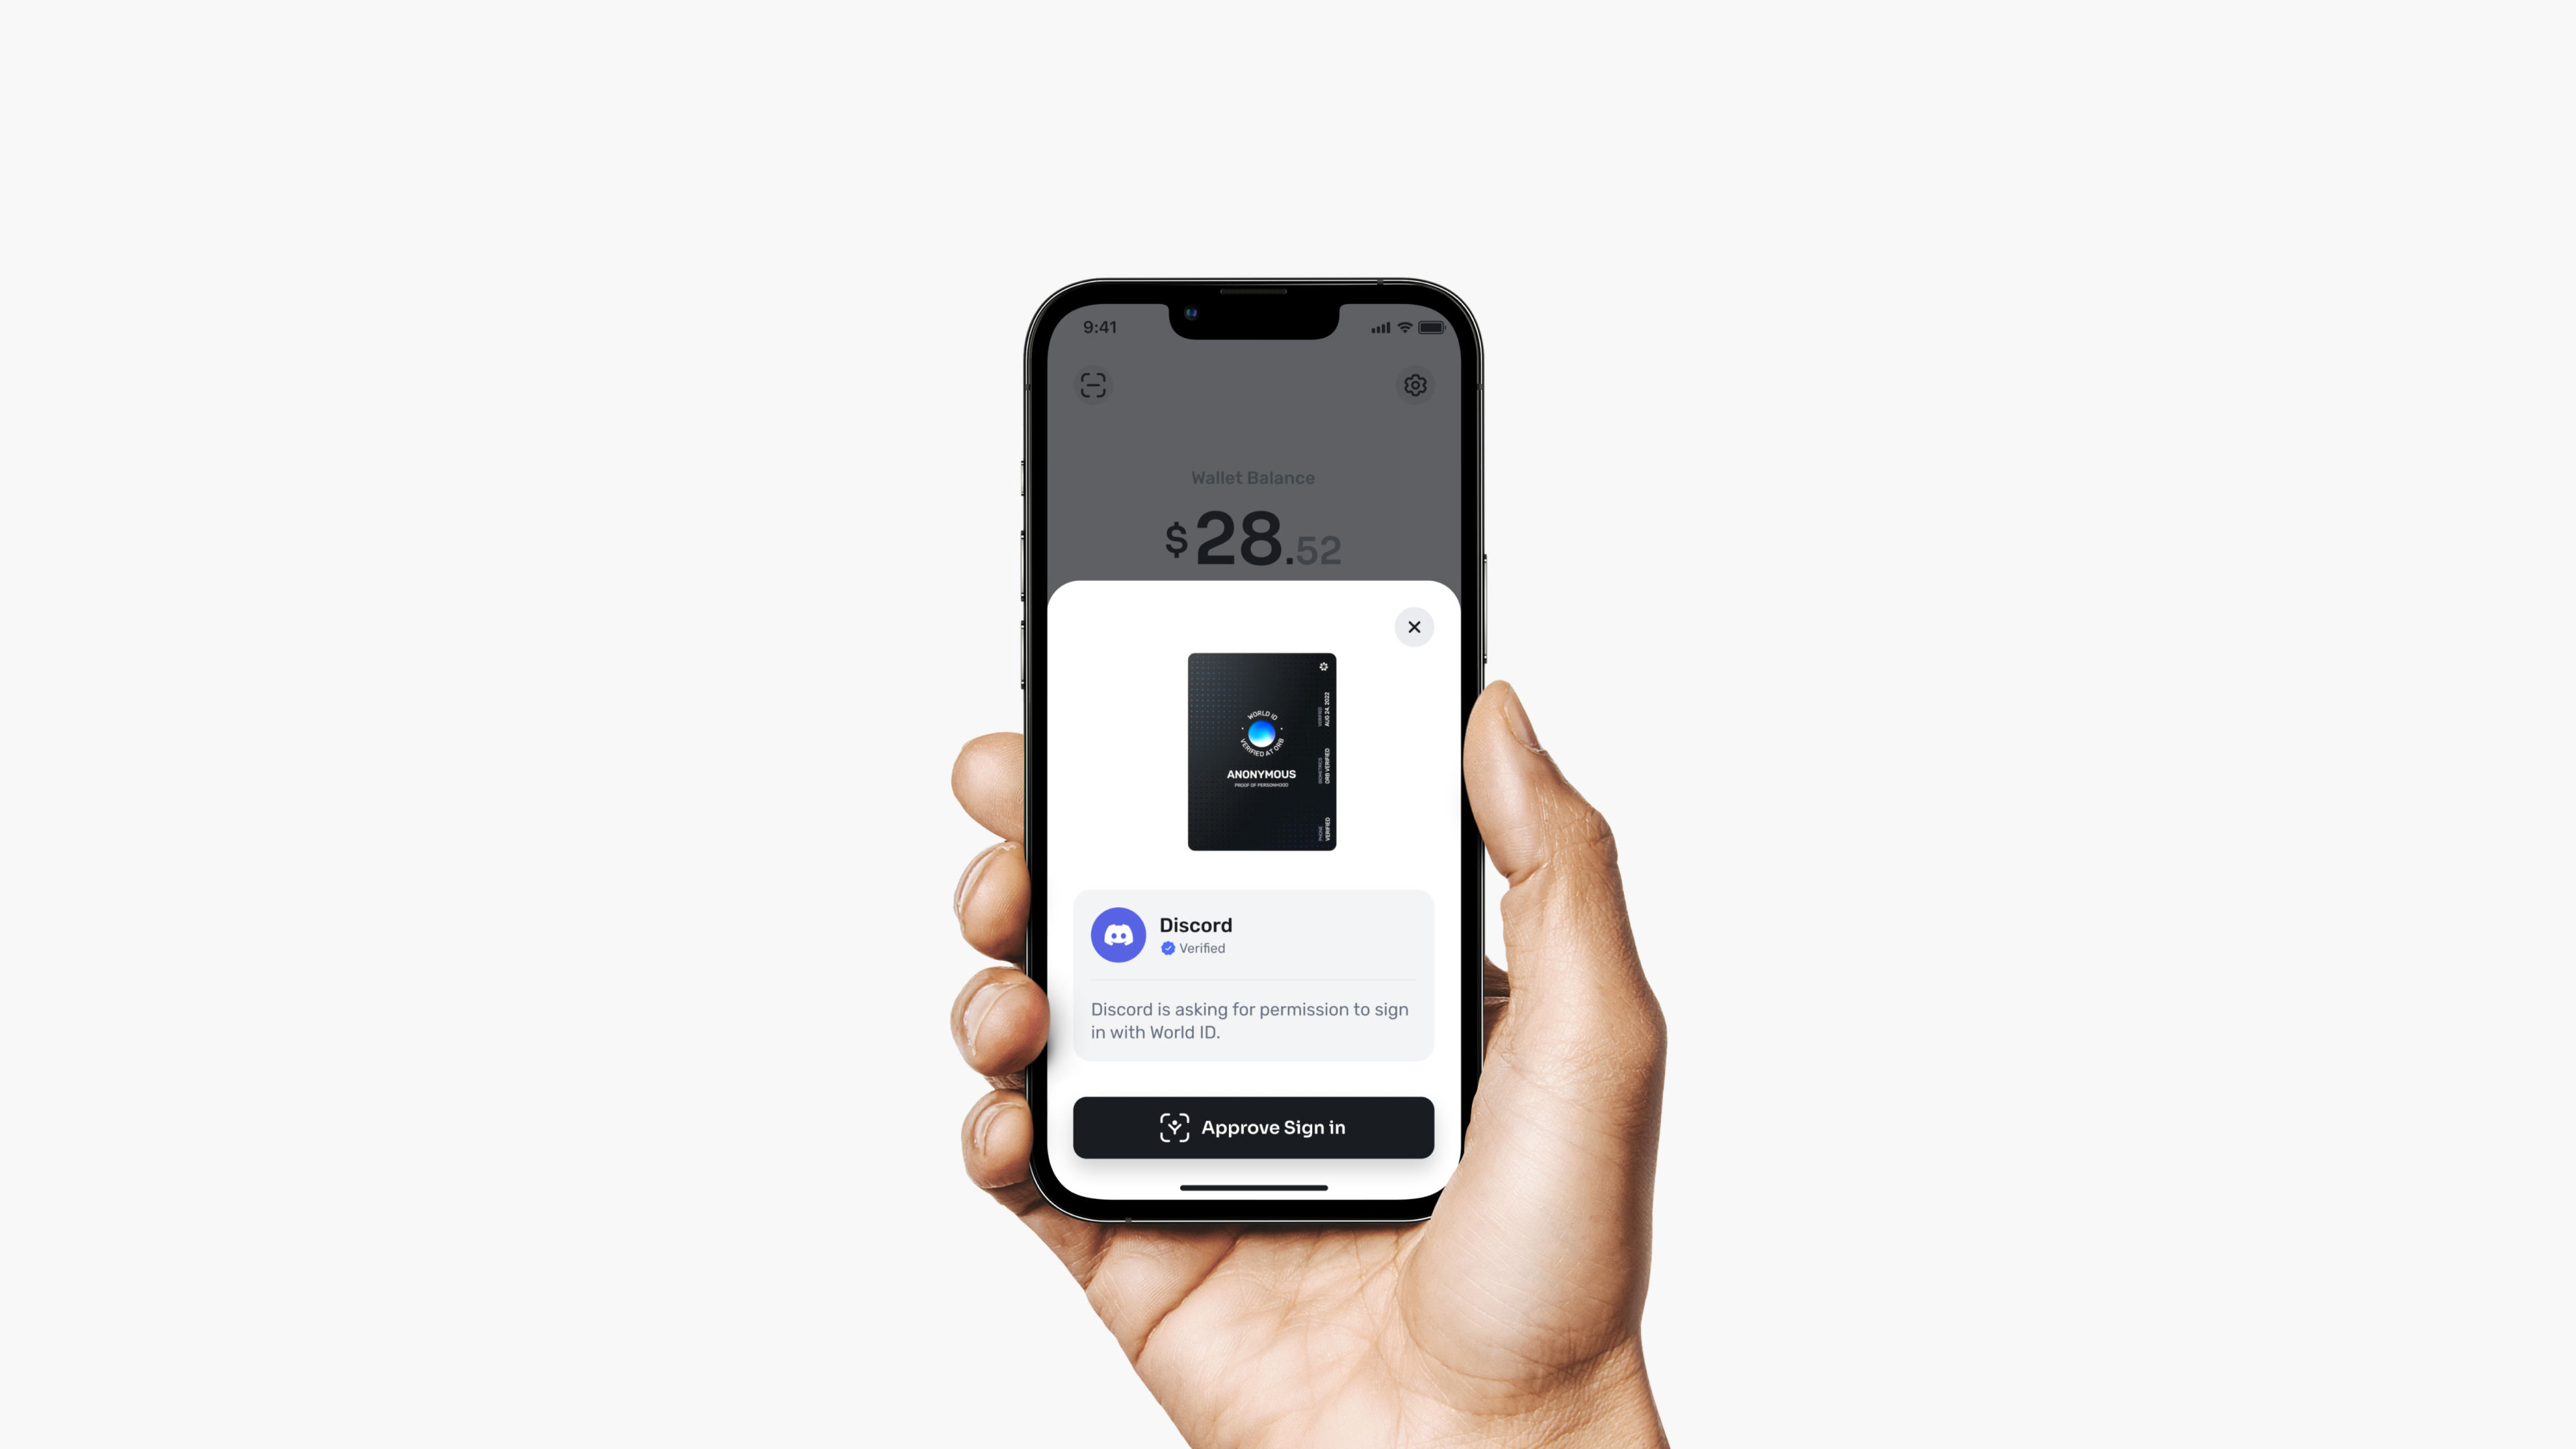
World ID is a digital identity solution enabling users to prove their uniqueness and humanity anonymously via [zero-knowledge proofs](/world-id/further-reading/zero-knowledge-proofs) and advanced privacy-preserving cryptography.
World ID can be easily integrated into both cloud and on chain apps. Users, with a valid World ID, can anonymously verify in seconds that they are a unique human through a World ID compatible wallet, like [World App](https://world.org/download).
### Why?
Existing identity solutions are broken. They are either too centralized, too invasive, or too insecure. World ID is a privacy-preserving, decentralized, and robust identity solution that is easy to use and integrate.
Users never need to share personal information to use World ID -- no government IDs, no emails, no social profiles, no names. They can prove they are a unique human without revealing their identity to anyone, **not even Worldcoin's core contributors.**